चर्चे चौके के Charche Chauke Ke

Hey! Join in the Kitchen Gossip!!

Archive for July, 2009

Beirut Tahini Swirls…….Sukkar Bi Tahin

Posted by vivnidhi on July 29, 2009

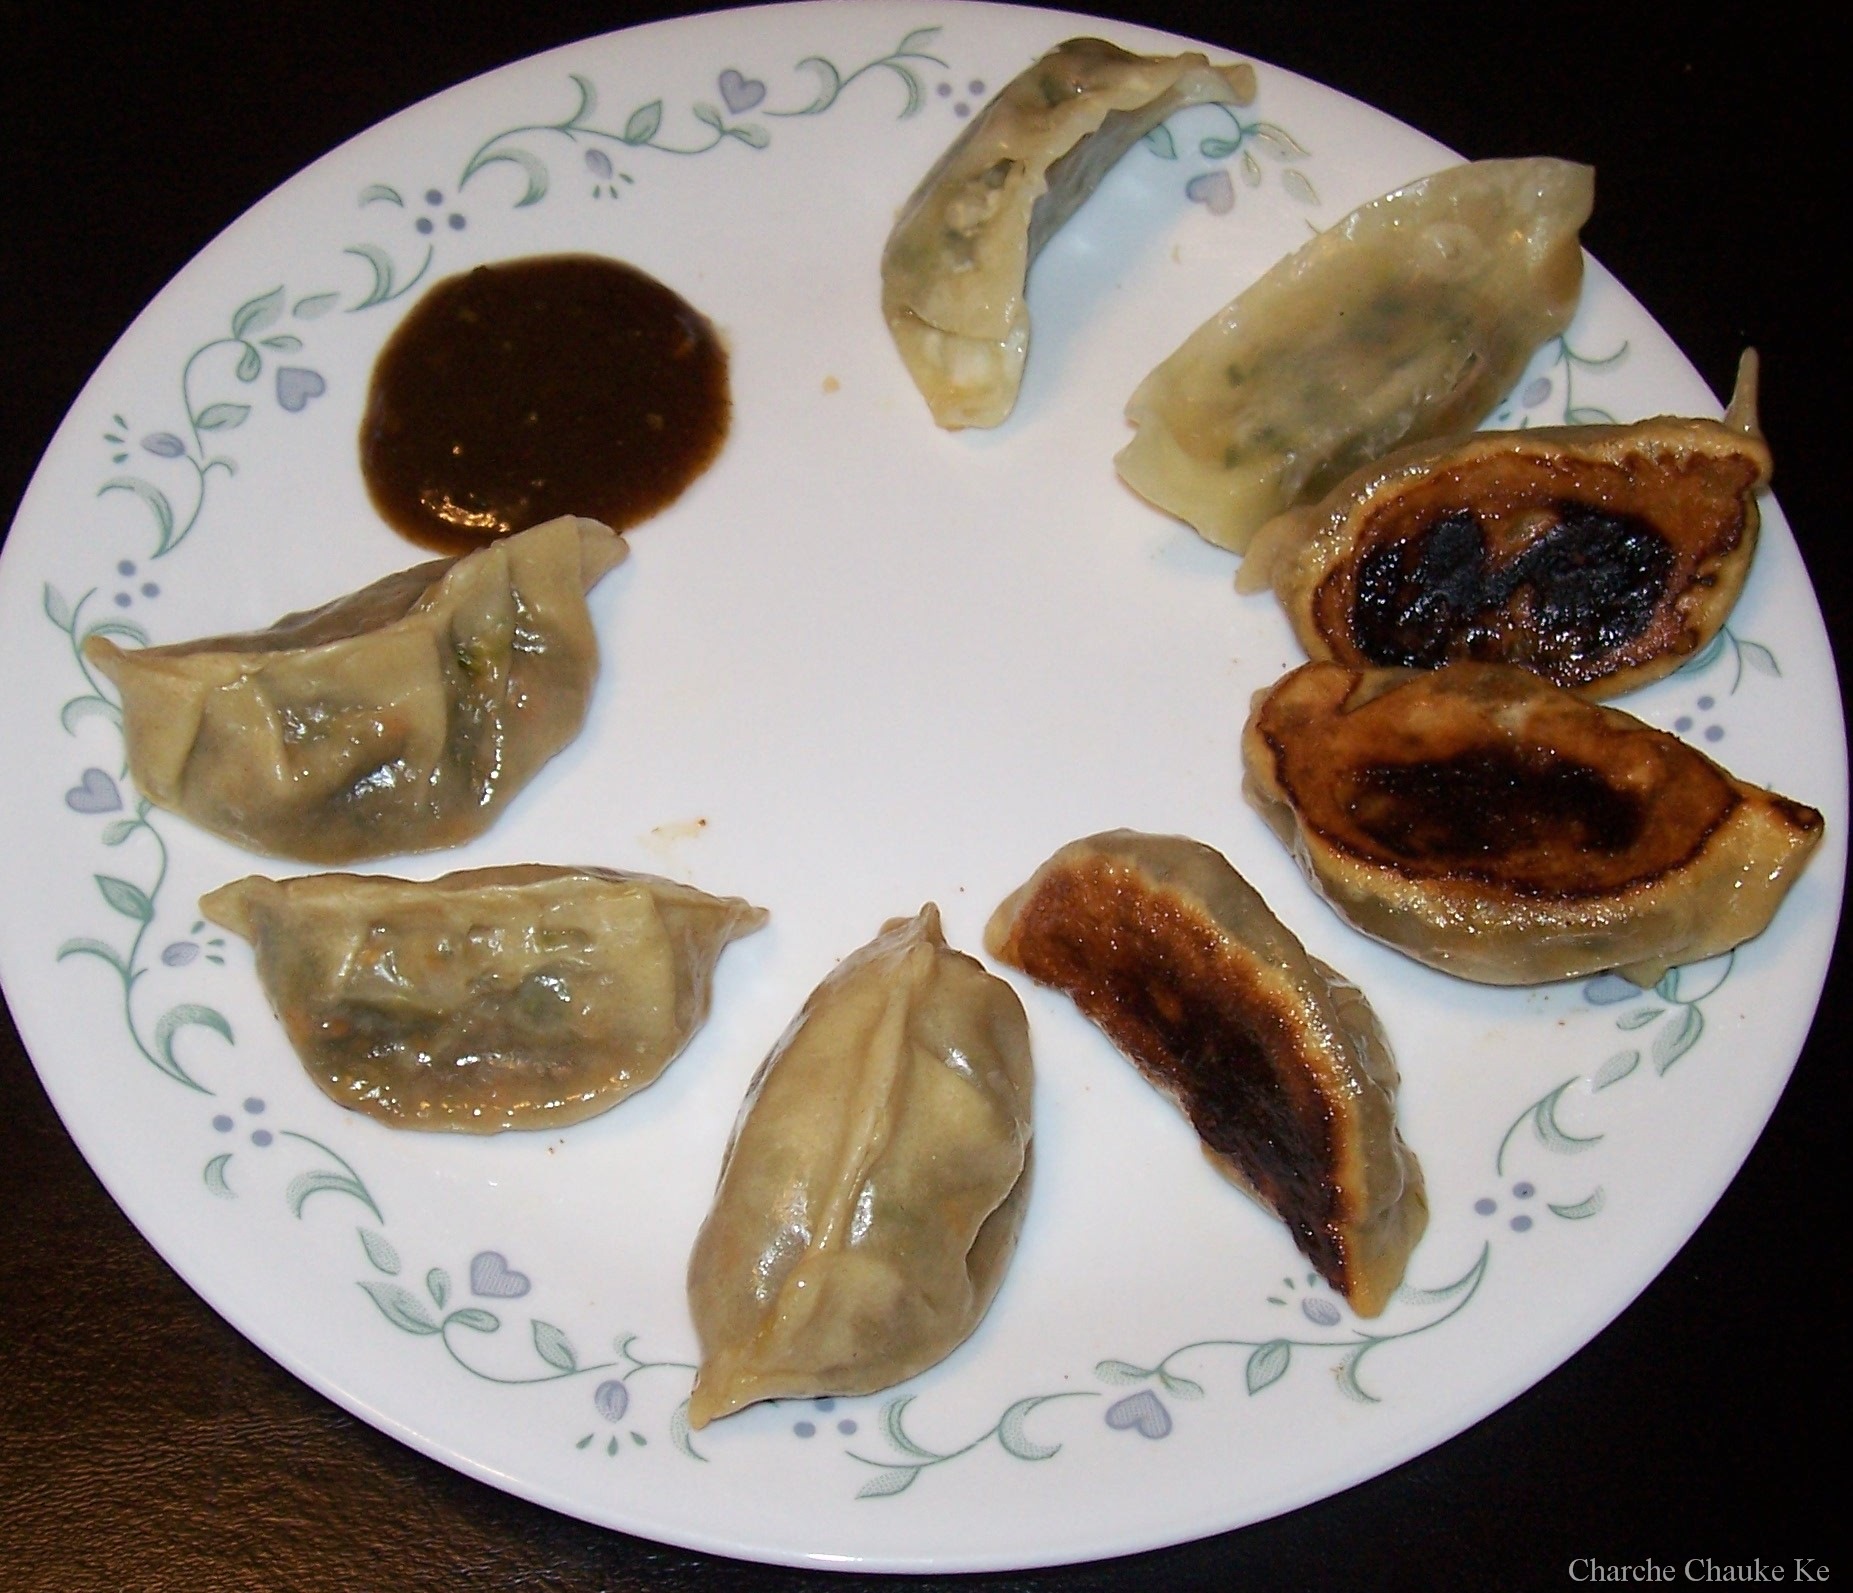
Bread Baking Babes make Sukkar bi Tahin.

1100_3665

Sukkar bi Tahin

100_3678  100_3673

Here’s my savory …garbanzo filled swirls and sweet Tahini paranthas

As soon it was approaching the middle of the month, I was frantically searching for bread baking babes….what are they baking this month, I hope I don’t miss it……….I did not 😉 . I made 2 batches at least and mix and match here and there ;-). This month’s host babe was Natashya of Living in the Kitchen with Puppies.

The recipe she chose is for Beirut Tahini Swirls, Sukkar bi Tahin. It is a cross between a flatbread and a yeasted pastry, only mildly sweet. It is street food in Beirut, and very addictive!
“Beirut has a lot of good food at every level, from fancy restaurants to local eateries, from home cooking to quality market shopping. And for a curbside snacker like me, it’s paradise. There are sesame-covered flatbreads, grilled meats, and sweet and not so sweet cookies; there’s always something nearby to eat.” “These tahini swirls, called sukkar bi tahin in Arabic, are flattened flaky rounds flavored with tahini and sugar, not too sweet, not too strong tasting. Serve them warm or at room temperature-they’re just right either way.”
Alford and Duguid, Home Baking .

The recipe:

Sukkar bi Tahin – Beirut Tahini Swirls

Home Baking, The Artful Mix of Flour and Tradition Around the World

Jeffrey Alford and Naomi Duguid

Makes 6 golden brown, flaky textured coiled rounds, about 6 inches wide, filled with sesame paste and sugar.


Ingredients


Dough

  • 1/2 tsp. active dry yeast
  • 1 cup lukewarm water
  • 1 cup all purpose flour
  • 1 cup whole wheat flour
  • about 1/2 cup all purpose flour for dusting
  • 2 tsp sugar
  • 1 tbsp olive oil

Filling

  • 3/4 cup tahini
  • 3/4 cup sugar


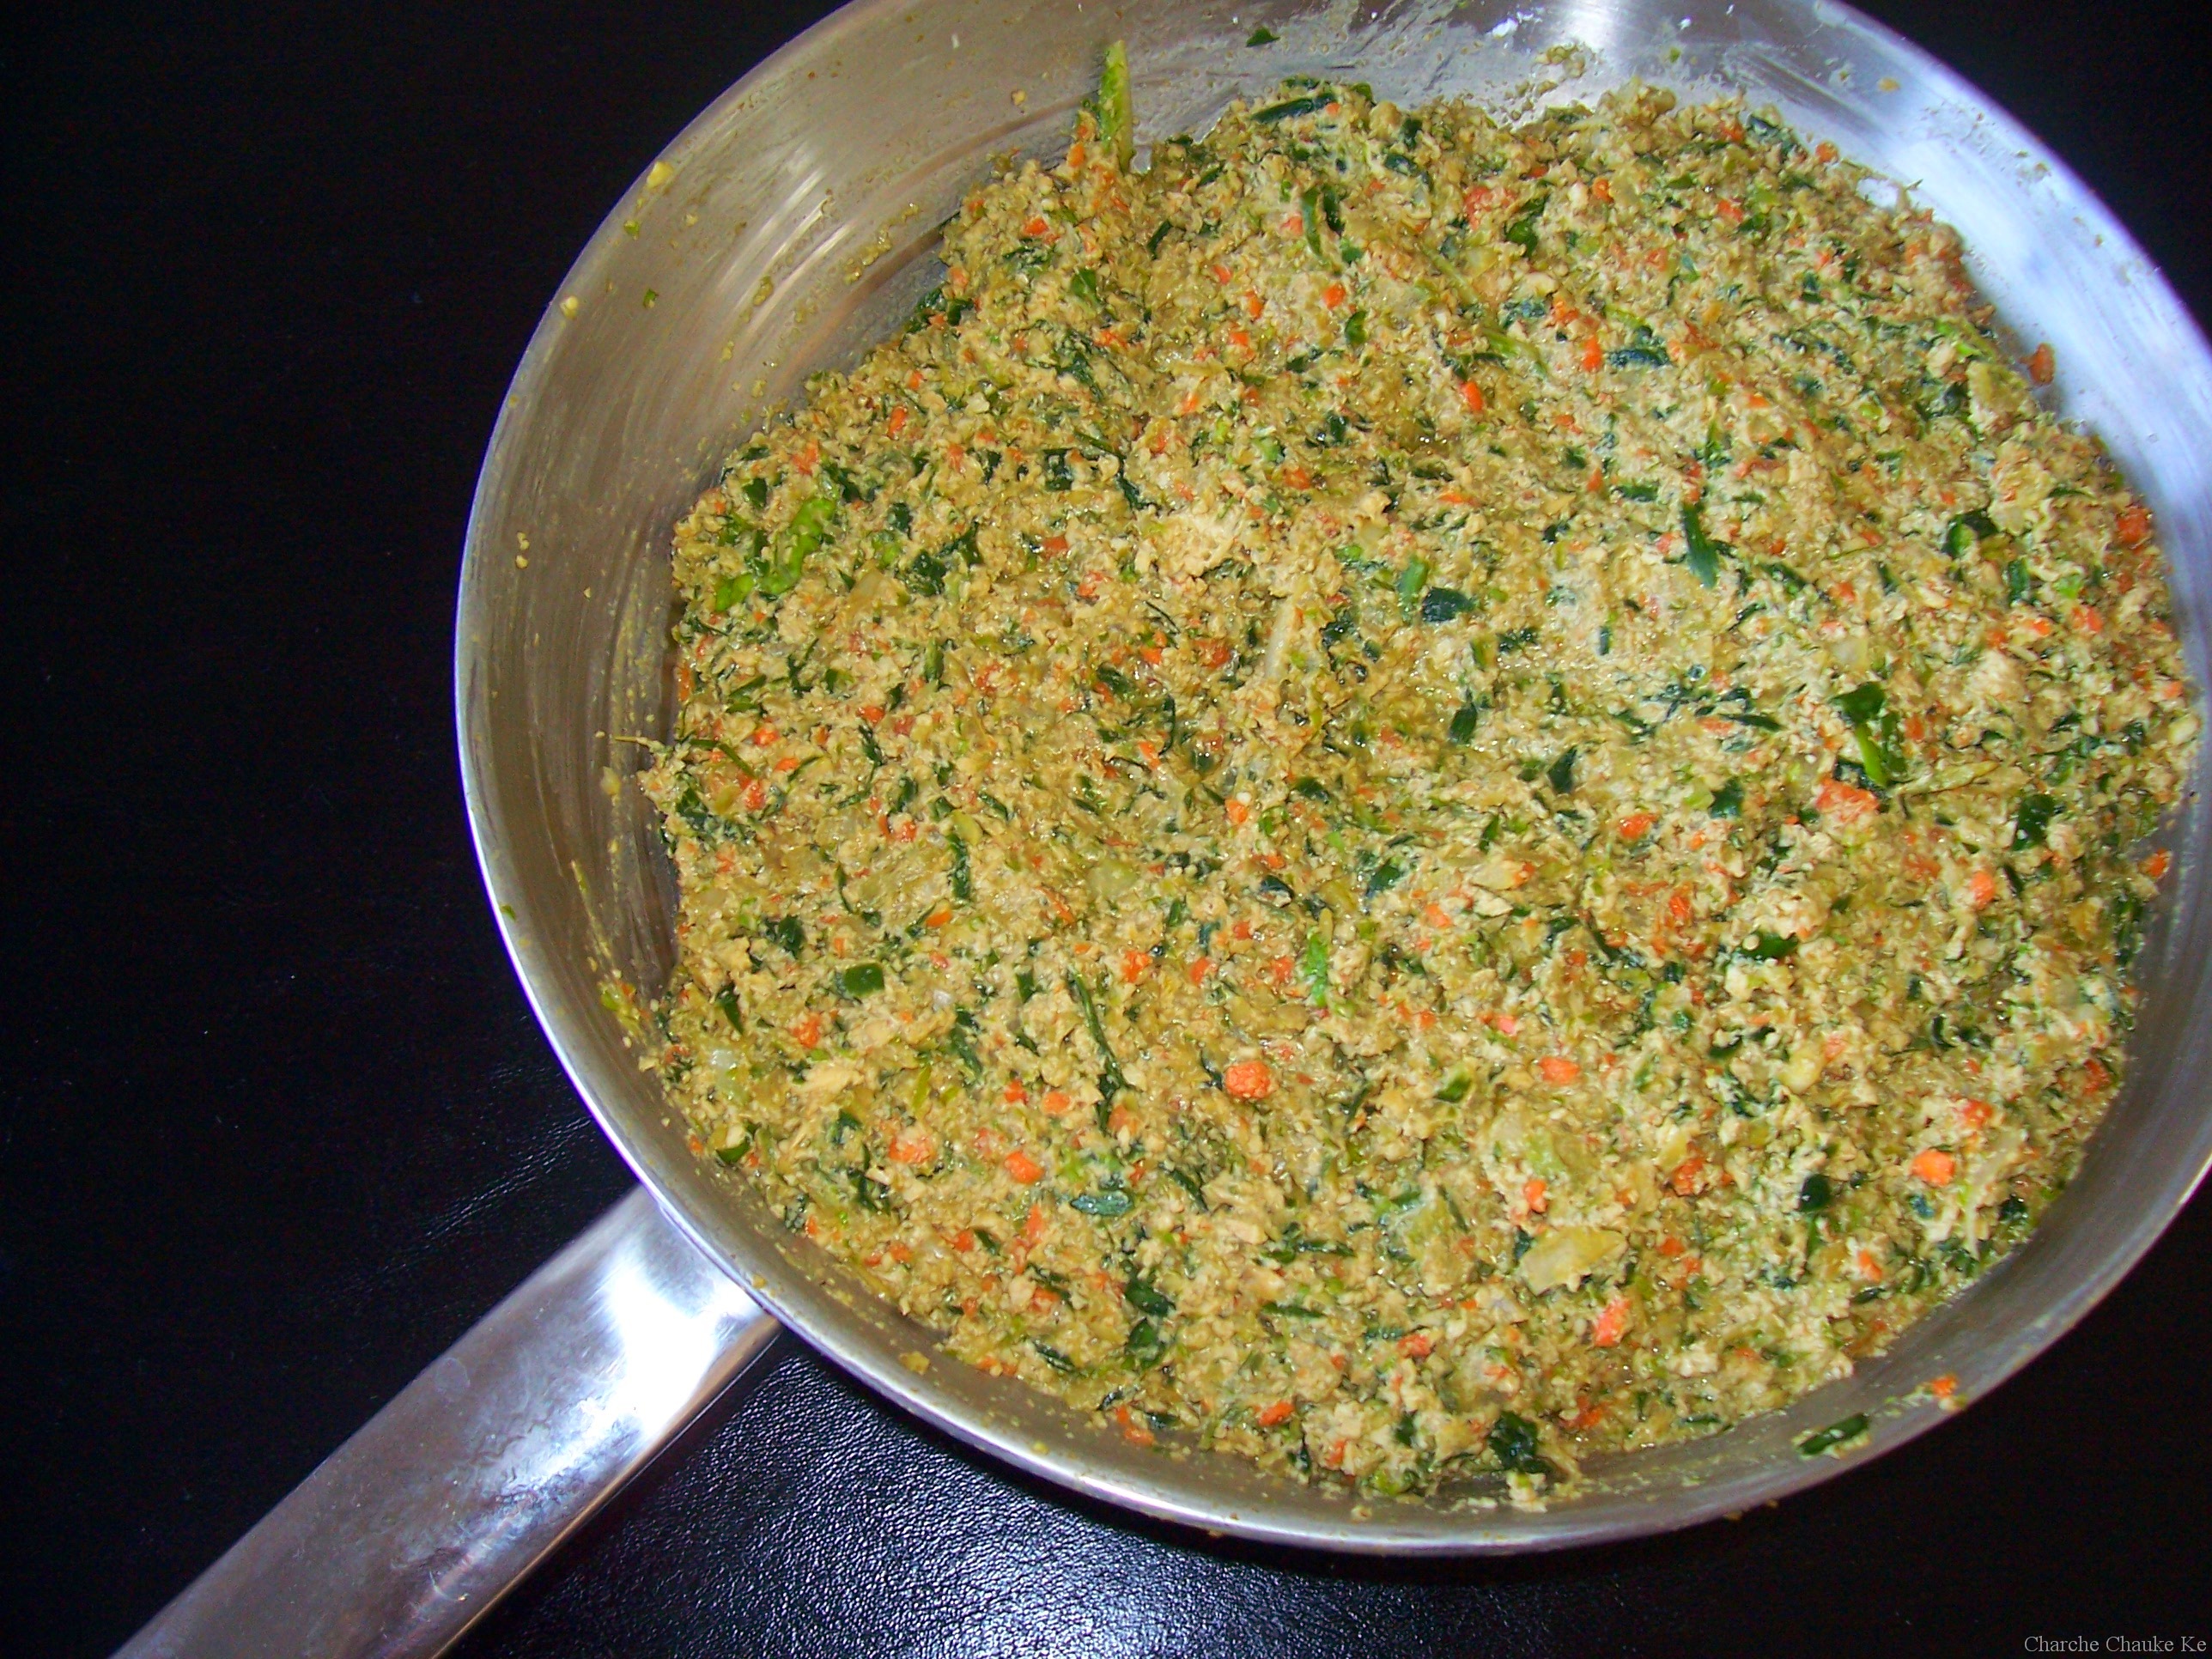
Garbanzo Bean Filling

  • 1/2 cup Garbanzo beans soaked for at least 4 hours and boiled…mashed lightly
  • 4 sun dried tomatoes soaked in water and drained
  • 1/2 cup Tahini
  • 2 cloves garlic minced
  • 1/4 Cilantro chopped
  • 1 Tbsp. lemon juice
  • salt to taste


Directions

In a medium bowl, dissolve the yeast in the lukewarm water.

Stir in one cup of the flour, then add the sugar and oil and stir in.

Incorporate a second cup of flour, then turn the dough out onto a well floured surface and knead for 5 minutes, or until smooth.

Cover the dough with plastic wrap and let rise for 2 to 3 hours, until doubled in volume.

Meanwhile, place a baking stone or unglazed quarry tiles, if you have them, (or a baking sheet) on the middle oven rack and preheat the oven to 375 F.

Mix together the tahini and sugar and stir until smooth. Set aside.
Cut the dough into 6 equal pieces.

Work with 3 at a time, keeping the others covered.

Flatten each out on a lightly floured surface, then roll each out to a rectangle about 5 inches by 10 inches.

Spread the top surface with 2 1/2 tablespoons of the filling mixture, spreading it almost to the edges.

Roll up the rectangle from a long side into a cylinder, which will stretch as you roll to about 20 inches long.

Anchor one end and coil the bread around itself, then tuck the end in.

Flatten with the palm of your hand, then set aside, covered, while you fill and shape the other 2 rectangles.

Return to the first coil and roll out gently with a rolling pin.

Roll the other 2 out a little and then return to the first one and roll it out a little more thinly, and so on, until you have rolled each to a round about 6 to 7 inches in diameter.

A little filling may leak out—don’t worry, just leave it.

I brushed the top with a wee bit of oil and sprinkled some sesame seeds before baking. (optional)

Place the breads on the hot baking stone or tiles (or baking sheet) and bake for 15 to 20 minutes, until golden brown and flaky.

Transfer to a rack to cool.

Shape and bake the remaining 3 pieces of dough.

Serve warm or at room temperature.


*Tahini is a paste of ground sesame seeds. It can be found in health food stores, Middle Eastern markets and some grocery stores. It is a common ingredient in hummus, and is gaining in popularity in most parts of the world. It must be refrigerated after opening.

Natashya says: “The swirls should end up like puffy pita. If they are very thin they will be crispy, if they are not rolled enough, they will puff up like cinnamon rolls. We are striving for a flatbread pastry that puffs a little. Try them a couple of times, experiment. They are fun to bake.”  You bet they are ……I had a ton of fun……as usual 😉 .

I used half whole wheat flour and half all purpose flour for sweet tahini filling ones and all whole wheat flour for the savory garbanzo beans ones. Original recipe uses all purpose flour only.

 100_3642 100_3650 

Left: 1/2 whole wheat with 1/2 all purpose flour dough Right: Whole wheat flour dough

100_3651 

We have risen..the 1/2-1/2 dough was a little behind, but it did catch on

 100_3652

Dough cut in 6 pieces ..sweet tahini filling behind

100_3653

1 piece rolled

100_3654

Filled up

100_3659 

Rolled up again

100_3663

Ready to be baked

100_3665

Sukkar bi Tahin

100_3666

Had some leftover sweet tahini filling…..what did I do with that

100_3667

Made sweet paranthas of course…..dough details here and here

100_3668

Filled up and closed

100_3669

rolled …

100_3671

On the griddle…ready to be turned and oiled

100_3670

The other side…..

100_3673

Quick , delicious sweet treat…….kids will thank you…..this tastes best warm, will harden as it cools cause the flour cover is thin….does not taste bad even then 😉

You bet I enjoy taking pictures and posting huge ones on the blog 😉 . I dare say I loved making these. Thank you Natashya and Bread Baking Babes.

Posted in -All Purpose flour, -Cilantro, -Garlic, -lemon, -Olive Oil, -Sesame seeds, -Sun dried tomatoes, -Tahini, -Whole wheat flour, Sugar, Yeast | Tagged: , , , | 2 Comments »

Daring Bakers July bring Cookies…….

Posted by vivnidhi on July 28, 2009

Vanilla at 180 x 180 (largest)brings…..

100_3688

The boy can’t stop himself 😉 Plum jam cookies and lots more…….

Jaana tha Japan , pahunch gaye Cheen…………Had to go to Japan , and I reached China…. You don’t get it……yeah…..oh well! the daring baker challenge this month was mallow cookies and milanos….long live Pepperidge Farm! I ended up making those and a fusion…..which we all absolutely loved.

These cookies pictured above are truly the best cookies I have ever made. If you liked and ate jam biscuits (called so in India) in your childhood, these cookies will bring those memories back. I surprised myself……..these tasted so good.

The July Daring Bakers’ challenge was hosted by Nicole at Sweet Tooth. She chose Chocolate Covered Marshmallow Cookies and Milan Cookies from pastry chef Gale Gand of the Food Network.

The mallow cookies were great, I would have never dreamt of making homemade marshmallows but homemade taste so………..good and you can flavor them just as you would want. Thanks a lot Nicole, for this challenge.The mallows biscuit was really delicious. The no. of cookies mentioned in the original recipe is all messed up….which actually worked in my favor 🙂 .  I loved it so much that I made some plum jam and filled them up and loved the result.

Milanos were quite a disappointment and I would certainly not want to make those again. The milanos dough was like tuiles batter yet not even that….I give up.

The husband was quite excited about Milano cookies and so I made them first, in fact packed a few for a friend, but it was a lot of effort in trying to make them the same size…..and the end result was not worth it… I just made about 2 dozen of them.After that I split the batter in half , spread on the parchment on the entire tray and baked for 5 minutes in the oven. Cut them with a pizza cutter in squares and back in oven for 5-7 minutes more. Same with the rest of the batter. Filled them up up with the chocolate ganache and anything with chocolate gets eaten here. I do not recommend this and will not be making them again 🙂 . I should mention the chocolate ganache tasted good and the husband even helped me zest the whole orange. What do you think…….I will need help again some other time too..I must not forget the dear husband 🙂

100_3679

Don’t they look cute…….

Milanos for friends…….hope they ate it up soon…..before they turned chewy…….oh no….boo hoo hoo

100_3682 100_3686

Rest of the Milanos……..:-)


Here come the mallows…..pretty good cookies , if one is fond of marshmallows. We are not too fond of them, yet no cookies left of the 28 I made.

The recipe:

Mallows(Chocolate Covered Marshmallow Cookies)
Recipe courtesy Gale Gand, from Food Network website

Prep Time: 10 min
Inactive Prep Time: 5 min
Cook Time: 10 min
Serves: about 2 dozen cookies

• 3 cups (375grams/13.23oz) all purpose flour
• 1/2 cup (112.5grams/3.97oz) white sugar
• 1/2 teaspoon salt
• 3/4 teaspoon baking powder
• 3/8 teaspoon baking soda
• 1/2 teaspoon ground cinnamon
• 12 tablespoons (170grams/ 6 oz) unsalted butter
• 3 eggs, whisked together
• Homemade marshmallows, recipe follows
• Chocolate glaze, recipe follows

1. In a mixer with the paddle attachment, blend the dry ingredients.
2. On low speed, add the butter and mix until sandy.
3. Add the eggs and mix until combine.
4. Form the dough into a disk, wrap with clingfilm or parchment and refrigerate at least 1 hour and up to 3 days.
5. When ready to bake, grease a cookie sheet or line it with parchment paper or a silicon mat.
6. Preheat the oven to 375 degrees F.
7. Roll out the dough to 1/8-inch thickness, on a lightly floured surface. Use a 1 to 1 1/2 inches cookie cutter to cut out small rounds of dough.
8. Transfer to the prepared pan and bake for 10 minutes or until light golden brown. Let cool to room temperature.
9. Pipe a “kiss” of marshmallow onto each cookie. Let set at room temperature for 2 hours.
10. Line a cookie sheet with parchment or silicon mat.
11. One at a time, gently drop the marshmallow-topped cookies into the hot chocolate glaze.
12. Lift out with a fork and let excess chocolate drip back into the bowl.
13. Place on the prepared pan and let set at room temperature until the coating is firm, about 1 to 2 hours.

Note: if you don’t want to make your own marshmallows, you can cut a large marshmallow in half and place on the cookie base. Heat in a preheated 350-degree oven to slump the marshmallow slightly, it will expand and brown a little. Let cool, then proceed with the chocolate dipping.

Homemade marshmallows:
• 1/4 cup water
• 1/4 cup light corn syrup
• 3/4 cup (168.76 grams/5.95oz) sugar
• 1 tablespoon powdered gelatin
• 2 tablespoons cold water
• 2 egg whites , room temperature
• 1/4 teaspoon pure vanilla extract

1. In a saucepan, combine the water, corn syrup, and sugar, bring to a boil until “soft-ball” stage, or 235 degrees on a candy thermometer.
2. Sprinkle the gelatin over the cold water and let dissolve.
3. Remove the syrup from the heat, add the gelatin, and mix.
4. Whip the whites until soft peaks form and pour the syrup into the whites.
5. Add the vanilla and continue whipping until stiff.
6. Transfer to a pastry bag.

Chocolate glaze:
• 12 ounces semisweet chocolate
• 2 ounces cocoa butter or vegetable oil

1. Melt the 2 ingredients together in the top of a double boiler or a bowl set over barely simmering water.

100_3674

Marshmallow cookies before the dip in chocolate

I got 28 cookies by using 1/4 of the cookie dough. Made 1/2 the amount of marshmallows and chocolate glaze. Since my glaze eventually bloomed, I covered them up in Milanos ganache…….the Milano cookie filling :-)………yeah that’s me!! Tasted good, nevertheless 😉

Chocolate Ganache:

• 1/2 cup heavy cream
• 8 ounces semisweet chocolate, chopped
• 1 orange, zested

I also prepared some plum jam….just because I had some plums I had to use. Filled them up in the mallows crust, sprinkled with sugar and loved , loved it! Please do try if you are in the mood to make cookies, true labor of love , forming so many small bites but totally worth it ……..as you will see in pictures below 🙂

Plum Jam Recipe:

  • Plums 2 1/2 cups …..pitted, and chopped fine
  • Sugar 1 1/2 cups
  • Lemon juice  1 Tbsp

That’s it….I added all of this in a heavy bottomed saucepan with 2 Tbsp. water. Cooked it down till I could do the plate test. For the plate test, place a plate in the freezer or chill it well. Pour a big drop of jam on this cold plate and give it 30 seconds. If the jam has reached the right consistency, it will very slowly spread a little. More about jam making here. I made a small quantity, hence it went directly to the refrigerator.

100_3693

Pick one up……these are ready for a sprinkling of sugar

100_3709

Here are the mallows…..this is how they looked

100_3700

Perfect with coffee….for some great mornings………

I just took a picture as the husband had set the table

100_3711

Somebody else had a great time too……….

It’s been one whole year being a part of the Daring Bakers for me. I have come a long way…..I remember my first challenge Filbert Gateau….I remember my delight. Now I dare to experiment on my own…..Thank you Lis and Ivonne and the whole Daring Baker community which is the best resource of all.

Expenditure:

Unsalted Butter: ………………….$2.17……….from Walmart, some left

Corn syrup(16 oz.)…………………$1.67……….from Kroger, lots left

Heavy cream(1/2 pint)…………….$2.89…………from Kroger, lots left

Powdered sugar……………………$1.99…………from Kroger, lots left

Bakers Chocolate semisweet(8 oz):$ 3.29………….from Kroger, none left

Orange 1 :-)…………………………$0.64………….from Kroger, ate it up….

————————————————————————————————–

Total………………………………..$12.65

Posted in -All Purpose flour, -Butter, -Canola Oil, -Cinnamon, -Corn Syrup, -Cream, -Orange, -Plums, -Semisweet Chocolate, -Vanilla, Baking Powder, Baking Soda, Daring Bakers, Eggs, Gelatin, Sugar | Tagged: , , , , , | 14 Comments »

Daring Cooks # 2 Potstickers / Gyoza

Posted by vivnidhi on July 21, 2009

July1_21

Yaay! I can make neat Potstickers  too!

Those who have read my earlier post know that I am late in posting about practically all the posts for the past two months. OK, enough of apologizing. Lost time can’t be brought back again but I can try to learn (Oh yeah………. 😉 )

The reason these potstickers are late is that I experimented a lot with these. Since I first ate the vegetarian gyozas that Trader Joe’s sells, I have been hooked. I remember telling the husband very comfortably……I can make these as he was trying to pick up the last TJ’s one off my plate too. I generously handed the last gyoza to him and said to myself, “shouldn’t be a big deal really”. Before I could fully make a plan about these gyozas, Jen from use real butter announced that the Daring cook challenge as Potstickers. I was very excited (shows when I don’t post on time, right 😉  ).

Anyway, the bigger challenge these days is posting , not making.

Let me start with saying, I have made it four times now (very unusual for me, I hate repeating) and don’t think my stint with gyozas ends here. I only repeat recipes which I am trying to master…….say Idlis………and now potstickers :-).  How do people write recipe books, how many times do they test?

Round 1: Stuffed whatever I had on hand, forgot soy sauce and cornstarch. You bet………..it tasted great…….I was the only one who ate 🙂 .

Round 2:  A planned visit to the Asian store, bought garlic chives, tofu etc…….pantry equipped. Even though I baked the tofu and drained it well, I found the end stuffing mixture to be quite wet. This resulted in not well shaped gyozas. Anyway, tasted great, got a pat on the back 🙂

Round 3: Cooked the stuffing up, mixed it with some finely chopped veggie burgers (this was for something else) but ended up in potstickers. Husband said, I liked round 2 better.

Round 4: This time, I was dead sure of what I wanted to do………everything in place……….yet the husband said…….round 2 was better…………and boo hoo hoo ……..he is right.

Round 5: Got filled with coconut fudge and some also had chocolate ganache filling , and topped with powdered sugar…Yes, I was cleaning the freezer which is filled with small tit-bits.

Here’s the recipe with my vegetarian filling and the best proportions *(these matter….all I had wrong in round 4 was a little extra daikon radish ):

Jen says “It’s a basic concept: a filling inside a dough wrapper, sealed, and cooked. This delicious theme runs through many cultures and is among the more popular bites at Chinese restaurants – especially dim sum. “

The process goes a little like this:

You can (and should) reference instructional photos and discussion on Jen’s blog post here.

Wrappers: Well yes, you could purchase pre-made dumpling wrappers at the store (NO WONTON WRAPPERS – they have egg), but they are inferior compared to homemade. The whole point of this challenge is to make the dumpling wrappers by hand. So here is the one requirement: the dumpling wrappers must be made by hand. It isn’t all that hard, it just takes a little time and practice. People usually get the hang of it after making about a dozen.

Fillings: the beauty of the Chinese dumpling/potsticker is that the filling is very versatile. That’s why there are so many different kinds of dumplings when you go to dim sum. The two most common are pork and shrimp. You can make them with other ground meats (beef, chicken…) or vegetarian (tofu, mushrooms, bamboo shoots, water chestnuts, glass noodles, Chinese chives – oh yum!). The important thing to keep in mind is that the filling needs to “stick” to itself or else you will make your life incredibly miserable wrapping up filling that keeps falling apart. I think if I were to make vegetarian dumplings, I would sauté the cabbage and mash up the tofu for a better cohesiveness. It’s up to you how you want to fill your dumplings and I say – run with it! Just keep it cohesive and no big chunks of hard ingredients (they poke through the wrapper dough = disaster). I realize it may be tempting to dump all of the vegetables into a food processor and give it a whir, but I caution against it. You don’t want a slurry, you want a mince. Practice your knife skills and be careful.

Special Equipment: A rolling pin – preferably not tapered. (see blog pictures for the type I use).

Time: Prep for the filling takes me 30 minutes – longer if peeling and de-veining shrimp. It will depend on your proficiency with a good sharp knife. Rolling and wrapping several dozen dumplings takes me 1 hour by myself. My parents can crank through it in 30 minutes when one person is rolling wrappers and the other is wrapping dumplings. Might be fun to get a second person to help! Cooking: I have to cook mine in batches. When steaming, I can cook a dozen at a time in about 10 minutes. Potstickers: 15 minutes per 2 dozen determined by the size of your pan. Boiling – 6 minutes per dozen or so depending on size of pot. My own personal preference is for potstickers – mmmmm! But they are ALL good.

The Recipe:

Dough:

  • 2 cups (250g) all-purpose flour
    1/2 cup (113g) warm water
    flour for worksurface

Make the dough, Method 1: Place the flour in the work bowl of a food processor with the dough blade. Run the processor and pour the warm water in until incorporated. Pour the contents into a sturdy bowl or onto a work surface and knead until uniform and smooth. The dough should be firm and silky to the touch and not sticky.[Note: it’s better to have a moist dough and have to incorporate more flour than to have a dry and pilling dough and have to incorporate more water).

Make the dough, Method 2 (my mom’s instructions): In a large bowl mix flour with 1/4 cup of water and stir until water is absorbed. Continue adding water one teaspoon at a time and mixing thoroughly until dough pulls away from sides of bowl. We want a firm dough that is barely sticky to the touch.

Both dough methods: Knead the dough about twenty strokes then cover with a damp towel for 15 minutes. Take the dough and form a flattened dome. Cut into strips about 1 1/2 to 2 inches wide. Shape the strips into rounded long cylinders. On a floured surface, cut the strips into 3/4 inch pieces. Press palm down on each piece to form a flat circle (you can shape the corners in with your fingers). With a rolling pin, roll out a circular wrapper from each flat disc. Take care not to roll out too thin or the dumplings will break during cooking – about 1/16th inch. Leave the centers slightly thicker than the edges. Place a tablespoon of filling in the center of each wrapper and fold the dough in half, pleating the edges along one side (see images in Jen’s post for how to fold pleats). Keep all unused dough under damp cloth.

June1_35

The dough, even though feels very dry….just let it rest ;-)…..this is after the rest

June1_38

Dough cut into 5 pieces

June1_41

The cut portion of the dough is rolled into a thinner round and cut further. Good idea to cut it bigger than I am showing here. This was my first attempt.

  • Vegetarian filling:
    2 carrots minced
  • 4 large napa cabbage leaves, minced
    3 stalks green onions, minced
    6 cloves garlic
  • 1/4 bunch Chinese chives/garlic chives minced
  • 1 medium red onion minced
    1/2 cup Daikon radish peeled and minced (lesser than shown in picture below)
    1/4  cup ginger root, minced
  • 1 cup tofu (baked in oven at 400F for 15 minutes) mashed (optional)
  • 2 Tbsp. sugar
    3 Tbsp (40g) soy sauce
    2 Tbsp (28g) sesame oil
    6 Tbsp (16g) corn starch

July1_18

Finally some color……spring onion, carrots, napa cabbage, garlic, garlic chives, red onion,ginger and daikon radish

Even though Jen asks to mince  the veggies by hand, I chose to use the food processor………and was I glad I did ;-). Mince these veggies and drain the water by pressing with hands. Add the sugar, soy sauce, sesame oil and corn starch.

June1_33

Vegetarian filling

  • dipping sauce:
    2 parts soy sauce
    1 part vinegar (red wine or black)
    a few drops of sesame oil
    chili garlic paste (optional)
    minced ginger (optional)
    minced garlic (optional)
    minced green onion (optional)
    sugar (optional)

To boil: Bring a large pot of water to a boil and add dumplings to pot. Boil the dumplings until they float.

To steam: Place dumplings on a single layer of napa cabbage leaves or on a well-greased surface in a steamer basket with lid. Steam covered for about 6 minutes.

To pan fry (potstickers): Place dumplings in a frying pan with 2-3 tbsp of vegetable oil. Heat on high and fry for a few minutes until bottoms are golden. Add 1/2 cup water and cover. Cook until the water has boiled away and then uncover and reduce heat to medium or medium low. Let the dumplings cook for another 2 minutes then remove from heat and serve.

To freeze: Assemble dumplings on a baking sheet so they are not touching. It helps to rub the base of the dumpling in a little flour before setting on the baking sheet for ease of release. Freeze for 20-30 minutes until dumplings are no longer soft. Place in ziploc bag and freeze for up to a couple of months. Prepare per the above instructions, but allow extra time to ensure the filling is thoroughly cooked.

To serve: Serve dumplings or potstickers hot with your choice of dipping sauce combinations.

July1_22 July1_26

Pan fried is the way to go for us: these look  darker than they actually were ….trust me, these are delicious

June1_47 July1_28

Ah…..my black background

One more pic and the one with the coconut fudge filling (tasted like modaks :-)) )

Posted in - Napa Cabbage, - Red onion, -All Purpose flour, -Carrot, -Daikon Radish, -Garlic, -Garlic chives, -Ginger, -Sesame oil, -Soya Sauce, -Spring Onions, -Tofu, Corn Starch, Sugar | Tagged: , , | 3 Comments »

Daring Cooks # 3 Cod, traditional flavors powdered

Posted by vivnidhi on July 14, 2009

On time, first time………for the Daring Cooks. Oh well I had to be ….even tardiness has a limit and…….Sketchy from Sketchy’s Kitchen made all of us do something we never tried before. Really got us out of the comfort zone and try something absolutely new… 🙂 . He says ” If you’ve read my blog before -I have a minor obsession with molecular cuisine. I hopped between a MC dish and a classic rustic Italian dish (I know – two completely different worlds).

I opted to skip the 400 year old dish in favor of something that would be new and daring for most of you. ” This is a dish from Grant Achatz, found in the Alinea cookbook – page 230

So, here we are………

Definitely…Miss Measure….Miss Measure at 180 x 180 (largest)presents

July2_38

Cod with Traditional Flavors Powdered……the red is paprika

Skate, Traditional Flavors Powderedwith changes
  • 8 oz. Cod
  • * Beurre monte
  • * 150g fresh green beans
  • sea salt/kosher salt
  • 1 banana
  • 225g smart balance (substitute for butter)
  • 150g lemons ……1 lemon
  • 2.5g citric acid/vitamin c tablet ……1/4 tsp.
  • 75g cilantro
  • 75g parsley
  • 50g dried banana chips
  • 150g spray dried cream powder (or powdered milk)
  • 50g cup minced red onion ….1 small red onion
  • 100g capers (brined, not oil)

* For green beans, slice each beans into very thin rounds (2 mm)
* Beurre Monte – 225 g smart balance cubed and cold, 30g water. In a small saucepan, bring the water to a boil, remove from heat and whisk in the butter 1 cube at a time. This should from an emulsion. Keep this heated, but under 195 degrees. The emulsion will not break – this is your poaching liquid.

Powders – prepare ahead of time
caper / onion
lemon powder
cilantro/parsley powder
‘brown butter’ powder

July2_30

L to R from back……citrus, cilantro/parsley,capers/onion and brown butter powders

Powders
once dried, all powders should be pulsed in a coffee grinder/spice mill/mortar and pestle then passed through a chinois or fine mesh strainer.

citrus powder
150g lemons……1 lemon
500g simple syrup….I used 250 ml sugar and 250 ml water, seemed to work for me…..maybe wrong ratio but worked 😉
5g citric acid/vitamin c tablet

zest lemons , remove the pith from the zest and poach in the simple syrup three times. dry with paper towels and move to a dehydrating tray. 130 for 12 hours. pulse the zest in a coffee grinder, pass through chinois, and mix with citric acid/vitamin C powder.

If you do not have a dehydrator, place in microwave for 8 to 10 minutes at medium powder. Once dried, follow the other instructions.

cilantro/parsley powder
75g cilantro
75g parsley

blanch the parsley in boiling saltwater for 1 second, submerge the leaves in ice water for 3 minutes. Dry on paper towels and place on dehydrator tray. 130 for 12 hours. grind and pass through chinois.

If you do not have a dehydrator, place in microwave for 30 seconds, turn over leaves and microwave for another thirty seconds. They should be dry by now, pulse in coffee grinder, pass through chinois and reserve.

onion powder
50g cup minced red onions

dehydrator – 130 for 12 hours
microwave at medium power for 20 minutes.

pulse in grinder, pass through chinois

Caper powder
100g capers (get the ones packed in brine/vinegar)

run the capers under cold water for two minutes to remove some of the brine.
dry on paper towels and dehydrate for 12 hours at 130 degrees.
microwave instructions are unclear. Dry them as much a possible with paper towels, the microwave on medium for 1 minute. Check the moisture content and stir them. repeat for 30 second intervals until they are dry. If you use this method, pleas post the time needed to dry the capers.

Once dry, pulse and sift the powder. Mix it with the onion powder.

Brown Butter powder

50g Dried banana chips (unsweetened if possible – many are coated in honey – the freeze dried ones would be brilliant)
150g spray dried cream powder

If you cannot find the cream powder, you can substitute Bob’s red mill non fat dry milk powder, or even carnation instant milk powder. The substitutions will alter the flavor a little, but you will still get the general idea.

preheat the oven to 350 degrees, sift the cream powder into a fine layer on a silpat or on parchment. bake for 4 minutes, then remove for heat. If it bakes for too long, it will burn. Be very cautious with all powders in the oven. They all go from browned to burnt in a few seconds.

grind the banana chips in a coffee grinder and mix with the toasted cream powder. Pass this through a chinois and reserve.

July2_21 July2_22

Red Onion and capers before going in the oven

July2_24

This is what became of it :-)…from back, L to R….onion, parsley, lemon zest, capers and cilantro……dried

I made half the recipe. Actual recipe calls for double the ingredients and skate wings instead of cod fish. I used the oven to dry the powder ingredients.

Onion/capers……3 hrs at 150 F

Cilantro /parsley…2 hrs at 150 F

lemon zest…….4 hrs at 150 F

And………those banana chips gave me a hard time. I got freeze dried whole banana(that’s what I got unsweetened)……which wouldn’t powder at all…all gluey. So,….I chopped it fine in my blender and spread as well as possible on baking tray……..2 hours at 200 F and finally it powdered well . Let me tell you it was a relief.


Cod

Prepare the cod – 50G v shaped cuts are recommended
Bring 50g water, 50g beurre monte, and green bean rounds to a boil over high heat. Cook until the water has evaporated (about 3 minutes), when the pan is almost dry, remove it from heat and season with 3g salt

bring 150g water and 150g beurre monte to simmer over medium heat, add skate wings and simmer for 2 minutes. Remove the pan from heat and flip the wing over and let rest in pan for two more minutes. Transfer to warming tray lined with parchment and season with 2.5 grams of fine sea salt.

Plating

Take the tip of a small spoon and make a small mound of the citrus powder, the onion-caper powder, and the cilantro parsley-powder. Swirl these around in a hurricane type pattern. I found that it is easier, and you get finer lines if you lightly shake the plate to flatten out the mounds, then swirl the spoon through it to get the pattern.

peel the remaining banana into very think slices (3mm) fan three slices on the plate, place green beans on top and place skate wing portion on top. On the tall edge, sprinkle the brown butter powder.

July2_31 July2_33

July2_35 July2_36

Sequence of plating…..banana , green beans, cod and finally brown butter powder


Substitutions
The Skate can be replaced with flounder or cod.
If you can get skate that is not ‘prepared’ IE – Skinned- get the fish monger to prepare it for you.

The powdered cream can be omitted completely, just replace it with more banana powder, or pineapple powder. Possibly non dairy creamer, but I have NO idea what would happen if you tried to brown it.

The poaching liquid is pretty much butter – it could be replaced with other poaching methods. Water, wine, bay leaf, garlic clove, pepper, etc. Try to go easy on the salt in the liquid if you use a replacement.

Disclaimer – the sample dish was made with cod because Skate was not available at the time in Richmond. Whole Foods usually carries it. Check your fish markets before you head out to buy some.

July2_42

The next day….:-)

Verdict: Husband (since I do not eat meat) found it very very interesting and liked the flavors but wondered if the effort is worth the result. But it’s quite easy to make if the powders are kept ready beforehand as we found out the next day. The dish was good ( I believe ) but pictures are all bleak because it was night by the time I finished…..and I rely solely on natural light :-). Shall try taking better pics next time.

Expenditure:

Cod…………….from Whole Foods……1/2 lb……….$ 6.48…….finished

Green Beans…..from Kroger…………..1/2 lb……….$ 0.69…….finished

Cilantro………..from Farmers Market…1 bunch……..$ 1.00…….some left

Banana freeze dried ..Peoples Food Co-op……………$ 2.00…….very little left (we ate some and burnt some;-) )

Powdered Milk….from Walmart………………………..$ 4.30…….lots left

Capers ………..from Meijer………….100 g…………..$ 3.69…..all gone


Total……………………………………………………..$ 18.16

My only grouse has been measuring everything on the scale…..that must have slowed me down by an hour or so ;-).

Posted in - Cod, - Milk Powder, - Red onion, - Smart Balance, -Banana, -Cilantro, -Green Beans, -lemon, -Parsley, Capers, Daring Cooks | Tagged: , , , , , | 6 Comments »

More than a month late : Daring Bakers May: Apple Strudel

Posted by vivnidhi on July 5, 2009

This was the May’s Daring Baker Challenge. No, its not a case of dementia……..just pure procrastination. Its been strange strange past months, I would make Daring Bakers & Cooks challenges with a lot  of enthusiasm and then not post them. Everybody in the house seems to be suffering from a severe case of Writer’s Block. I really hope Lis and Ivonne don’t kick me out of the group. This month (whole of June), I sat and pondered and planned what I would do with the recipe……..but the truth is : I haven’t made it yet.

Anyway, often in life I have gone in my self-created shells and each time emerged stronger. So, I am hoping that the same would happen this time too. Cooking and baking has kept me sane all these years when I have not paid any particular attention to my career. I remember hearing somewhere (blame the radio for all my weird stories) that the happiest workers are those who work in creative fields. You bet, the only creativity I have is in the kitchen:-). This is the very thread that keeps me excited about the next day. When my mother was here a year back, she was surprised beyond belief to hear my then 2 year old son tell her all about Indian spices, where his Mom kept them, which utensils she used for what purpose.

Oh , now that I have blabbered about everything else, let’s get on with the strudel. I found it to be delicious and a perfect spring-summery light dessert.

Vanilla at 180 x 180 (largest)presents:

May_58

Mini Apple Strudel topped with candied apple peels and caramel sauce

The May Daring Bakers’ challenge was hosted by Linda of make life sweeter! and Courtney of Coco Cooks. They chose Apple Strudel from the recipe book Kaffeehaus: Exquisite Desserts from the Classic Cafés of Vienna, Budapest and Prague by Rick Rodgers.

Preparation time
Total: 2 hours 15 minutes – 3 hours 30 minutes

15-20 min to make dough
30-90 min to let dough rest/to prepare the filling
20-30 min to roll out and stretch dough
10 min to fill and roll dough
30 min to bake
30 min to cool

Apple strudel
from “Kaffeehaus – Exquisite Desserts from the Classic Cafés of Vienna, Budapest and Prague” by Rick Rodgers

2 tablespoons (30 ml) golden rum
3 tablespoons (45 ml) raisins
1/4 teaspoon ground cinnamon
1/3 cup plus 1 tablespoon (80 g) sugar
1/2 cup (1 stick / 115 g) unsalted butter, melted, divided
1 1/2 cups (350 ml) fresh bread crumbs
strudel dough (recipe below)
1/2 cup (120 ml, about 60 g) coarsely chopped walnuts
2 pounds (900 g) tart cooking apples, peeled, cored and cut into ¼ inch-thick slices (use apples that hold their shape during baking)

1. Mix the rum and raisins in a bowl. Mix the cinnamon and sugar in another bowl.

2. Heat 3 tablespoons of the butter in a large skillet over medium-high. Add the breadcrumbs and cook whilst stirring until golden and toasted. This will take about 3 minutes. Let it cool completely.

3. Put the rack in the upper third of the oven and preheat the oven to 400°F (200°C). Line a large baking sheet with baking paper (parchment paper). Make the strudel dough as described below. Spread about 3 tablespoons of the remaining melted butter over the dough using your hands (a bristle brush could tear the dough, you could use a special feather pastry brush instead of your hands). Sprinkle the buttered dough with the bread crumbs. Spread the walnuts about 3 inches (8 cm) from the short edge of the dough in a 6-inch-(15cm)-wide strip. Mix the apples with the raisins (including the rum), and the cinnamon sugar. Spread the mixture over the walnuts.

4. Fold the short end of the dough onto the filling. Lift the tablecloth at the short end of the dough so that the strudel rolls onto itself. Transfer the strudel to the prepared baking sheet by lifting it. Curve it into a horseshoe to fit. Tuck the ends under the strudel. Brush the top with the remaining melted butter.

5. Bake the strudel for about 30 minutes or until it is deep golden brown. Cool for at least 30 minutes before slicing. Use a serrated knife and serve either warm or at room temperature. It is best on the day it is baked.

Strudel dough
from “Kaffeehaus – Exquisite Desserts from the Classic Cafés of Vienna, Budapest and Prague” by Rick Rodgers

1 1/3 cups (200 g) unbleached flour
1/8 teaspoon salt
7 tablespoons (105 ml) water, plus more if needed
2 tablespoons (30 ml) vegetable oil, plus additional for coating the dough
1/2 teaspoon cider vinegar

1. Combine the flour and salt in a stand-mixer fitted with the paddle attachment. Mix the water, oil and vinegar in a measuring cup. Add the water/oil mixture to the flour with the mixer on low speed. You will get a soft dough. Make sure it is not too dry, add a little more water if necessary.
Take the dough out of the mixer. Change to the dough hook. Put the dough ball back in the mixer. Let the dough knead on medium until you get a soft dough ball with a somewhat rough surface.

2. Take the dough out of the mixer and continue kneading by hand on an unfloured work surface. Knead for about 2 minutes. Pick up the dough and throw it down hard onto your working surface occasionally.
Shape the dough into a ball and transfer it to a plate. Oil the top of the dough ball lightly. Cover the ball tightly with plastic wrap. Allow to stand for 30-90 minutes (longer is better).

3. It would be best if you have a work area that you can walk around on all sides like a 36 inch (90 cm) round table or a work surface of 23 x 38 inches (60 x 100 cm). Cover your working area with table cloth, dust it with flour and rub it into the fabric. Put your dough ball in the middle and roll it out as much as you can.
Pick the dough up by holding it by an edge. This way the weight of the dough and gravity can help stretching it as it hangs. Using the back of your hands to gently stretch and pull the dough. You can use your forearms to support it.

4. The dough will become too large to hold. Put it on your work surface. Leave the thicker edge of the dough to hang over the edge of the table. Place your hands underneath the dough and stretch and pull the dough thinner using the backs of your hands. Stretch and pull the dough until it’s about 2 feet (60 cm) wide and 3 feet (90 cm) long, it will be tissue-thin by this time. Cut away the thick dough around the edges with scissors. The dough is now ready to be filled.

Tips
– Ingredients are cheap so we would recommend making a double batch of the dough, that way you can practice the pulling and stretching of the dough with the first batch and if it doesn’t come out like it should you can use the second batch to give it another try;
– The tablecloth can be cotton or polyster;
– Before pulling and stretching the dough, remove your jewelry from hands and wrists, and wear short-sleeves;
– To make it easier to pull the dough, you can use your hip to secure the dough against the edge of the table;
– Few small holes in the dough is not a problem as the dough will be rolled, making (most of) the holes invisible.

May_67 

Milk Bread for bread crumbs

May_19

This is what happened to the bread

May_20

Sliced apples, flour, bread crumbs and chopped nuts

May_25

Here’s  the dough

May_27

This is what I could do with it

May_30

And, here’s  the result……yeah at least some of it

May_53

Decided that I do not like sliced apples, minced them up with the rest of the stuff and it stayed marinated in rum for a good 3-4 days…………:-)

May_54

Here’s the result …hot out from the oven

May_26

Oh..this is what I did with the apple peels………candied them 🙂 ………..sliced the peels, blanched them in boiling water for a bit, threw the water and then reduced them with sugar, spread them on parchment and let them dry. Topped them on the strudels in the last 5 minutes of baking. (My son could not stop eating these 🙂 )

May_63

Loved these mini strudels topped with candied apple peels and caramel sauce

Have a bite……

It’s a shame I did not post this scrumptious strudel on time even though I made and took pictures way before the challenge date. Yet I am posting it now:-). Hopefully I will post on time henceforth( don’t apply this to the June challenge for which I am late already:-) ). Thank you Linda and Courtney for a delicious challenge.

Expenditure: Zilch

I had everything at home, specially the big box of granny smith apples(approx. 20 lb for $2) I picked up at Joe’s Randazzo on my early morning finds.

Posted in - Bread Flour, -All Purpose flour, -Bread crumbs, -Butter, -Cider Vinegar, -Cinnamon, -Granny Smith, -Raisins, -Vegetable Oil, Alcohol, Daring Bakers, Sugar | Tagged: , , | Leave a Comment »