चर्चे चौके के Charche Chauke Ke

Hey! Join in the Kitchen Gossip!!

Archive for the ‘– Bread Flour’ Category

This Halloween we decided to eat some sleeping swaddled Babies

Posted by vivnidhi on November 2, 2009

Yeah the ghoulish spirits entered our house this year and we ate these babies up with some butter and honey.

100_4209

This is before baking them……notice the colored little fingers

This month Gretchen of Canela & Comino baked up Tanta Wawas (Peruvian Bread Babies). Now the name itself sounds so much fun and she has made such beautiful loaves (just looking at them will tell you that they were fun to make). She has a lot about Tanta Wawas on her blog. I just remembered ” On November 2nd, these bread babies are taken to the cemeteries in town so they can be left as offerings to those that have passed away and then are broken apart and eaten among the visitors. It is unknown when this Andean tradition began but it is known that from long ago, special breads were made and eaten in this manner.” I knew I’d be making it on Halloween.

As you can see from the picture above, we had a great time making these. The kids colored their hands well (yeah, there was more color on their hands than on the dough). And since they are a little sweet, they were liked by all.

100_4210

Look at those hands……project totally worth it

The Recipe:

Tanta Wawa (Peruvian Bread Babies)

Makes 4 small loaves

  • sponge:
    1 egg
    1/2 cup of all purpose flour
    1 tablespoon of sugar
    1/4 teaspoon of yeast
  • dough:
    1/2 cup of all purpose flour
    1 cup of whole wheat flour
    2 cups of bread flour
    1/2 cup of white sugar
    1/4 cup of brown sugar (I used turbinado sugar)
    1 tablespoon of dry yeast
    1 teaspoon of ground cinnamon
    1/8 teaspoon of ground cloves
    1/2 teaspoon of sesame seeds
    2 teaspoons of salt
    1/2 cup of milk
    1/4 cup of water
    1/4 cup of butter (I used smart balance)
    2 eggs (at room temperature)
    1/2 teaspoon of vanilla
    1 egg yolk (for painting)

1. In a bowl create the sponge by combining 1/2 cup of flour, 1 egg, 2 tablespoons of water, a pinch of instant yeast and 1 tablespoon of sugar. Stir together, cover and let rest for a few hours. …..(Mine was 6-7 hours as it was the day before Halloween)

2. In a bowl, mix the flours, sugar, yeast, salt, cinnamon, cloves, and sesame seeds. Sprinkle over the sponge. Don’t stir. Cover and let rest for a few hours. (Mine rested overnight)

3. Add the 2 eggs and vanilla to the flour mixture. Measure the milk, water and butter in a measuring cup. Heat for 30 seconds in the microwave, pour into the flour mixture. Mix well, then turn out and knead for 10-15 minutes, using additional flour if necessary. Divide dough into 4 equal portions. Form them into ovals. Cover and let the dough rest for 10 minutes.

4. Stretch each dough ball into the form of a “fat baby” and place them on baking sheets. Cover with plastic and let the dough babies rise for 2 hours (there won’t be too much rise at this point).

5. Preheat the oven to 180C. Brush the egg yolks evenly over the dough babies. Bake bread at 180C for 30 minutes.

I am sending these swaddled sleeping Tanta Wawa, or Peruvian Bread Babies, to YeastSpotting .

 100_4213

So, the oven baked up triplets for us :-))

The husband asked why did you not paint them after baking and I wondered why too.

Thanks a lot Gretchen for a real fun challenge. All the Bread Baking Babes have baked up beautiful babies, a must see.

No new expenses for this one ;-). I had everything at home.

Posted in - Bread Flour, - Smart Balance, -All Purpose flour, -Cinnamon, -cloves, -Sesame seeds, -Turbinado Sugar, -Vanilla, -Whole wheat flour, Eggs, Sugar, Yeast | 8 Comments »

Black Bread

Posted by vivnidhi on September 7, 2009

100_3945

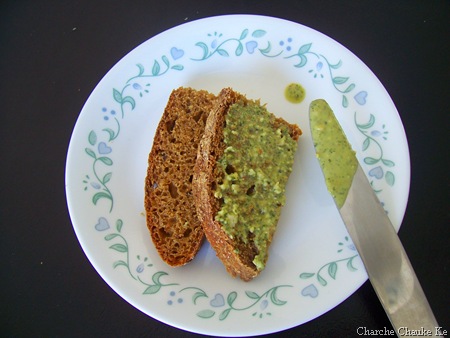
Russian Black Bread…We loved ours with pesto mayo sauce

The bread is black and I cheated too…….was that because I cheated………NO. Gorel of Grain Doe made a Russian Black bread this month for Bread Baking Babes. How she used a couple of recipes to invent this one is a very interesting read. I did not have any sourdough starter and used yeast….that’s my cheat ;-). Now, you think I would not buddy up those who bake bread?

It was such a different looking bread and I had never even heard of it, leave alone taste it.Result : We all loved it. Even when it started getting drier on the 4th day, the husband said ” I like it” :-). The recipe’s a keeper even if it requires more pre-planning than normal.

Black Bread – intermediate style

SOURDOUGH

  • Medium rye flour 300 g (10,6 oz)
  • Water 350 ml (1,5 cup)
  • Active sourdough culture* 2 Tbsp

SOAKER

  • Old bread**, toasted 100 g/3,5 oz
  • Coffee, ground 15 g/0,5 oz
  • Vegetable, neutral oil 25 g/0,9 oz
  • Molasses 60 ml/1/4 cup
  • Caraway seeds 2 tsp
  • Fennel seeds 1 tsp
  • Minced shallots 1 Tbsp

Water, hot 400 ml/1 2/3 cup

FINAL DOUGH

  • Medium rye flour 300 g/10,6 oz
  • High gluten bread flour 400 g/14,1 oz
  • Salt 20 g/0,7 oz (appr. 1 Tbsp)
  • Yeast
  • Fresh: 15 g/0,5 oz
  • Instant dry: 1,5 tsp (0,17 oz)

Soaker

  • All of the above
  • Sourdough
  • All of the above

* If you don’t have any active starter at hand, I think you can cheat by using a small amount (say 5 g fresh or 0,5 tsp instant dry yeast) instead.

**  Gorel used rye sourdough bread, but I guess any old unsweetened bread will do, or any old bread in general.

Sourdough

Mix the ingredients to the sourdough, cover the container with plastic and leave for 12–14 hours at room temperature.

Soaker

Toast the old bread in a toaster or in the oven. The bread should be browned, but absolutely not blackened. Dice the bread or just tear it in pieces and put it in a bowl. Add the rest of the soaker ingredients except the water. Heat the water to near boiling and pour over the soaker ingredients. Cover and leave for the same duration as the sourdough.

100_3937

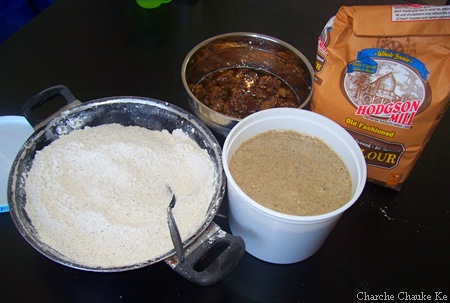
All set: Flour mix, Soaker and sourdough…and yes,  that’s my rye flour


Final dough

Mix the two flours in a separate bowl.

If using fresh yeast: Take a small amount of the soaker liquid and dissolve the yeast in it.

Add the yeast mixture OR the instant dry yeast, soaker, sourdough and salt to a mixing bowl.

Add half of the flour mixture and work the dough by hand or in machine. Continue to add about 100 ml or ½ cup of the flour mixture at a time and work until the flour is completely absorbed before you add the next round. The dough shall be firm but still quite sticky. You might not use all the flour, or you might need to add more flour, all depending on the flour used.

Place the dough in an oiled container, cover with plastic and leave for 2–3 hours or until doubled in size.

Shaping and proofing

Drizzle some rye flour on the table top and place the dough on top. If the dough is very sticky, pour just enough rye flour on top of it to make it possible to handle.

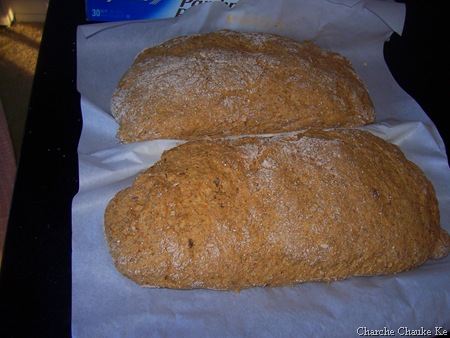
Divide the dough in two and shape the parts into oblong loaves. (I placed them on parchment paper to make it possible to just slide the loaves into the oven.) Stretch the surface using both hands to get a tight loaf. Use more rye if the dough is too sticky to handle.

Cover with a tea towel and leave for 60 minutes. Don’t over-proof! (Fire up the oven after 30 minutes to have it ready.)

100_3938

Sticky dough: After first proof

100_3940

Does this sticky dough proof quickly, this is after 55 minutes

Baking

Place an empty metal container in the bottom of the oven. Put in your baking stone or an empty baking sheet. Heat the oven to 225 °C/435 °F.

Put 3–4 ice cubes in the metal container.

Move the loaves to the hot stone or sheet. Bake for 10 minutes.

Open the oven door to vent out some moist. At the same time, lower the temp. to 200 °C/400 °F. Bake another 30-40 minutes or until they sound hollow when tapped underneath, or when the inner temperature has reached appr. 97 °C/207 °F.

Let the loaves cool down before you slice them. Eat with butter and maybe some sharp cheese, or why not cured salmon.

100_3941

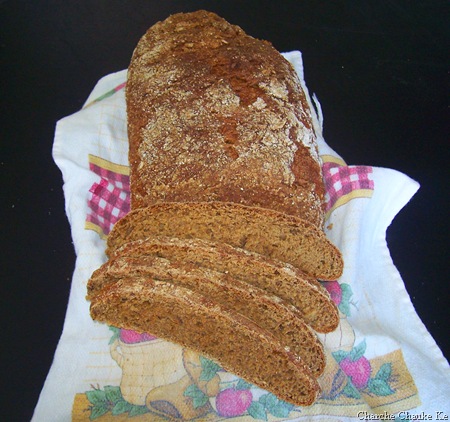
Russian Black Bread

This bread made some delicious veggie sandwiches for us with mayo and pesto. Thank you Gorel.

I’d like to send this to Susan of Wild Yeast as my first YeastSpotting entry.

Posted in - Bread Flour, -Caraway seeds, -Fennel seeds, -Rye Flour, -Vegetable Oil, Baking Powder, Coffee, Old Bread, Shallots, Sugar, Yeast | 7 Comments »

More than a month late : Daring Bakers May: Apple Strudel

Posted by vivnidhi on July 5, 2009

This was the May’s Daring Baker Challenge. No, its not a case of dementia……..just pure procrastination. Its been strange strange past months, I would make Daring Bakers & Cooks challenges with a lot  of enthusiasm and then not post them. Everybody in the house seems to be suffering from a severe case of Writer’s Block. I really hope Lis and Ivonne don’t kick me out of the group. This month (whole of June), I sat and pondered and planned what I would do with the recipe……..but the truth is : I haven’t made it yet.

Anyway, often in life I have gone in my self-created shells and each time emerged stronger. So, I am hoping that the same would happen this time too. Cooking and baking has kept me sane all these years when I have not paid any particular attention to my career. I remember hearing somewhere (blame the radio for all my weird stories) that the happiest workers are those who work in creative fields. You bet, the only creativity I have is in the kitchen:-). This is the very thread that keeps me excited about the next day. When my mother was here a year back, she was surprised beyond belief to hear my then 2 year old son tell her all about Indian spices, where his Mom kept them, which utensils she used for what purpose.

Oh , now that I have blabbered about everything else, let’s get on with the strudel. I found it to be delicious and a perfect spring-summery light dessert.

Vanilla at 180 x 180 (largest)presents:

May_58

Mini Apple Strudel topped with candied apple peels and caramel sauce

The May Daring Bakers’ challenge was hosted by Linda of make life sweeter! and Courtney of Coco Cooks. They chose Apple Strudel from the recipe book Kaffeehaus: Exquisite Desserts from the Classic Cafés of Vienna, Budapest and Prague by Rick Rodgers.

Preparation time
Total: 2 hours 15 minutes – 3 hours 30 minutes

15-20 min to make dough
30-90 min to let dough rest/to prepare the filling
20-30 min to roll out and stretch dough
10 min to fill and roll dough
30 min to bake
30 min to cool

Apple strudel
from “Kaffeehaus – Exquisite Desserts from the Classic Cafés of Vienna, Budapest and Prague” by Rick Rodgers

2 tablespoons (30 ml) golden rum
3 tablespoons (45 ml) raisins
1/4 teaspoon ground cinnamon
1/3 cup plus 1 tablespoon (80 g) sugar
1/2 cup (1 stick / 115 g) unsalted butter, melted, divided
1 1/2 cups (350 ml) fresh bread crumbs
strudel dough (recipe below)
1/2 cup (120 ml, about 60 g) coarsely chopped walnuts
2 pounds (900 g) tart cooking apples, peeled, cored and cut into ¼ inch-thick slices (use apples that hold their shape during baking)

1. Mix the rum and raisins in a bowl. Mix the cinnamon and sugar in another bowl.

2. Heat 3 tablespoons of the butter in a large skillet over medium-high. Add the breadcrumbs and cook whilst stirring until golden and toasted. This will take about 3 minutes. Let it cool completely.

3. Put the rack in the upper third of the oven and preheat the oven to 400°F (200°C). Line a large baking sheet with baking paper (parchment paper). Make the strudel dough as described below. Spread about 3 tablespoons of the remaining melted butter over the dough using your hands (a bristle brush could tear the dough, you could use a special feather pastry brush instead of your hands). Sprinkle the buttered dough with the bread crumbs. Spread the walnuts about 3 inches (8 cm) from the short edge of the dough in a 6-inch-(15cm)-wide strip. Mix the apples with the raisins (including the rum), and the cinnamon sugar. Spread the mixture over the walnuts.

4. Fold the short end of the dough onto the filling. Lift the tablecloth at the short end of the dough so that the strudel rolls onto itself. Transfer the strudel to the prepared baking sheet by lifting it. Curve it into a horseshoe to fit. Tuck the ends under the strudel. Brush the top with the remaining melted butter.

5. Bake the strudel for about 30 minutes or until it is deep golden brown. Cool for at least 30 minutes before slicing. Use a serrated knife and serve either warm or at room temperature. It is best on the day it is baked.

Strudel dough
from “Kaffeehaus – Exquisite Desserts from the Classic Cafés of Vienna, Budapest and Prague” by Rick Rodgers

1 1/3 cups (200 g) unbleached flour
1/8 teaspoon salt
7 tablespoons (105 ml) water, plus more if needed
2 tablespoons (30 ml) vegetable oil, plus additional for coating the dough
1/2 teaspoon cider vinegar

1. Combine the flour and salt in a stand-mixer fitted with the paddle attachment. Mix the water, oil and vinegar in a measuring cup. Add the water/oil mixture to the flour with the mixer on low speed. You will get a soft dough. Make sure it is not too dry, add a little more water if necessary.
Take the dough out of the mixer. Change to the dough hook. Put the dough ball back in the mixer. Let the dough knead on medium until you get a soft dough ball with a somewhat rough surface.

2. Take the dough out of the mixer and continue kneading by hand on an unfloured work surface. Knead for about 2 minutes. Pick up the dough and throw it down hard onto your working surface occasionally.
Shape the dough into a ball and transfer it to a plate. Oil the top of the dough ball lightly. Cover the ball tightly with plastic wrap. Allow to stand for 30-90 minutes (longer is better).

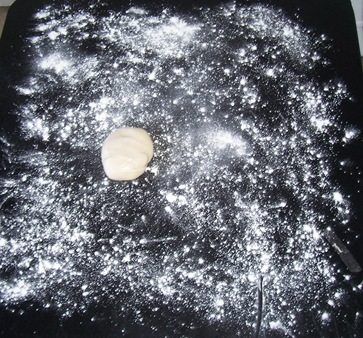
3. It would be best if you have a work area that you can walk around on all sides like a 36 inch (90 cm) round table or a work surface of 23 x 38 inches (60 x 100 cm). Cover your working area with table cloth, dust it with flour and rub it into the fabric. Put your dough ball in the middle and roll it out as much as you can.
Pick the dough up by holding it by an edge. This way the weight of the dough and gravity can help stretching it as it hangs. Using the back of your hands to gently stretch and pull the dough. You can use your forearms to support it.

4. The dough will become too large to hold. Put it on your work surface. Leave the thicker edge of the dough to hang over the edge of the table. Place your hands underneath the dough and stretch and pull the dough thinner using the backs of your hands. Stretch and pull the dough until it’s about 2 feet (60 cm) wide and 3 feet (90 cm) long, it will be tissue-thin by this time. Cut away the thick dough around the edges with scissors. The dough is now ready to be filled.

Tips
– Ingredients are cheap so we would recommend making a double batch of the dough, that way you can practice the pulling and stretching of the dough with the first batch and if it doesn’t come out like it should you can use the second batch to give it another try;
– The tablecloth can be cotton or polyster;
– Before pulling and stretching the dough, remove your jewelry from hands and wrists, and wear short-sleeves;
– To make it easier to pull the dough, you can use your hip to secure the dough against the edge of the table;
– Few small holes in the dough is not a problem as the dough will be rolled, making (most of) the holes invisible.

May_67 

Milk Bread for bread crumbs

May_19

This is what happened to the bread

May_20

Sliced apples, flour, bread crumbs and chopped nuts

May_25

Here’s  the dough

May_27

This is what I could do with it

May_30

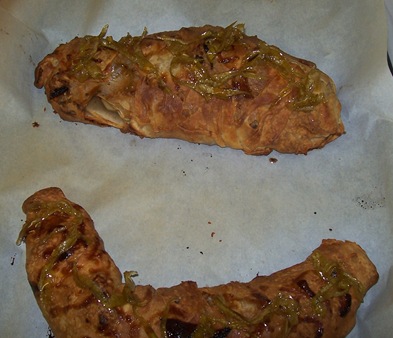
And, here’s  the result……yeah at least some of it

May_53

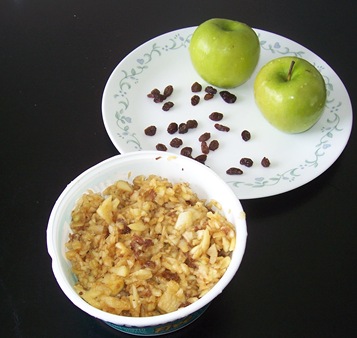
Decided that I do not like sliced apples, minced them up with the rest of the stuff and it stayed marinated in rum for a good 3-4 days…………:-)

May_54

Here’s the result …hot out from the oven

May_26

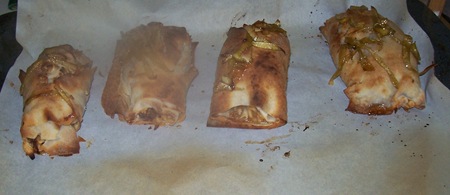
Oh..this is what I did with the apple peels………candied them 🙂 ………..sliced the peels, blanched them in boiling water for a bit, threw the water and then reduced them with sugar, spread them on parchment and let them dry. Topped them on the strudels in the last 5 minutes of baking. (My son could not stop eating these 🙂 )

May_63

Loved these mini strudels topped with candied apple peels and caramel sauce

Have a bite……

It’s a shame I did not post this scrumptious strudel on time even though I made and took pictures way before the challenge date. Yet I am posting it now:-). Hopefully I will post on time henceforth( don’t apply this to the June challenge for which I am late already:-) ). Thank you Linda and Courtney for a delicious challenge.

Expenditure: Zilch

I had everything at home, specially the big box of granny smith apples(approx. 20 lb for $2) I picked up at Joe’s Randazzo on my early morning finds.

Posted in - Bread Flour, -All Purpose flour, -Bread crumbs, -Butter, -Cider Vinegar, -Cinnamon, -Granny Smith, -Raisins, -Vegetable Oil, Alcohol, Daring Bakers, Sugar | Tagged: , , | Leave a Comment »

YES….Asparagus bread with Parmesan cheese and Walnuts and uh… Arugula

Posted by vivnidhi on June 26, 2009

It’s been a long time that I wrote anything on the blog. Not even posting more photographs of the gnocchi , not posting about the daring bakers and cooks challenges. Past couple of months have been absolutely crazy. It’s an absolute surprise how time flies by, really…….doesn’t the time ever get tired of just ticking. Oh, I get crazy running after it, never really making it. I want to be on top of situations and reach appointments early……….but the reality is …I am mostly running late. If I wake at 5 am in the morning, the day and the task list gets longer……..I start thinking…..”Oh, why didn’t I wake up at 4″ And……I don’t even work outside the house……..I don’t know what is wrong and do I even have the time to think of it…..ha?

Anyway, now that I have opened up my heart, written a full paragraph without interruption……….(ah, lets not count the fact that I have a fidgety 1 year old who landed up on my lap scribbled a little on the table till I actually handed her “writing book”) OK OK……focus, focus………I just had to break my silence on the blog and I have been so excited this past month about the Bread Baking Babes.

I baked the bread they blogged about and it just tasted superb. I had to blog about it and yeah………..today is the last day if I want the badge. I always manage doing things…….it’s ok if on the last minute. A friend a few years back illuminated me about the JIT….Just in Time Theory. Well, I am a perfect practitioner.

June1_68

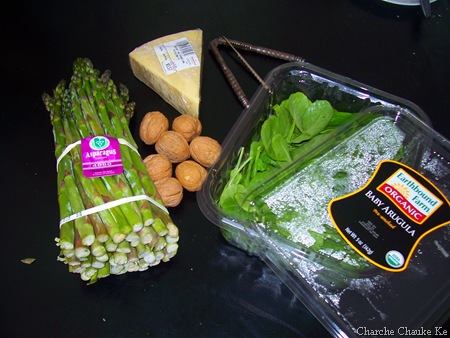
Asparagus, walnuts, parmesan cheese and baby Arugula/Rocket

I was going to bake this month’s BBB bread no matter what cause I love baking breads and these folks bake great looking breads:-) . I was out of almost every bread baking ingredient so I bought a lot of stuff. It was fun. Baked the bread yesterday…..and was really thankful that it was not difficult. The only added activity for me was shelling the walnuts but I better use them before they go bad.

The Recipe:

Asparagus Bread (with Parmesan Cheese and Walnuts)

2 small loaves

This bread goes very well with a cold meat and salad buffet.

125 g green asparagus ……..9 pieces for me

25-30 g rocket

50 g walnuts,

50 g freshly grated parmesan cheese

450 g strong bread flour (you can also use half whole wheat and half white or white whole wheat if you can get that)

12 g fresh yeast or 1 1/4 tsp dry instant yeast

250-270 g water

25 g olive oil…….1 1/2 Tbsp for me

10 g (sea) salt………….1 1/2 tsp. for me

  • Boil 3/4 liter of water with a pinch of (sea) salt. Clean the asparagus, set two of them aside, cut the rest into 4 pieces. Boil these pieces for 2 minutes in the water, scoop them out (so you can use the water for the rocket as well) and rinse under cold water (to stop them cooking).
  • Put the rocket in the boiling water for a few seconds (until wilted), drain and rinse under cold water and drain again.
  • Press the water our of the rocket, chop it coarsely and cut the asparagus into 1/4 inch (± 1 cm) long pieces, set aside.
  • Crush the walnuts coarsely and grate the parmesan.
  • Measure the flour and yeast in a large bowl, mix in most of the water and knead for a few minutes (on low speed), add the olive oil and knead for 10-12 minutes. Add the salt and knead on medium speed for 5 minutes until very elastic.
  • Let the dough rest for 10 minutes. Work the asparagus pieces, rocket, walnuts and parmesan in with care so that they’re evenly distributed. The dough should be very supple and elastic, hence the long kneading time. For me the best way to incorporate all the ingredients is to spread the dough out into a large slap, sprinkle all the ingredients on and roll it up. Let it rest for 5-10 minutes, press flat and fold… rest 5-10 minutes press flat and fold. Shape into rounds.
  • Place the dough in a greased container, cover and let rise for about 2 hrs.
  • Divide the dough into 2 equal parts.
  • Make round balls, cover with a tea towel and let rest for 10 minutes.
  • Flatten the balls and fold into taut breads with slightly tapering ends. Lay one asparagus in lengthwise in the middle of the bread and press in slightly. Sprinkle with wheat flour and cover to rise for 70 minutes or until doubled. Before baking you can sprinkle a little grated cheese on the bread if you like (optional).
  • Preheat the oven (preferably with stone) to 460ºF.
  • Place the loaves directly on the stone. Spray with water (or poor some hot water in a metal container on the bottom of the oven that you preheated to create steam)
  • Lower the temperature after 5 minutes to 400ºF. Open the door after another 10 minutes to let some air in. Repeat twice during baking.
  • Bake for 40-45 minutes and cool on a wire rack.

(adapted from: “Artisan Bread” -Jan Hedh)

Original post can be found on the blog “Notitie van Lien” ©2009.

www.notitievanlien.blogspot.com

I used half whole wheat and half bread flour. I followed the recipe exactly except for these changes: Mixed with hands, mixed flour, yeast , salt and water together and then knead in oil.  After letting the dough rest for about minutes, I incorporated the greens and walnuts , shaped the dough and left it to rise. No excessive resting allowed in this house. Next I shaped the bread for final rising on the sheet I was going to bake it in. I do not have a stone, so I baked the breads on a normal baking sheet. Sprayed some water on the loaves before baking and baked for 40 minutes. The bread tasted fabulous. One thing I’d change about my recipe is that I would spread some cornmeal instead of the whole wheat flour I put under the loaves as I was in a rush (always!!)

One more note about the ingredients: I should admit that I am not an asparagus fan at all and the husband has very limited likes in the vegetable world. But, what do you do if you have an adamant wife determined to put all kinds of vegetables on the plate:-) ? And the husband can’t even complain these days cause the 31/2 year old catches it instantly …….”even Papa doesn’t like broccoli” . So, I these days find the husband eating broccoli and actually saying  that he likes it:-)………even when there are other choices:-). Ok, gist of the matter…..everybody at home enjoyed the bread thoroughly. This is a delicious bread, do try it…..and it’s even good for beginners as the recipe is so simple. Thanks Lien!

June1_69

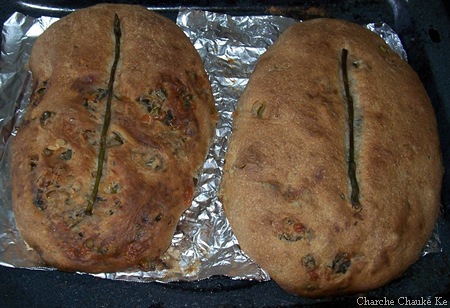
After the second rise, before baking

June1_70

Baked loaves

June1_76

Pick a slice………….

Expenditure:

Asparagus………………….1.57 lb. …………$3.12 ,        from Busch’s………lots left

Arugula……………………5 oz………………$ 3.99        from Busch’s………lots left

Argentine Parmesan……..0.62 oz……………$5.57          from Busch’s………lots left

Whole wheat flour(KA)…. 5 lb………………..$3.22          from Walmart…….lots left

Bread flour………………..5 lb……………..$2.64         from Walmart…….lots left

——————————————————————————————————–

Total………………………………………….$18.54………..

That’s an expensive bread! The pleasure I got out of baking and eating it……….priceless……


Posted in - Bread Flour, -Arugula/Rocket, -Asparagus, -Olive Oil, -Walnuts, -Whole wheat flour | Tagged: , , | 6 Comments »

Sailing the Pink Seas

Posted by vivnidhi on January 29, 2009

j_97

Tuile Boats with whipped cream and strawberry cream

This month’s Daring Bakers challenge was French Tuiles. Light and fragile as can be. I can definitely not call this month a success cause we were a part of several mishaps as we waded our way in making these fragile bits. First my one year old chanced upon the chocolate sauce bottle as I was playing with refrigerating tuile dough and baking tray. Next thing we had a delicious choco-baby and chocolate floor (right when I was using the tuile stencils). Thank God for my 3 year old(who loves to keep an eye on such situations and raises the alarm only when the deed is done;-) )………otherwise I would not even have noticed and continued my play. Next, when I thought I had learnt how to roll these exactly as I wanted to……….kept the last batch in the oven ………………………………….and ………….forgot to take it out ………until it turned into crisp , dark brown ………..yes, burnt.

Anyway, in spite of all this , as usual with daring bakers, the tuiles were delicious and very fragile. They paired beautifully with the strawberry cream I made. I learnt a fabulous way to garnish in future. I will certainly use these in my desserts.

I paired these with Light and easy strawberry Cream. The strawberries were courtesy of Locavorious. I must say that they were better than store bought frozen ones and my son just loves to snack on them plain. A very big thank you to Rena Basch who gave these to us free of cost. I joined a fabulous group of Michigan Lady Food Bloggers and through them I came to know of locavores. I will try and join them next season.

j_81

Local Strawberries

Light & Easy Strawberry Cream

The Recipe:

  • Strawberries 1 cup (fresh /frozen)
  • Sugar 1 tsp.
  • Sugar Free Strawberry gelatin 6 oz (1 pack)
  • Water 1/2 cup
  • Fat free Whipped Topping 2 cups thawed

This is an extremely simple recipe. Dissolve the gelatin in 1/2 cup hot water. Puree the strawberries in the blender with 1 tsp. sugar. No need to thaw the strawberries. Add the strawberry puree to the gelatin and mix well. Put  this in the refrigerator for half an hour. When it has started to set a little, add the whipped topping and fold it in the gelatin mixture carefully. Back it goes in the refrigerator for at least 4-6 hours. Ready!! Pair it with tuiles and a sprinkle of best aged balsamic vinegar and we have a classic dessert ready.

j_91

Light & Easy Strawberry Cream

For a little shaping up after the holidays, we’re adapting an air of lightness, adding a touch of crisp and maybe even go nuts. A challenge that’s more about technique than about baking a recipe. With the choices given, we think you’ve got plenty of options to chose something that’s individually challenging. You are allowed every flavor in the universe, you may go round or square, roll or fold but you need to shape up!
So here we go; January – something light… Tuiles – what could be lighter?? big_smile
Traditionally, tuiles are thin, crisp almond cookies that are gently molded over a rolling pin or arched form while they are still warm. Once set, their shape resembles the curved French roofing tiles for which they’re named. The Dutch angle: traditionally this batter was used to bake flat round cookies on 31st December, representing the year unfold. On New Years day however, the same batter was used but this day they were presented to well-wishers shaped as cigars and filled with whipped cream, symbolizing the New Year that’s about to roll on. And of course the batter is sometimes called tulip-paste….

This month’s challenge is brought to us by Karen of Bake My Day and Zorra of 1x umruehren bitte aka Kochtopf. They have chosen Tuiles from The Chocolate Book by Angélique Schmeink and Nougatine and Chocolate Tuiles from Michel Roux.

About the shaping: you don’t need to buy anything especially for this challenge, I made the stencils I used for the butterflies myself out of thick plastic sheet and cut out the desired shape. You can use anything you have handy in your kitchen/house like broomsticks, knitting needles, cups, cones.. use your imagination.

Following is a recipe taken from a book called “The Chocolate Book”, written by female Dutch Master chef Angélique Schmeinck.
Recipe:

Yields: 20 small butterflies/6 large (butterflies are just an example)

Preparation time batter 10 minutes, waiting time 30 minutes, baking time: 5-10 minutes per batch

65 grams / ¼ cup / 2.3 ounces softened butter (not melted but soft)
60 grams / ½ cup / 2.1 ounces sifted confectioner’s sugar
1 sachet vanilla sugar (7 grams or substitute with a dash of vanilla extract)
2 large egg whites (slightly whisked with a fork)
65 grams / 1/2 cup / 2.3 ounces sifted all purpose flour
1 table spoon cocoa powder/or food coloring of choice
Butter/spray to grease baking sheet

Oven: 180 C / 350F
Using a hand whisk or a stand mixer fitted with the paddle (low speed) and cream butter, sugar and vanilla to a paste. Keep stirring while you gradually add the egg whites. Continue to add the flour in small batches and stir to achieve a homogeneous and smooth batter/paste. Be careful to not overmix.
Cover the bowl with plastic wrap and chill in the fridge for at least 30 minutes to firm up. (This batter will keep in the fridge for up to a week, take it out 30 minutes before you plan to use it).
Line a baking sheet with parchment paper or grease with either butter/spray and chill in the fridge for at least 15 minutes. This will help spread the batter more easily if using a stencil/cardboard template such as the butterfly. Press the stencil on the bakingsheet and use an off sided spatula to spread batter. Leave some room in between your shapes. Mix a small part of the batter with the cocoa and a few drops of warm water until evenly colored. Use this colored batter in a paper piping bag and proceed to pipe decorations on the wings and body of the butterfly.
Bake butterflies in a preheated oven (180 C/350F) for about 5-10 minutes or until the edges turn golden brown. Immediately release from bakingsheet and proceed to shape/bend the cookies in the desired shape. These cookies have to be shaped when still warm, you might want to bake a small amount at a time or maybe put them in the oven to warm them up again. (Haven’t tried that). Or: place a bakingsheet toward the front of the warm oven, leaving the door half open. The warmth will keep the cookies malleable.
If you don’t want to do stencil shapes, you might want to transfer the batter into a piping bag fitted with a small plain tip. Pipe the desired shapes and bake. Shape immediately after baking using for instance a rolling pin, a broom handle, cups, cones….

Anything you’d like to know and more: http://www.pastrysampler.com/Questions_ … /tuile.htm

There are more alternative recipes too  Nougatine, Chocolate Tuiles, Savory tuile/cornet recipe. These recipes can be found at host’s blogs here. To check out who has made what , check out the Daring Bakers’ blogroll.

Wish I had done the savory…..the husband wanted me to but I couldn’t some other time:-) Not a great start to 2009 but then there’s hope………I see it just behind the snow 🙂

Expenditure:

Parchment paper : $ 2.84 from Walmart lots left

And a huge big thank you to Rena for the strawberries!

Posted in - Bread Flour, - Confectioner's Sugar, -Balsamic Vinegar, -Butter, -Cocoa Powder, -Cream, -Strawberry, Eggs, Gelatin, Sugar | Tagged: , , | 14 Comments »

Hot Hot from the oven……Pizza…….

Posted by vivnidhi on October 30, 2008

A very happy Deepavali to my readers!!  Had a fabulous festival of lights, cooking for Diwali was a very satisfying experience this year with just a  few hitches..:)

As I had not tried this month’s Daring Bakers Challenge early enough this month, I am a day late in posting this month. This month’s challenge was hosted by the benevolent Rosa of Rosa’s Yummy Yums. This challenge is also a tribute to the memory of Sher of What Did you Eat who passed away suddenly in July. She was to host this month’s challenge along with Rosa and Glenna of a Fridge full of Food.

Here are the pizzas I made up without much pre-planning.

garden100_2580

Garden veggie pizza with Paneer

peethi100_2582

Olives, spicy lentils, paneer and cilantro Pizza

The main thing is the pizza base.

The Recipe:

EQUIPMENT: Stand mixer with paddle and dough hook attachments (optional, see recipe), cooking thermometer, baking sheet, parchment paper, cooking oil, plastic wrap, pizza peel/scraper, pizza stone or pan.

RECIPE SOURCE: “The Bread Baker’s Apprentice: Mastering The Art of Extraordinary Bread” by Peter Reinhart. Ten Speed Press, Berkeley, CA. Copyright 2001. ISBN-10: 1-58008-268-8, ISBN-13: 978-158008-268-6.

***************

~ BASIC PIZZA DOUGH ~

Original recipe taken from “The Bread Baker’s Apprentice” by Peter Reinhart.

Makes 6 pizza crusts (about 9-12 inches/23-30 cm in diameter).

Ingredients:

4 1/2 Cups (20 1/4 ounces/607.5 g) Unbleached high-gluten (%14) bread flour or all purpose flour, chilled – FOR GF: 4 ½ cups GF Flour Blend with xanthan gum or 1 cup brown rice flour, 1 cup corn flour, 1 cup oat flour, 1 ½ cup arrowroot, potato or tapioca starch + 2 tsp xanthan or guar gum

1 3/4 Tsp Salt

1 Tsp Instant yeast – FOR GF use 2 tsp

1/4 Cup (2 ounces/60g) Olive oil or vegetable oil (both optional, but it’s better with)

1 3/4 Cups (14 ounces/420g or 420ml) Water, ice cold (40° F/4.5° C)

1 Tb sugar – FOR GF use agave syrup

Semolina/durum flour or cornmeal for dusting

DAY ONE

Method:

1. Mix together the flour, salt and instant yeast in a big bowl (or in the bowl of your stand mixer).

2. Add the oil, sugar and cold water and mix well (with the help of a large wooden spoon or with the paddle attachment, on low speed) in order to form a sticky ball of dough. On a clean surface, knead for about 5-7 minutes, until the dough is smooth and the ingredients are homogeneously distributed. If it is too wet, add a little flour (not too much, though) and if it is too dry add 1 or 2 teaspoons extra water.

NOTE: If you are using an electric mixer, switch to the dough hook and mix on medium speed for the same amount of time.The dough should clear the sides of the bowl but stick to the bottom of the bowl. If the dough is too wet, sprinkle in a little more flour, so that it clears the sides. If, on the contrary, it clears the bottom of the bowl, dribble in a teaspoon or two of cold water.

The finished dough should be springy, elastic, and sticky, not just tacky, and register 50°-55° F/10°-13° C.

Or

2. FOR GF: Add the oil, sugar or agave syrup and cold water, then mix well (with the help of a large wooden spoon or with the paddle attachment, on low speed) in order to form a sticky ball of dough.

3. Flour a work surface or counter. Line a jelly pan with baking paper/parchment. Lightly oil the paper.

4. With the help of a metal or plastic dough scraper, cut the dough into 6 equal pieces (or larger if you want to make larger pizzas).

NOTE: To avoid the dough from sticking to the scraper, dip the scraper into water between cuts.

5. Sprinkle some flour over the dough. Make sure your hands are dry and then flour them. Gently round each piece into a ball.

NOTE: If the dough sticks to your hands, then dip your hands into the flour again.

6. Transfer the dough balls to the lined jelly pan and mist them generously with spray oil. Slip the pan into plastic bag or enclose in plastic food wrap.

7. Put the pan into the refrigerator and let the dough rest overnight or for up to thee days.

NOTE: You can store the dough balls in a zippered freezer bag if you want to save some of the dough for any future baking. In that case, pour some oil(a few tablespooons only) in a medium bowl and dip each dough ball into the oil, so that it is completely covered in oil. Then put each ball into a separate bag. Store the bags in the freezer for no longer than 3 months. The day before you plan to make pizza, remember to transfer the dough balls from the freezer to the refrigerator.

DAY TWO

8. On the day you plan to eat pizza, exactly 2 hours before you make it, remove the desired number of dough balls from the refrigerator. Dust the counter with flour and spray lightly with oil. Place the dough balls on a floured surface and sprinkle them with flour. Dust your hands with flour and delicately press the dough into disks about 1/2 inch/1.3 cm thick and 5 inches/12.7 cm in diameter. Sprinkle with flour and mist with oil. Loosely cover the dough rounds with plastic wrap and then allow to rest for 2 hours.

Or

8. FOR GF: On the day you plan to eat pizza, exactly 2 hours before you make it, remove the number of desired dough balls from the refrigerator. Place on a sheet of parchment paper and sprinkle with a gluten free flour. Delicately press the dough into disks about ½ inch/1.3 cm thick and 5 inches/12.7 cm in diameter. Sprinkle the dough with flour, mist it again with spray oil. Lightly cover the dough round with a sheet of parchment paper and allow to rest for 2 hours.

9. At least 45 minutes before making the pizza, place a baking stone on the lower third of the oven. Preheat the oven as hot as possible (500° F/260° C).

NOTE: If you do not have a baking stone, then use the back of a jelly pan. Do not preheat the pan.

10. Generously sprinkle the back of a jelly pan with semolina/durum flour or cornmeal. Flour your hands (palms, backs and knuckles). Take 1 piece of dough by lifting it with a pastry scraper. Lay the dough across your fists in a very delicate way and carefully stretch it by bouncing it in a circular motion on your hands, and by giving it a little stretch with each bounce. Once the dough has expanded outward, move to a full toss.

Or

10. FOR GF: Press the dough into the shape you want (about 9-12 inches/23-30 cm in diameter – for a 6 ounces/180g piece of dough).

NOTE: Make only one pizza at a time.

During the tossing process, if the dough tends to stick to your hands, lay it down on the floured counter and reflour your hands, then continue the tossing and shaping.

In case you would be having trouble tossing the dough or if the dough never wants to expand and always springs back, let it rest for approximately 5-20 minutes in order for the gluten to relax fully,then try again.

You can also resort to using a rolling pin, although it isn’t as effective as the toss method.

11. When the dough has the shape you want (about 9-12 inches/23-30 cm in diameter – for a 6 ounces/180g piece of dough), place it on the back of the jelly pan, making sure there is enough semolina/durum flour or cornmeal to allow it to slide and not stick to the pan.

Or

11. FOR GF: Lightly top it with sweet or savory toppings of your choice.

12. Lightly top it with sweet or savory toppings of your choice.

Or

12. FOR GF: Place the garnished pizza on the parchment paper onto the stone in the oven or bake directly on the jelly pan. Close the door and bake for about 5-8 minutes.

NOTE: Remember that the best pizzas are topped not too generously. No more than 3 or 4 toppings (including sauce and cheese) are sufficient.

13. Slide the garnished pizza onto the stone in the oven or bake directly on the jelly pan. Close the door and bake for abour 5-8 minutes.

Or

13. FOR GF: Follow the notes for this step.

NOTE: After 2 minutes baking, take a peek. For an even baking, rotate 180°.

If the top gets done before the bottom, you will need to move the stone or jelly pane to a lower shelf before the next round. On the contrary, if the bottom crisps before the cheese caramelizes, then you will need to raise the stone or jelly.

14. Take the pizza out of the oven and transfer it to a cutting board or your plate. In order to allow the cheese to set a little, wait 3-5 minutes before slicing or serving.

garden100_2580

Garden Veggie Pizza with Paneer:

  • Tomato 1 sliced thin
  • Shallots 2 sliced
  • Garlic 2 cloves minced
  • Ginger 1/2 inch piece minced
  • Roasted Red Bell Pepper 1/2 sliced
  • Paneer 1/4 cup sliced
  • Sea Salt 2 tsp.
  • Chat masala 1/4 tsp.
  • Cilantro leaves 10-12 for garnish

Since sauce and toppings both were a MUST according to the rules…………my sauce for this was a very unusual one………if it can actually be called a sauce;)

Mix ginger, garlic and tomatoes. Add salt and let the whole thing sweat for 5-10 minutes. After we have some liquid in the mixture…….this becomes our sauce;). Spread this on the pizza base. Add shallots, roasted bell pepper and paneer.

In the 500F oven for 8 minutes. Remove from oven and garnish with cilantro leaves immediately and sprinkle with chat masala.

The result was absolutely delicious:) A great quick fix if you have pizza base ready.

Note: Chat masala can be bought at most Indian Stores. It is basically a tangy spicy mix.

Olives, spicy lentils, Paneer and cilantro Pizza

Kaheen ka eenth, kaheen ka roda………..Bhanumati ne Kumbha joda

(bricks from somewhere and pebbles from somewhere else, Bhanumati somehow made a house………….)

Diwali had some leftovers too:) Made Kachoris for Diwali and the (peethi) spicy lentils were left. They are a big favorite in my house as you must have seen in my previous posts:) Peethi Bhara Daal ka Dulha, Peethi ki Paronthi……….;)

peethi100_2582

The Recipe:

Spicy Lentils:

  • Urad daal/ split black lentils without skin 1 cup
  • Ginger 2″ piece chopped fine or grated
  • Oil 2 tsp.
  • Green chili 2 chopped fine
  • Red chili powder 1 tsp.
  • fennel seeds/saunf 1 Tbsp.
  • cumin seeds/jeera 2 tsp.
  • Fenugreek seeds/methi 1/2 tsp.
  • Garam masala 1 tsp.
  • coriander powder/dry cilantro powder/dhaniya 1 Tbsp.
  • Asafoetida/heeng powdered 1/2 tsp.
  • Dry mango powder/Amchur 2 Tbsp.
  • Salt to taste
  • Trader Joe’s Mixed Olive Bruschetta
  • Paneer 1/4 cup crumbled
  • Cilantro leaves 10-12 for garnish

For the spicy lentils, the lentils, ginger and green chillies are ground coarsely. They are then fried in oil with the rest of the spices.  These can be stored in the refrigerator for upto two weeks.

Bake the pizza crust for 5 minutes. Remove from oven. Spread the bruschetta mix , top with spicy lentils and paneer. In  the oven again for 6 minutes.

Out form the oven and garnish with cilantro leaves.

The son just loved this one. This is a strange combination but delicious………..trust me:)

By the way, here’s the snap of me trying to toss the dough. All rules satisfied;) I don’t think I know how to toss the dough at all but it was fun.

toss100_2578

That’s my flying Saucer……..

Thank you for a fun challenge Rosa. Have you checked other Daring Bakers’ posts on pizza as yet or not?? Don’t be late like me;)

Expenditure:

  • Bread Flour $ 2.68 ………from Kroger…………lots left
  • Paneer $ 4.49 …………from Indian Store ………………lots left
  • Total ………….$ 7.17 …………not bad at all:)

Posted in - Bread Flour, -Asafoetida, -Cilantro, -Coriander, -Cumin seeds, -Dry Mango Powder, -Fennel seeds, -Fenugreek seeds, -Garlic, -Ginger, -Olive Oil, -Olives, -Red Bell Pepper, -Red chili powder, -Tomato, Daring Bakers, Paneer, Shallots, Sugar, Yeast | Tagged: , , , | 6 Comments »