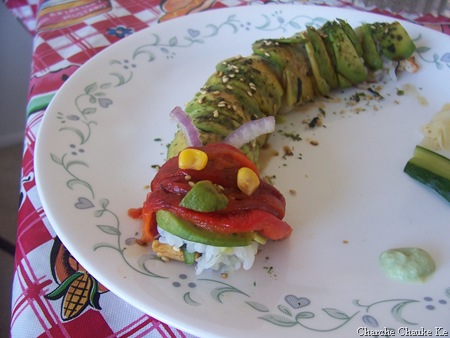
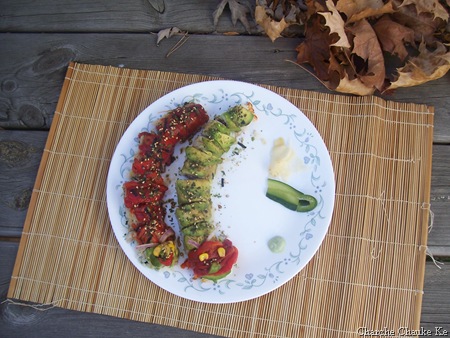
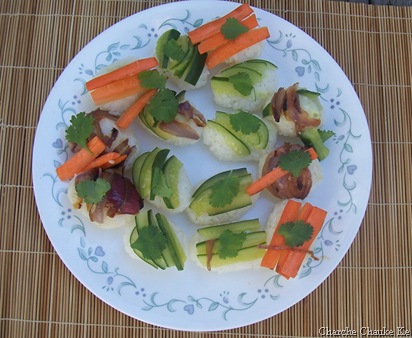
Top: Caterpillar Rolls , Bottom L: Nigiri Sushi and Bottom R : Spiral Roll
I have not been able to post earlier about the fabulous sushi Daring Cooks made this month. I love sushi and really had my fill making vegetarian sushi. I couldn’t say enough of ” This is so much better than store bought and I made so much so cheap” I found this month’s Daring Cook challenge the best so far. The instructions are quite precise so no chatter in this post. I was supposed to post on the 14th, ah well here I am …………
The November 2009 Daring Cooks challenge was brought to you by Audax of Audax Artifex and Rose of The Bite Me Kitchen. They chose sushi as the challenge.
Sushi (寿司 or 鮨 or 鮓) is much appreciated for its delicate taste and exquisite appearance. Sushi actually means vinegared rice, which is the essential ingredient in every sushi recipe. Sushi is simple and cheap to make at home, needs no special equipment and is an excellent way to use left overs.
Although sushi in various forms has been around for fourteen centuries, the modern version was invented in Japan in the 1800’s where a ‘hand-formed’ sliced fresh fish and vinegared rice ball was eaten as a snack food. Nowadays, sushi is made with various seafood, meats and vegetables, raw and cooked.
PART 1 : SUSHI RICE (makes about 7 cups of cooked sushi rice)
Preparation time: 1¾ hours consisting of :-
Rinsing and draining rice: 35 minutes
Soaking rice: 30 minutes (includes 5 minutes making the vinegar dressing)
Cooking and steaming time: 25 minutes
Finishing the rice: 15 minutes
INGREDIENTS:
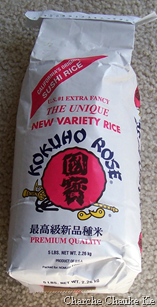
- 2½ cups uncooked short grain rice
- 2½ cups water
- For superior results use equal volumes of rice and water
Sushi Rice
Optional Ingredients
- 3 inch (75mm or 15 grams) square dashi konbu (or kombu) (dried kelp seaweed) wipe with a damp cloth to remove white powder & cut a few slits in the sides of the kelp to help release its flavors (I used Shimaya Instant Dashi Konbu powder …..I used only 1 tsp. in the water given……that’s what I got)
- 2½ teaspoons (12.5 mls) of sake (Japanese rice wine)
Sushi vinegar dressing
- 5 Tablespoons (75 mls) rice vinegar
- 5 Teaspoons (25 mls or 21 grams) sugar
- 1¼ Teaspoons (6.25 mls or 4.5 grams) salt
DIRECTIONS:
Rinsing and draining the rice
- Swirl rice gently in a bowl of water, drain, repeat 3-4 times until water is nearly clear. Don’t crush the rice in your hands or against the side of the bowl since dry rice is very brittle.
- Gently place rice into a strainer and drain well for 30 minutes.
Soaking the rice
- Gently place the rice into a heavy medium pot with a tight fitting lid (if you have a loose fitting lid use a piece of aluminum foil to make the seal tight).
- Add 2½ cups of water and the dashi konbu. (I used 1 tsp. instant powder)
- Set the rice aside to soak for 30 minutes, during this time prepare the sushi rice dressing.
Preparing the Rice Vinegar Dressing
- Combine the rice vinegar, sugar and salt in a small bowl.
- Heat on low setting.
- Stir until the mixture goes clear and the sugar and salt have dissolved.
- Set aside at room temperature until the rice is cooked.
Cooking the rice
- After 30 minutes of soaking add sake (if using) to the rice.
- Bring rinsed and soaked rice to the boil.
- Reduce heat to the lowest setting and simmer, covered, until all the water is absorbed, 12-15 minutes. Do not remove the lid during this process. Turn off heat.
- Let stand with the lid on, 10-15 minutes. Do not peek inside the pot or remove the lid. During this time the rice is steaming which completes the cooking process.
Finishing the rice
- Turning out the rice
- Moisten lightly a flat thin wooden spatula or spoon and a large shallow flat-bottomed non-metallic (plastic, glass or wood) bowl. Do not use metallic objects since the vinegar will react with it and produce sour and bitter sushi rice.
- Remove the dashi konbu (kelp) from the cooked rice.
- Use the spatula to loosen gently the rice and invert the rice pot over the bowl, gently causing the cooked rice to fall into the bowl in one central heap. Do this gently so as not to cause the rice grains to become damaged.
- Dressing the rice with vinegar
- Slowly pour the cooled sushi vinegar over the spatula onto the hot rice.
- Using the spatula gently spread the rice into a thin, even layer using a 45° cutting action to break up any lumps and to separate the rice. Don’t stir or mash rice.
- After the rice is spread out, start turning it over gently, in small portions, using a cutting action, allowing steam to escape, for about a minute.
- Fanning & Tossing the rice
- Continue turning over the rice, but now start fanning (using a piece of stiff cardboard) the rice vigorously as you do so. Don’t flip the rice into the air but continue to gently slice, lift and turn the rice occasionally, for 10 minutes. Cooling the rice using a fan gives good flavor, texture and a high-gloss sheen to the rice. The vinegar dressing will be absorbed by the hot rice. Using a small electric fan on the lowest speed setting is highly recommended.
- Stop fanning when there’s no more visible steam, and all the vinegar dressing has been adsorbed and the rice is shiny. Your sushi rice is ready to be used.
- Keeping the rice moist
- Cover with a damp, lint free cloth to prevent the rice from drying out while preparing your sushi meal. Do not store sushi rice in the refrigerator leave on the counter covered at room temperature. Sushi rice is best used when it is at room temperature.
* Tip: To make sushi rice: for each cup of rice use 1 cup of water, 2 Tbs rice vinegar, 2 tsp sugar, ½ tsp salt and 1 tsp sake. For superior results use equal volumes of rice and water when cooking the sushi rice since the weight of rice can vary. Weight of 2½ cups of uncooked rice is about 525 grams or 18½ ounces.
* Tip: While the rice is draining, soaking and cooking prepare your rice vinegar dressing, sushi fillings and toppings.
* Tip: Photo series on How to Cook Rice with a Pot
http://www.sushiencyclopedia.com/how_to_make_sushi/how_to_cook_rice_with…
* Tip: Photo series on How to Make Sushi Rice with Tools You Already Own
http://www.sushiencyclopedia.com/how_to_make_sushi/how_to_make_sushi_ric…
NOTES:
Sushi Rice – choose a short or medium grain rice. Do not use Arborio, long-grain, or parboiled white rice. Medium-grained calrose is a suitable rice. Rice expands (about 3 times) when cooked so make sure your pot is large enough. Washing the rice removes the rice flour that coats the rice and gives a fresh flavor and scent to the cooked rice. Look for rice that is labeled ‘sushi’ rice. Cooked sushi rice can be placed in plastic bags and frozen for 3 months, microwave when needed. Cooked sushi rice should be sticky, shiny and the individual grains of rice can been see. Price: AUS $4/KG.
Dashi konbu – or ( dashi kombu) – dried kelp, it looks like broad, leathery, wrinkly greenish ribbon often coated with a white powder. The darker green the leaves, the better the quality of kelp. Dashi konbu adds a refreshing light ocean taste to sushi rice. Price: AUS $1.50 for ten 3”(75mm) squares.
Rice Vinegar – this gives prepared sushi rice its unique clean, crisp taste. Do not use bottled “sushi vinegar” as it is too harsh and has a bitter after-taste. Look carefully at the label of the rice vinegar it should have NO SALT and NO SUGAR in the product. Apple cider vinegar is a good substitute if rice vinegar is not available. You can use mild white wine vinegar or mild red wine vinegar if you cannot find rice vinegar or apple cider vinegar. DO NOT USE NORMAL WHITE VINEGAR it is too harsh. Price: AUS $4 /500ml bottle.
Sake – Japanese rice wine. Do not use cooking sake or Chinese cooking rice wine, look for a reasonably priced drinkable sake. Refrigerate opened sake & use within two months. You can use vodka or a mild tasting gin if sake is not available. Price: AUS $10/500ml bottle.
Sugar – you can use mild honey or any other vegan substitute to give the equivalent sweetness.
PART 2 : Dragon Rolls (also called Caterpillar Rolls)
Preparation time: 30 minutes, plus 1¾ hours to make the sushi rice
Cooking time: about 5 minutes (grilling the eel)
Yield: 2 inside-out (uramaki) sushi rolls
INGREDIENTS:
- 1 sheet 7”x8” (17.5cmx20cm) of toasted nori (dried seaweed sheets), cut into halves
- 1/2 Japanese cucumber
- 2 cups of prepared sushi rice
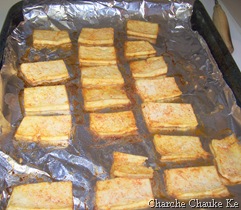
- 3 slabs tofu (sliced, seasoned with salt & paprika and baked at 400 F for 20 minutes)
- 1 Avocado
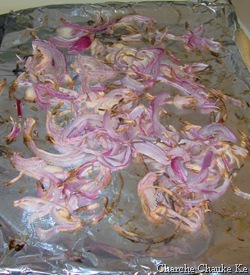
- 1 Red onion thinly sliced and broiled for 7-8 minutes
- Vinegared Water – ½ cup of water combined with a dash of rice vinegar
- Various small amounts of sauces to use as the flames of the dragon (or legs of a caterpillar)
Optional
- A mix of crumbled toasted nori, toasted sesame seeds and sugar and salt
Japanese Cucumber and salt paprika seasoned baked tofu
Oiled & Broiled thinly sliced red onions
DIRECTIONS:
1.Cut cucumber into strips ¼ inch (6mm) x 7” (175mm) long, then salt, rinse & dry the strips.
2.Grill (broil) the red onions for about 2-5 minutes until bubbling. Bake sliced seasoned tofu. Apply or spray some oil before baking.
3.Halve, pit and peel the avocado. Cut the avocado halves into thin even 1/8 inch (3 mm) slices. Fan out the cut avocado into a 7 inch (175 mm) overlapping pattern.
4.Cover bamboo mat with plastic wrap. Place a sheet of nori shiny side down, lengthwise, on the edge the mat.
5.Moisten lightly your hands in the bowl of vinegared water.
6.Place one cup of rice on the nori and gently rake your fingertips across grains to spread rice evenly. Do not mash or squash the rice onto the nori, the rice should appear loosely packed and be evenly distributed over the entire sheet, you should be able to see the nori sheet in a few places.
7.Flip the rice-covered nori over (so the bare nori is now on top) and place on the edge of the mat closest to you.
8.Slice tofu again in slices. Arrange sliced baked tofu across the length of the nori, not quite centred on it but a little closer to you. Place half the cucumber sticks & grilled onions next to the tofu.
9.Lift the edge of the mat closest to you with both hands, keeping your fingertips over the fillings, and roll the mat and its contents until the edge of the mat touches straight down on the nori, enclosing the fillings completely. Lift up the edge of the mat you’re holding, and continue rolling the inside-out roll away from you until it’s sealed. Tug at the mat to tighten the seal. If the rice doesn’t quite close the roll add more rice in the gap and re-roll using the mat to completely cover the inside-out roll. Place the roll on a damp, clean smooth surface.
10.Spread about 1 tablespoon of the optional sesame mix along the entire top of the rice-covered roll. Using the plastic covered mat gently press the fish roe so it adheres to the rice.
11.Slide a knife under one fan of avocado and transfer it onto the top of an inside-out roll. Gently spread out the avocado layer to cover the entire roll. Lay the plastic wrapped mat over the avocado-covered roll. Squeeze very gently to shape the roll.
12. Lay a sheet of plastic wrap over the roll. Slice the roll into 6-8 equal, bite-sized pieces, wiping your knife with a damp towel before each slice. Discard the plastic wrap. Repeat the above to make one more roll.
13.Arrange the cut pieces on a serving plate with the sauces so the finished dish appears as a dragon breathing fire and flames (or a caterpillar with many legs).
* Tip: The most common mistake is having too much filling the golden rule is less is more when it comes to making sushi it is easier to roll an under-filled roll than an over-filled roll.
* Tip: Dampen your knife with a moist lint-free towel before every cut – this prevents the sushi rice from sticking to your knife.
* Tip: Excellent videos on making Dragon Rolls
http://www.youtube.com/watch?v=pQZGRohVNFQ
http://www.youtube.com/watch?v=fo55iBN9FQs&feature=related
Caterpillar roll
Caterpillar rolls with pickled ginger and wasabi
NOTES:
Bamboo mat (makisu) – A 10 inch (25cm) square mat made of thin slates of bamboo tied together with string.
Substitutes: a thin magazine cut to size wrapped in plastic wrap or a few layers of parchment paper cut to size about 10 inch (25cm) square.
Nori – Sheets of seaweed (laver) processed into thin sheets about 7 inches x 8 inches (17.5cm x 20cm) in size. Always re-toast the nori sheet over a gas stove on low flame for 5 to 10 seconds, or place nori on a clean oven rack and bake it in a preheated 350F-degree (180C) oven for 30 seconds. Nori should be sealed tightly in a plastic bag and used within a few months. It can be stored in the freezer. Nori will deteriorate if left out of its sealed package so use quickly.
Substitutes: Thin cooked egg omelette cut to same size as a nori sheet (7 inches by 8 inches or 17.5cm x 20cm). Also soya bean wrappers, rice paper, tofu wrappers, dosas, crepes or an overlapping layer of thinly sliced cooked vegetables.
Japanese Cucumber – Japanese cucumbers are thin-skinned, seedless and contain much less water than normal cucumber.
Substitutes: English or hothouse cucumbers which have been peeled, de-seeded and salted as above. If not available try matchsticks of your favorite crisp vegetable.
Avocado –
Substitutes: If not available use slices of roasted capsicum (bell pepper), slices of roasted tomatoes, lightly cooked whole snap (snow) peas, slices of Japanese daikon radish or other cooked thinly sliced vegetables, or slices of ‘sushi’ grade fish such as tuna, yellow tail and red snapper; smoked salmon, pastrami, salami, various colour’s of fish roe, or various colour’s of sesame seeds.
PART 3 : Spiral Sushi Roll
This is easiest ‘decorative’ sushi roll.
Preparation time: 15 minutes, plus 1¾ hours to make the sushi rice
Yield: One Roll, cut into 8 pieces
INGREDIENTS:
- 2½ cups prepared sushi rice
- 2 sheets of toasted nori, each sized 7”x8” (17.5cmx20cm)
- Six assorted fillings, each filling should be the size of a pencil (see note below)
DIRECTIONS:
1.Join 2 sheets of nori by moistening the adjacent edges and overlapping them about ½ inch (12mm).
2.Place this double sheet shiny side down on a rolling mat, part of the nori will extend beyond the mat.
3.Using moist fingers place 2½ cups of rice on the nori and gently rake your fingertips across grains to spread rice evenly, leaving ¼ inch (6mm) nori showing on the both ends of the sheet. Do not mash or squash the rice onto the nori, the rice should appear loosely packed and be evenly distributed over the entire sheet, you should be able to see the nori sheet in a few places.
4.Using your fingers form six grooves (in the same direction that you will be rolling the mat) at even intervals across the bed of rice. Make the first groove about 2 inches (50 mm) from the edge of the nori sheet. Form the grooves by pushing the rice away, do not mash or squash the rice, leave a loose one grain layer of rice in the bottom of the grooves. Level the areas between the grooves where you have pushed the rice.
5.Place your fillings in the grooves. Fill the grooves a little higher than the surrounding rice bed.
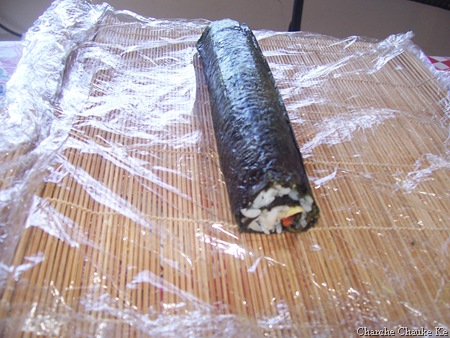
6.Then roll the sushi up from the edge closest to you, this will form a spiral pattern of nori, rice and fillings inside the roll.
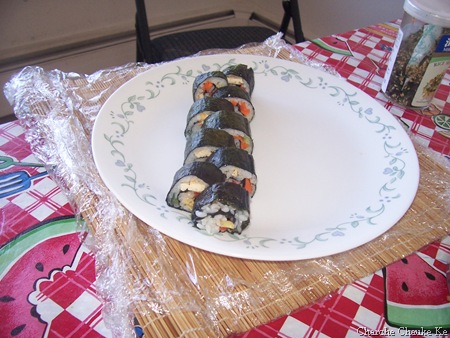
7.Slice into 8 pieces with a very sharp wet knife, wiping the blade with a damp cloth after each cut.
8.Place the pieces on a platter and garnish.
NOTE:
Make each groove about a finger-width wide they will hold about 1-2 tablespoons of filling. Use fillings that compliment each other and are highly colored. Use parboiled vegetables cut into strips, seafood, left over eel, smoked fish or chicken, whole cooked beans, edible flowers etc….
I used baked seasoned tofu, roasted red bell pepper, carrots, salted and drained Japanese cucumbers, omelette and grilled onions. Grilled vegetables in sushi is absolutely fabulous. Take my word and try it.
Spiral Roll
Spiral Roll
PART 4 : Nigiri Sushi
Nigiri sushi is the type of sushi most often made in sushi bars. In Japanese, nigiri means “squeeze”.
Preparation time: 30 minutes, plus 1¾ hours to make the sushi rice
Yield: 14-16 pieces of sushi
INGREDIENTS:
- 2 cups prepared sushi rice
- 8 pairs of assorted toppings, 200 gms/7 ozs total of fish, meat or vegetables (see note below)
- 1 tablespoon Wasabi (paste, reconstituted powder) or any other paste to adhere topping to rice
Optional
- Garnishes such as Ginger (pickled), chilli strips, vegetables flowers etc
- Thin strips of nori or vegetables (for tying topping on)
DIRECTIONS:
1.When handling sushi rice, make certain your hands are very clean. To keep the rice from sticking to our hands moisten your hands with vinegared water.
2.Form nigiri sushi by scooping up a small amount (about 2 tablespoons) of rice with your forefinger and second finger of your right hand and placing it in your cupped left palm.
3.Use the fingers and thumb of your right hand to form it into a long, narrow mound (about 2 inches x 1 inch wide or 50mm x 25mm) in your cupped palm.
4.Press enough to make the rice hold firmly together. Place the nigiri on a damp cutting board flat side down. Don’t let sushi touch or they’ll stick to each other. At this point, you can cover the sushi with plastic wrap, and they’ll keep at room temperature (not the refrigerator) for several hours.
5.Smear a thin line of wasabi on top of the rice and place the topping piece on it. You may need to press the topping down lightly with your fingers and adjust the shape of the rice accordingly to form an attractive piece of nigiri sushi. If your topping is very loose like fish roe you can place a strip of nori (higher than the rice) around the nigiri and form ‘battleship’ sushi. The cavity that the nori forms holds the topping so it does not fall off.
6.Garnish as desired and use strips of nori (or vegetable) to tie the topping to the nigiri if needed.
7.It is customary to make nigiri sushi in pairs, so make two of each variety.
* Tips: A great video on making nigiri sushi
http://www.howcast.com/videos/270-How-To-Make-Sushi
A great web page on slicing fish for nigiri
http://www.sushilinks.com/sushi-recipes/how-to-buy-fish/index.html
Nigiri Sushi topped with vegetables
NOTES:
Seafood nigiri must use sushi grade (sashimi grade) fish. Try tuna, red sea bream (red snapper), yellowtail or salmon. Cooked shrimp, cooked crab, cooked meat can also be used! You can use any vegetable you wish try asparagus, pumpkin, carrot, avocado, cucumber, shiitake mushroom, tofu, thin sliced egg omelette, etc… Thinly slice or julienne vegetables, parboiling if necessary tie on with a thin (1/4” or 6mm) strip of nori or vegetable strip wrapped around the whole sushi if needed..
*MOST IMPORTANT ADVICE YOU MUST READ THIS* – If you are using raw fish or raw meat it must be ‘sushi’ grade (sashimi grade) ask your fishmonger or butcher for advice and if in doubt don’t use. Find your local Japanese market and ask them where the best sushi (sashimi) fish is. Maybe you can buy sushi grade fish at your local sushi bar. Purchase flash-frozen sashimi grade fish which is guaranteed to be free of all parasites. Only salt-water fish and shellfish should be consumed raw. Crab and prawn (shrimp) should always be cooked. Sashimi grade fish should have a clean cool smell if it smells fishy it is a sign that the fish is old and cannot be used. If you are pregnant or have a weakened immune system only use cooked ingredients. There is no need to use raw fish or raw meat in sushi.
Resources
Written instructions on making various forms of sushi can be found here http://homepage3.nifty.com/maryy/eng/sushi_roll.htm
http://www.sushiencyclopedia.com/index.html
Expenditure:
Sushi Rice………………………….$6.49 for 5 lb……………….HuaXing Asia Store ……….plenty left
Sake……………………………….$2.32 for 300 ml…………….HuaXing Asia Store………..plenty left
Instant seaweed powder……………$2.59 for 64 g……………….HuaXing Asia Store……….plenty left
Japanese Cucumber………………..$0.5 for 2 ………………….HuaXing Asia Store………..gone
Tofu……………………………….$2.49 for 2.65 lb……………HuaXing Asia Store………..plenty left
Sesame,nori mix……………………$2.49………………………HuaXing Asia Store………..half left
Wasabi powder…………………….$1.69………………………HuaXing Asia Store………..half left
Pickled Ginger……………………..$2.99 for 12 oz…………….HuaXing Asia Store…………half left
—————————————————————————————————–
Total………………………………$21.56
Now you know why sushi is so expensive. Anyway this much money will make many many servings till you really get your fill of sushi like me. And yes, this was not all, I bumped into another car on my way out of the store and so this sushi turned out really really expensive.


