चर्चे चौके के Charche Chauke Ke

Hey! Join in the Kitchen Gossip!!

Archive for the ‘-Vegetable Oil’ Category

Black Bread

Posted by vivnidhi on September 7, 2009

100_3945

Russian Black Bread…We loved ours with pesto mayo sauce

The bread is black and I cheated too…….was that because I cheated………NO. Gorel of Grain Doe made a Russian Black bread this month for Bread Baking Babes. How she used a couple of recipes to invent this one is a very interesting read. I did not have any sourdough starter and used yeast….that’s my cheat ;-). Now, you think I would not buddy up those who bake bread?

It was such a different looking bread and I had never even heard of it, leave alone taste it.Result : We all loved it. Even when it started getting drier on the 4th day, the husband said ” I like it” :-). The recipe’s a keeper even if it requires more pre-planning than normal.

Black Bread – intermediate style

SOURDOUGH

  • Medium rye flour 300 g (10,6 oz)
  • Water 350 ml (1,5 cup)
  • Active sourdough culture* 2 Tbsp

SOAKER

  • Old bread**, toasted 100 g/3,5 oz
  • Coffee, ground 15 g/0,5 oz
  • Vegetable, neutral oil 25 g/0,9 oz
  • Molasses 60 ml/1/4 cup
  • Caraway seeds 2 tsp
  • Fennel seeds 1 tsp
  • Minced shallots 1 Tbsp

Water, hot 400 ml/1 2/3 cup

FINAL DOUGH

  • Medium rye flour 300 g/10,6 oz
  • High gluten bread flour 400 g/14,1 oz
  • Salt 20 g/0,7 oz (appr. 1 Tbsp)
  • Yeast
  • Fresh: 15 g/0,5 oz
  • Instant dry: 1,5 tsp (0,17 oz)

Soaker

  • All of the above
  • Sourdough
  • All of the above

* If you don’t have any active starter at hand, I think you can cheat by using a small amount (say 5 g fresh or 0,5 tsp instant dry yeast) instead.

**  Gorel used rye sourdough bread, but I guess any old unsweetened bread will do, or any old bread in general.

Sourdough

Mix the ingredients to the sourdough, cover the container with plastic and leave for 12–14 hours at room temperature.

Soaker

Toast the old bread in a toaster or in the oven. The bread should be browned, but absolutely not blackened. Dice the bread or just tear it in pieces and put it in a bowl. Add the rest of the soaker ingredients except the water. Heat the water to near boiling and pour over the soaker ingredients. Cover and leave for the same duration as the sourdough.

100_3937

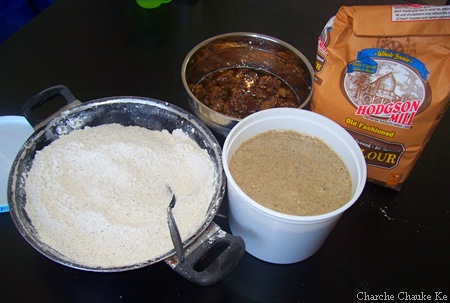
All set: Flour mix, Soaker and sourdough…and yes,  that’s my rye flour


Final dough

Mix the two flours in a separate bowl.

If using fresh yeast: Take a small amount of the soaker liquid and dissolve the yeast in it.

Add the yeast mixture OR the instant dry yeast, soaker, sourdough and salt to a mixing bowl.

Add half of the flour mixture and work the dough by hand or in machine. Continue to add about 100 ml or ½ cup of the flour mixture at a time and work until the flour is completely absorbed before you add the next round. The dough shall be firm but still quite sticky. You might not use all the flour, or you might need to add more flour, all depending on the flour used.

Place the dough in an oiled container, cover with plastic and leave for 2–3 hours or until doubled in size.

Shaping and proofing

Drizzle some rye flour on the table top and place the dough on top. If the dough is very sticky, pour just enough rye flour on top of it to make it possible to handle.

Divide the dough in two and shape the parts into oblong loaves. (I placed them on parchment paper to make it possible to just slide the loaves into the oven.) Stretch the surface using both hands to get a tight loaf. Use more rye if the dough is too sticky to handle.

Cover with a tea towel and leave for 60 minutes. Don’t over-proof! (Fire up the oven after 30 minutes to have it ready.)

100_3938

Sticky dough: After first proof

100_3940

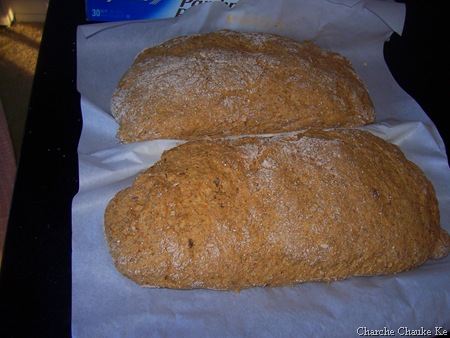
Does this sticky dough proof quickly, this is after 55 minutes

Baking

Place an empty metal container in the bottom of the oven. Put in your baking stone or an empty baking sheet. Heat the oven to 225 °C/435 °F.

Put 3–4 ice cubes in the metal container.

Move the loaves to the hot stone or sheet. Bake for 10 minutes.

Open the oven door to vent out some moist. At the same time, lower the temp. to 200 °C/400 °F. Bake another 30-40 minutes or until they sound hollow when tapped underneath, or when the inner temperature has reached appr. 97 °C/207 °F.

Let the loaves cool down before you slice them. Eat with butter and maybe some sharp cheese, or why not cured salmon.
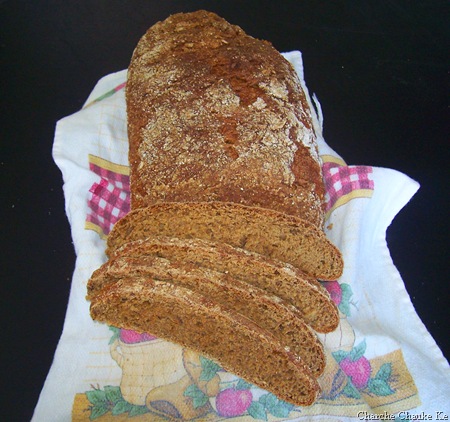
100_3941

Russian Black Bread

This bread made some delicious veggie sandwiches for us with mayo and pesto. Thank you Gorel.

I’d like to send this to Susan of Wild Yeast as my first YeastSpotting entry.

Posted in - Bread Flour, -Caraway seeds, -Fennel seeds, -Rye Flour, -Vegetable Oil, Baking Powder, Coffee, Old Bread, Shallots, Sugar, Yeast | 7 Comments »

More than a month late : Daring Bakers May: Apple Strudel

Posted by vivnidhi on July 5, 2009

This was the May’s Daring Baker Challenge. No, its not a case of dementia……..just pure procrastination. Its been strange strange past months, I would make Daring Bakers & Cooks challenges with a lot  of enthusiasm and then not post them. Everybody in the house seems to be suffering from a severe case of Writer’s Block. I really hope Lis and Ivonne don’t kick me out of the group. This month (whole of June), I sat and pondered and planned what I would do with the recipe……..but the truth is : I haven’t made it yet.

Anyway, often in life I have gone in my self-created shells and each time emerged stronger. So, I am hoping that the same would happen this time too. Cooking and baking has kept me sane all these years when I have not paid any particular attention to my career. I remember hearing somewhere (blame the radio for all my weird stories) that the happiest workers are those who work in creative fields. You bet, the only creativity I have is in the kitchen:-). This is the very thread that keeps me excited about the next day. When my mother was here a year back, she was surprised beyond belief to hear my then 2 year old son tell her all about Indian spices, where his Mom kept them, which utensils she used for what purpose.

Oh , now that I have blabbered about everything else, let’s get on with the strudel. I found it to be delicious and a perfect spring-summery light dessert.

Vanilla at 180 x 180 (largest)presents:

May_58

Mini Apple Strudel topped with candied apple peels and caramel sauce

The May Daring Bakers’ challenge was hosted by Linda of make life sweeter! and Courtney of Coco Cooks. They chose Apple Strudel from the recipe book Kaffeehaus: Exquisite Desserts from the Classic Cafés of Vienna, Budapest and Prague by Rick Rodgers.

Preparation time
Total: 2 hours 15 minutes – 3 hours 30 minutes

15-20 min to make dough
30-90 min to let dough rest/to prepare the filling
20-30 min to roll out and stretch dough
10 min to fill and roll dough
30 min to bake
30 min to cool

Apple strudel
from “Kaffeehaus – Exquisite Desserts from the Classic Cafés of Vienna, Budapest and Prague” by Rick Rodgers

2 tablespoons (30 ml) golden rum
3 tablespoons (45 ml) raisins
1/4 teaspoon ground cinnamon
1/3 cup plus 1 tablespoon (80 g) sugar
1/2 cup (1 stick / 115 g) unsalted butter, melted, divided
1 1/2 cups (350 ml) fresh bread crumbs
strudel dough (recipe below)
1/2 cup (120 ml, about 60 g) coarsely chopped walnuts
2 pounds (900 g) tart cooking apples, peeled, cored and cut into ¼ inch-thick slices (use apples that hold their shape during baking)

1. Mix the rum and raisins in a bowl. Mix the cinnamon and sugar in another bowl.

2. Heat 3 tablespoons of the butter in a large skillet over medium-high. Add the breadcrumbs and cook whilst stirring until golden and toasted. This will take about 3 minutes. Let it cool completely.

3. Put the rack in the upper third of the oven and preheat the oven to 400°F (200°C). Line a large baking sheet with baking paper (parchment paper). Make the strudel dough as described below. Spread about 3 tablespoons of the remaining melted butter over the dough using your hands (a bristle brush could tear the dough, you could use a special feather pastry brush instead of your hands). Sprinkle the buttered dough with the bread crumbs. Spread the walnuts about 3 inches (8 cm) from the short edge of the dough in a 6-inch-(15cm)-wide strip. Mix the apples with the raisins (including the rum), and the cinnamon sugar. Spread the mixture over the walnuts.

4. Fold the short end of the dough onto the filling. Lift the tablecloth at the short end of the dough so that the strudel rolls onto itself. Transfer the strudel to the prepared baking sheet by lifting it. Curve it into a horseshoe to fit. Tuck the ends under the strudel. Brush the top with the remaining melted butter.

5. Bake the strudel for about 30 minutes or until it is deep golden brown. Cool for at least 30 minutes before slicing. Use a serrated knife and serve either warm or at room temperature. It is best on the day it is baked.

Strudel dough
from “Kaffeehaus – Exquisite Desserts from the Classic Cafés of Vienna, Budapest and Prague” by Rick Rodgers

1 1/3 cups (200 g) unbleached flour
1/8 teaspoon salt
7 tablespoons (105 ml) water, plus more if needed
2 tablespoons (30 ml) vegetable oil, plus additional for coating the dough
1/2 teaspoon cider vinegar

1. Combine the flour and salt in a stand-mixer fitted with the paddle attachment. Mix the water, oil and vinegar in a measuring cup. Add the water/oil mixture to the flour with the mixer on low speed. You will get a soft dough. Make sure it is not too dry, add a little more water if necessary.
Take the dough out of the mixer. Change to the dough hook. Put the dough ball back in the mixer. Let the dough knead on medium until you get a soft dough ball with a somewhat rough surface.

2. Take the dough out of the mixer and continue kneading by hand on an unfloured work surface. Knead for about 2 minutes. Pick up the dough and throw it down hard onto your working surface occasionally.
Shape the dough into a ball and transfer it to a plate. Oil the top of the dough ball lightly. Cover the ball tightly with plastic wrap. Allow to stand for 30-90 minutes (longer is better).

3. It would be best if you have a work area that you can walk around on all sides like a 36 inch (90 cm) round table or a work surface of 23 x 38 inches (60 x 100 cm). Cover your working area with table cloth, dust it with flour and rub it into the fabric. Put your dough ball in the middle and roll it out as much as you can.
Pick the dough up by holding it by an edge. This way the weight of the dough and gravity can help stretching it as it hangs. Using the back of your hands to gently stretch and pull the dough. You can use your forearms to support it.

4. The dough will become too large to hold. Put it on your work surface. Leave the thicker edge of the dough to hang over the edge of the table. Place your hands underneath the dough and stretch and pull the dough thinner using the backs of your hands. Stretch and pull the dough until it’s about 2 feet (60 cm) wide and 3 feet (90 cm) long, it will be tissue-thin by this time. Cut away the thick dough around the edges with scissors. The dough is now ready to be filled.

Tips
– Ingredients are cheap so we would recommend making a double batch of the dough, that way you can practice the pulling and stretching of the dough with the first batch and if it doesn’t come out like it should you can use the second batch to give it another try;
– The tablecloth can be cotton or polyster;
– Before pulling and stretching the dough, remove your jewelry from hands and wrists, and wear short-sleeves;
– To make it easier to pull the dough, you can use your hip to secure the dough against the edge of the table;
– Few small holes in the dough is not a problem as the dough will be rolled, making (most of) the holes invisible.

May_67 

Milk Bread for bread crumbs

May_19

This is what happened to the bread

May_20

Sliced apples, flour, bread crumbs and chopped nuts

May_25

Here’s  the dough

May_27

This is what I could do with it

May_30

And, here’s  the result……yeah at least some of it

May_53

Decided that I do not like sliced apples, minced them up with the rest of the stuff and it stayed marinated in rum for a good 3-4 days…………:-)

May_54

Here’s the result …hot out from the oven

May_26

Oh..this is what I did with the apple peels………candied them 🙂 ………..sliced the peels, blanched them in boiling water for a bit, threw the water and then reduced them with sugar, spread them on parchment and let them dry. Topped them on the strudels in the last 5 minutes of baking. (My son could not stop eating these 🙂 )

May_63

Loved these mini strudels topped with candied apple peels and caramel sauce

Have a bite……

It’s a shame I did not post this scrumptious strudel on time even though I made and took pictures way before the challenge date. Yet I am posting it now:-). Hopefully I will post on time henceforth( don’t apply this to the June challenge for which I am late already:-) ). Thank you Linda and Courtney for a delicious challenge.

Expenditure: Zilch

I had everything at home, specially the big box of granny smith apples(approx. 20 lb for $2) I picked up at Joe’s Randazzo on my early morning finds.

Posted in - Bread Flour, -All Purpose flour, -Bread crumbs, -Butter, -Cider Vinegar, -Cinnamon, -Granny Smith, -Raisins, -Vegetable Oil, Alcohol, Daring Bakers, Sugar | Tagged: , , | Leave a Comment »

Rajma (Red Kidney Beans Curry)

Posted by vivnidhi on November 12, 2008

100-2681.jpg

Dried Red Kidney Beans

Rajma or Red kidney beans were rarely made in my house in India. It was a treat made, like, once in 6 months and that too……..with potatoes like a vegetable;) . My grandmother had a grave dislike for kidney beans for its flatulent tendencies. She also believed that its ‘taseer’ was hot. Now, that means that it was one of the foods that would cause excess heat in the body when eaten. The flatulence part of kidney beans cannot be disputed but I really don’t know much about “hot” and “cold” foods :). Anyway, kidney beans are quite a favorite with people from Punjab and Delhi. I believe that it is not that commonly eaten in Uttar Pradesh. I got a request a few days back from Lavanya, who wanted me to tell her how I made Rajma. Thank you for considering my recipe worthy enough to know. Well! this is how I make Rajma,it is mostly liked by all who have had to eat it. Try it out and let me know what you think. This blog is nearing its first anniversary which is BIG for me cause it’s hard to believe that I am still blogging:).

I ate Rajma a lot when I was suffering from Gestational Diabetes. This is one of  the few foods that women who suffer can eat without worrying about the numbers, as it has enough protein and folate AND is also filling:).One can have  2 servings, 1/2 cup each and that would equal approximately 30 g. carbs. At least this paired with 1 thin roti 6″ in diameter along with LOTS of lettuce and cucumber worked very well for me. This is when my lunch was restricted to only 45 g. carbs.  Since, I have gone through the pain of gestational diabetes and am a good candidate for diabetes in the future , I try to eat as much sugar as I can eat now:))…………………….NO, I am careful of my diet and I am sending this recipe to all diabetes conscious people:)  Sangeeth’s  Eat Healthy Fight Diabetes Contest of Art of Cooking Indian food and Raulillo OK’s Blogg Event: Gastronomical adventure 2008 on the occasion of World Diabetes Day on November 14th.

I have learnt to make decent Rajma from my Husband’s  Aunt who makes Rajma quite well. Never really sat and jotted down this recipe from her but I believe that mine turns out quite like hers now:).  The key points in a good rajma recipe is that the kidney beans should be well cooked (one should not need to apply pressure to break the beans (hey, we don’t want a paste either…..somewhere in between) ) and the gravy should not be watery.

The Recipe:

  • Red Kidney Beans 1 1/2 cups soaked for at least 4 hours or overnight
  • Vegetable oil 1 Tbsp.
  • Bay Leaf 1
  • Cinnamon stick 2″ piece
  • Onion 1 big chopped very fine
  • Ginger 2″ piece minced
  • Garlic 5-6 cloves minced
  • Green Chillies 2 chopped fine (add less for less heat, though this results in medium hot)
  • Cumin seeds (Jeera) 2 tsp.
  • Asafoetida (Heeng) 1/2 tsp. (optional)
  • Turmeric powder (Haldi) 2 tsp.
  • Coriander powder (Dhaniya) 2 Tbsp.
  • Salt to taste
  • Tomato puree/Tomato sauce 1 1/2 cups or about 4 medium sized tomatoes chopped fine
  • Water 3 cups
  • Garam Masala 1 Tbsp.
  • Kasoori Methi 1 Tbsp.
  • Cilantro leaves for garnish 1/2 cup

I used to boil the kidney beans prior to adding it to the gravy but now I have learnt that it is not a necessary step. With the help of a pressure cooker, a well soaked kidney beans gets cooked quite well in the gravy itself. Hence all the masalas can be directly fried in the pressure cooker itself. This recipe makes quite a lot of curry, but then who minds rajma leftovers?

Heat oil in the pressure cooker. Add asafoetida (which I add in addition to garlic to reduce the flatulence tendencies of the beans), cumin seeds, bay leaf, cinnamon stick and turmeric powder. Add finely chopped onion, ginger,green chillies and garlic. Fry it well, when this mixture starts to brown, add coriander powder, salt and tomatoes. Fry a little more till this mixture starts to dry out and one can specks of oil on the masala. If you are using fresh tomatoes, the tomatoes should be all mushy at this stage. In case the masala starts sticking to the pan, you can add 2-3 Tbsps. of water to it and stir well. Next add the kidney beans and the water. Close the pressure cooker. Keep the gas on high flame till you can hear the pressure being built up (approximately 2-3 minutes), then reduce the flame to medium low. I tend to cook until I hear 4 whistles (approximately 30 minutes).

When the pressure cooker can be safely opened, open it and check the salt. Add more if needed. If the curry is dry, one can add some warm water to the rajma or add plain water and heat the gravy well again. Now add the Garam masala and Kasoori Methi. Its a good idea to crush the kasoori methi between your palms as you add to the curry. Add fresh cilantro leaves just before serving.

Rajma Chawal (Red kidney beans with Rice) is quite famous and pairs beautifully but the last time I made Naan with it and so the rice had few takers:). In fact, the best quality of rajma is that it can be paired well with almost anything………roti, parantha, tortilla, bread…………:) Save leftovers in the refrigerator. This is ideal for freezing too, lasts a good couple of months in the Freezer and the taste remains the same. And yes, if you are short on kidney beans, by all means, add a potato to this recipe………..I sometimes do that just cause I want my mother’s rajma:)

nov-21.jpgEnjoy………Rajma

Posted in - Bay Leaf, - Turmeric, -Asafoetida, -Cinnamon, -Coriander, -Cumin seeds, -Garam Masala, -Garlic, -Ginger, -Green Chillies, -Kasoori Methi, -Onion, -Red Kidney Beans, -Tomato, -Vegetable Oil | Tagged: , , | 6 Comments »