चर्चे चौके के Charche Chauke Ke

Hey! Join in the Kitchen Gossip!!

Posts Tagged ‘Breads’

Chinese Flower Steam Buns (Xiang Cong Hya Juan Bao)

Posted by vivnidhi on October 5, 2009

Trust me, I do not know what half the title says but these are delicious!

sep2_21

Bad picture …….once again, but these are good!!

Bread Baking Babes have been steaming this month. Trying to produce the best flower buns and each one’s a looker. Mine’s not a looker but was so good. Karen of Bake My Day steamed up a recipe from Global Baker by Dean Brettschneider.

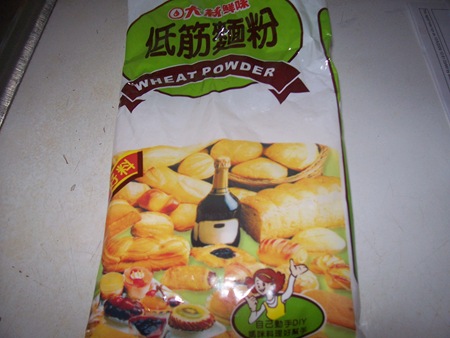
I read all the bread baking babes blogs before I went ahead with the recipe. This recipe calls for Chinese Flour which should be low gluten. I made a trip to our Chinese Store , got all the ingredients and that’s the best thing I did ;-). These came out perfect ……absolutely bread like……no chewiness……perfect soft breads. I was absolutely surprised….how could steaming create such fabulous buns……it was a transformation. Unfortunately, I do not have a cut shot, that would have said more than I can write. We were all so hungry, we just ate it up and forgot all about pictures :-). Anyway, bottom line, if you want to make these……get Chinese Flour :-).

oct_04

Low Gluten Chinese Flour……called “Weak Flour”

The Recipe:

makes 10 buns

Everywhere you go in China you see people eating steam buns, also known as mantong Typically Chinese, a sweet bread is combined with a savoury filling, such as red bean paste and barbecued pork, but take care and avoid using too much filling or the bun will fall apart during the rising and steaming stage. The baking powder helps to open up the texture and gives a little tenderness to the eating quality of the buns. If you can, use imported Chinese flour from a specialist Asian food market or store”.

Dough

300 g chinese flour (use low gluten flour such as cake flour)

15 g sugar

15 g butter

good pinch of salt

1/4 tsp baking powder

1/4 tsp active dry yeast

150 ml chilled water, placed in the refrigerator overnight ( I just put mine in  the freezer for 15 minutes )


Filling

rice bran oil, for brushing on dough (I used good old extra virgin olive oil 🙂 )

40 g finely chopped spring onions or chives

25 g finely chopped red chillies

salt to taste


To make the dough, place all the ingredients into a large mixing bowl and, using your hands, combine to form a very, very firm dough mass. Don’t be tempted to add any water or the steam buns will be flat after steaming.

Place the dough on a work surface and, using your rolling pin, roll out to a thin strip, fold this in half and roll again. Repeat this 10-15 times with a 30 second rest in between each time. This is a way of mixing a very firm dough, the dough will start to become smooth and elastic as a result of the rolling process.

Put the dough in a lightly oiled bowl and cover with plastic wrap. Leave in a warmish place (23-25C) for 15 minutes. Tip the dough onto a lightly floured surface. Using a rolling pin, roll out each piece to a 25cm square. {{this is strange…he never states that you divide the dough in this stage, so use and roll the one ball of dough you have}}

Brush the dough surface lightly with oil and sprinkle the chopped chives and chillies evenly over the dough. Season with salt.

Fold the dough in half and then cut into 2.5cm strips so that you end up with 10 folded strips. Stretch each strip and, starting at the folding edge, twist the two pieces of each strip over each other to form a rope.

Take the twisted rope and tie into a double knot, tucking the loose ends underneath. Place each bun with ends facing down on a 5cm square of non-stick baking paper** and cover loosely with plastic wrap. Prove for approximately 30-45 minutes in a warm place.

Bring a wok or saucepan of water to the boil with a bamboo steamer sitting on top. Remove the bamboo steamer lid and place the buns on the paper in the steamer 3-4 cm apart to allow for expansion during steaming. Replace the steamer lid and steam for 20 minutes. Repeat until all the buns have been steamed and are firm to the touch.

Karen‘s Notes: you might want to adjust the steaming time from 10-20 minutes, keeping the water at a low blub.

the paper: the pics in the book show him using paper circles, sort of perforated. (as in: paper circles with rather large holes in them). I’m using a regular steam pan with a metal insert and I preferred oiling the base of the metal insert not using any paper, re-oiling when needed. Another thing: I used a tea towel between the lid and the pan to catch any condensation.

I forgot all about the paper and just plain steamed mine. No problems ;-).

I am absolutely in love with garlic chives from Chinese store and so of course I got the authentic stuff.

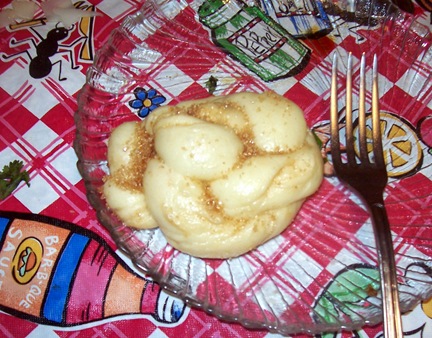
I also made a couple for the kids with turbinado sugar and they were gone in no time.

sep2_19

Chinese Flower Buns with Turbinado Sugar

I will certainly be making  these again. Thanks a lot Karen.  All I wish is that the recipe would at least not have butter and sugar in grams. It’s painful to measure such small quantities in my manual scale which has been even suffered in the hands of my kids 🙂 .

Expenditure:

Chinese Flour…….500 g……….. Chinese Store (Hua Xing)………….$ 2.39

Chives…………….1.03 lb……….Chinese Store (Hua Xing)………….$ 2.21

————————————————————————————————–

Total……………………………………………………………………..$ 4.60

Posted in --Extra virgin olive oil, -Chinese Flour (low gluten), -Garlic chives, -Olive Oil, -Red Chillies, -Turbinado Sugar, Baking Powder, Sugar, Yeast | Tagged: , , , | 1 Comment »

YES….Asparagus bread with Parmesan cheese and Walnuts and uh… Arugula

Posted by vivnidhi on June 26, 2009

It’s been a long time that I wrote anything on the blog. Not even posting more photographs of the gnocchi , not posting about the daring bakers and cooks challenges. Past couple of months have been absolutely crazy. It’s an absolute surprise how time flies by, really…….doesn’t the time ever get tired of just ticking. Oh, I get crazy running after it, never really making it. I want to be on top of situations and reach appointments early……….but the reality is …I am mostly running late. If I wake at 5 am in the morning, the day and the task list gets longer……..I start thinking…..”Oh, why didn’t I wake up at 4″ And……I don’t even work outside the house……..I don’t know what is wrong and do I even have the time to think of it…..ha?

Anyway, now that I have opened up my heart, written a full paragraph without interruption……….(ah, lets not count the fact that I have a fidgety 1 year old who landed up on my lap scribbled a little on the table till I actually handed her “writing book”) OK OK……focus, focus………I just had to break my silence on the blog and I have been so excited this past month about the Bread Baking Babes.

I baked the bread they blogged about and it just tasted superb. I had to blog about it and yeah………..today is the last day if I want the badge. I always manage doing things…….it’s ok if on the last minute. A friend a few years back illuminated me about the JIT….Just in Time Theory. Well, I am a perfect practitioner.

June1_68

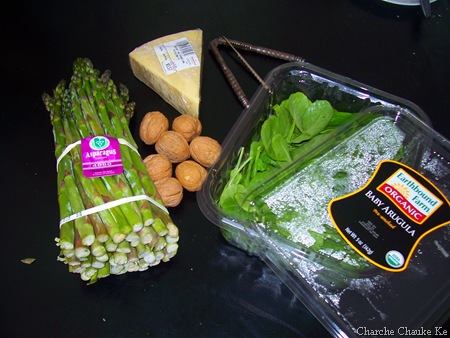
Asparagus, walnuts, parmesan cheese and baby Arugula/Rocket

I was going to bake this month’s BBB bread no matter what cause I love baking breads and these folks bake great looking breads:-) . I was out of almost every bread baking ingredient so I bought a lot of stuff. It was fun. Baked the bread yesterday…..and was really thankful that it was not difficult. The only added activity for me was shelling the walnuts but I better use them before they go bad.

The Recipe:

Asparagus Bread (with Parmesan Cheese and Walnuts)

2 small loaves

This bread goes very well with a cold meat and salad buffet.

125 g green asparagus ……..9 pieces for me

25-30 g rocket

50 g walnuts,

50 g freshly grated parmesan cheese

450 g strong bread flour (you can also use half whole wheat and half white or white whole wheat if you can get that)

12 g fresh yeast or 1 1/4 tsp dry instant yeast

250-270 g water

25 g olive oil…….1 1/2 Tbsp for me

10 g (sea) salt………….1 1/2 tsp. for me

  • Boil 3/4 liter of water with a pinch of (sea) salt. Clean the asparagus, set two of them aside, cut the rest into 4 pieces. Boil these pieces for 2 minutes in the water, scoop them out (so you can use the water for the rocket as well) and rinse under cold water (to stop them cooking).
  • Put the rocket in the boiling water for a few seconds (until wilted), drain and rinse under cold water and drain again.
  • Press the water our of the rocket, chop it coarsely and cut the asparagus into 1/4 inch (± 1 cm) long pieces, set aside.
  • Crush the walnuts coarsely and grate the parmesan.
  • Measure the flour and yeast in a large bowl, mix in most of the water and knead for a few minutes (on low speed), add the olive oil and knead for 10-12 minutes. Add the salt and knead on medium speed for 5 minutes until very elastic.
  • Let the dough rest for 10 minutes. Work the asparagus pieces, rocket, walnuts and parmesan in with care so that they’re evenly distributed. The dough should be very supple and elastic, hence the long kneading time. For me the best way to incorporate all the ingredients is to spread the dough out into a large slap, sprinkle all the ingredients on and roll it up. Let it rest for 5-10 minutes, press flat and fold… rest 5-10 minutes press flat and fold. Shape into rounds.
  • Place the dough in a greased container, cover and let rise for about 2 hrs.
  • Divide the dough into 2 equal parts.
  • Make round balls, cover with a tea towel and let rest for 10 minutes.
  • Flatten the balls and fold into taut breads with slightly tapering ends. Lay one asparagus in lengthwise in the middle of the bread and press in slightly. Sprinkle with wheat flour and cover to rise for 70 minutes or until doubled. Before baking you can sprinkle a little grated cheese on the bread if you like (optional).
  • Preheat the oven (preferably with stone) to 460ºF.
  • Place the loaves directly on the stone. Spray with water (or poor some hot water in a metal container on the bottom of the oven that you preheated to create steam)
  • Lower the temperature after 5 minutes to 400ºF. Open the door after another 10 minutes to let some air in. Repeat twice during baking.
  • Bake for 40-45 minutes and cool on a wire rack.

(adapted from: “Artisan Bread” -Jan Hedh)

Original post can be found on the blog “Notitie van Lien” ©2009.

www.notitievanlien.blogspot.com

I used half whole wheat and half bread flour. I followed the recipe exactly except for these changes: Mixed with hands, mixed flour, yeast , salt and water together and then knead in oil.  After letting the dough rest for about minutes, I incorporated the greens and walnuts , shaped the dough and left it to rise. No excessive resting allowed in this house. Next I shaped the bread for final rising on the sheet I was going to bake it in. I do not have a stone, so I baked the breads on a normal baking sheet. Sprayed some water on the loaves before baking and baked for 40 minutes. The bread tasted fabulous. One thing I’d change about my recipe is that I would spread some cornmeal instead of the whole wheat flour I put under the loaves as I was in a rush (always!!)

One more note about the ingredients: I should admit that I am not an asparagus fan at all and the husband has very limited likes in the vegetable world. But, what do you do if you have an adamant wife determined to put all kinds of vegetables on the plate:-) ? And the husband can’t even complain these days cause the 31/2 year old catches it instantly …….”even Papa doesn’t like broccoli” . So, I these days find the husband eating broccoli and actually saying  that he likes it:-)………even when there are other choices:-). Ok, gist of the matter…..everybody at home enjoyed the bread thoroughly. This is a delicious bread, do try it…..and it’s even good for beginners as the recipe is so simple. Thanks Lien!

June1_69

After the second rise, before baking

June1_70

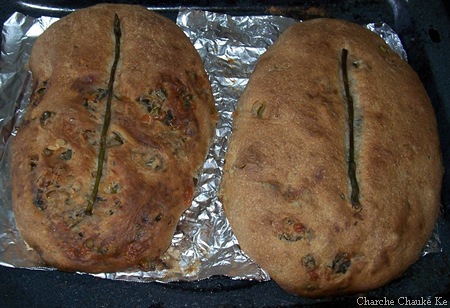
Baked loaves

June1_76

Pick a slice………….

Expenditure:

Asparagus………………….1.57 lb. …………$3.12 ,        from Busch’s………lots left

Arugula……………………5 oz………………$ 3.99        from Busch’s………lots left

Argentine Parmesan……..0.62 oz……………$5.57          from Busch’s………lots left

Whole wheat flour(KA)…. 5 lb………………..$3.22          from Walmart…….lots left

Bread flour………………..5 lb……………..$2.64         from Walmart…….lots left

——————————————————————————————————–

Total………………………………………….$18.54………..

That’s an expensive bread! The pleasure I got out of baking and eating it……….priceless……


Posted in - Bread Flour, -Arugula/Rocket, -Asparagus, -Olive Oil, -Walnuts, -Whole wheat flour | Tagged: , , | 6 Comments »

Cucumber Parsley Focaccia with spicy whipped Butter

Posted by vivnidhi on August 5, 2008

100_2165

Parsley & cucumber for bread

Yes, cucumber focaccia. Unusual, but delicious:). Focaccia (pronounced foe-ca-chia) is a popular flatbread which was originally made without a leavening agent but now some small amount of yeast is added to it. More history here.

Did you know that a full refrigerator actually cools more efficiently than an empty one. Here’s a link  that says so and I know it for sure:). 2 pickle cucumbers, for which I even paid more; froze in my fridge cause the refrigerator was full. It had hardly been a day that I bought them and I felt quite sad looking at them. I wanted to eat bread that day and this bread just happened but it tasted really great.

Pickle cucumbers are the normal ones in India but called pickling cucumbers in the USA. This is certainly among the best breads I have baked.

The Recipe:

For the Bread:

  • Cucumber puree 3/4 cup
  • Curly Parsley 1/2 bunch washed and minced (cut really small, I used my small food processor)
  • All Purpose Flour 1 cup
  • Whole wheat flour 1 cup
  • Instant dried yeast 1 1/2 tsp.
  • Honey 1 1/2 tsp.
  • Cumin powder 1 tsp.
  • Oregano 1/4 tsp.
  • Salt 1 tsp.
  • Olive oil 3 Tbsp.

For the whipped Butter:

  • Butter 1/4 cup
  • Red chilli powder 1/2 tsp.
  • lime juice 1 tsp.
  • salt to taste

Peel and puree the cucumber.Do not throw the cucumber water away. Mince the cleaned and dried parsley. Keep cucumber and parsley aside.

In a big bowl, mix the flours together and make a well. In the well add yeast and honey.

Warm the cucumber a little more than lukewarm. Add the warm cucumber and the rest of the ingredients. Knead really well. The dough will be sticky in the beginning but keep working on it. It will dry up and become elastic. Remove the dough, oil the bowl with an extra tsp of oil , place the dough in  the bowl and cover with cling wrap. Keep in a dark draft free place for 1 hour. Let it rise till almost double in size.

Punch the dough after 1 hour. Prepare a round 9″ cake pan by spreading a Tbsp. of butter on it and then adding some dry flour on it. Spread the dough with your finger tips till covers the pan. Brush some olive oil on the top of the dough. Cover with cling wrap and leave it to rise again for 45 minutes to 1 hour.

Preheat the oven to 350 degrees Fahrenheit. Place the ready cake pan into the oven and bake for 25-28 minutes till the top of the bread turns golden.

For the spicy butter, whip all the ingredients well. First taste without adding any salt if you are using salted butter and then adjust the salt per your liking.

Extremely fresh tasting and delicious cucumber focaccia is ready:)

Here’s a taste for the eyes:

100_2191

Cucumber Parsley Focaccia

100_2199

A small bite with spicy whipped Butter

My cucumber parsley focaccia is on its way to image Original Recipe organized by Culinarty .

And, my bread will be well packed for the picnic basket to image Waiter There’s Something in my……….Picnic hosted by Johanna of thepassionatecook. I love the name:)

Posted in -All Purpose flour, -Cucumber, -Cumin seeds, -Oregano, -Parsley, -Whole wheat flour, Yeast | Tagged: , , , | 9 Comments »

Beginning with the staple: The ROTI

Posted by vivnidhi on November 19, 2007

My first post. Starting with the very basic……the staple in our house. Carb watching for me and cholesterol watching for my husband has already led to the roti being the only flour preparation made everyday. Paranthas, naans, all are enjoyed only rarely, when we like to treat ourselves.

100_10321.jpg

Hot Rotis stay fresh in aluminum foil

Rotis or phulkas need no introduction whatsoever. But the art of making them is really THE skill to know in the chauka (kitchen).  It used to be an accomplishment when my roti too would puff like my Mom’s. Her standards are still too high for me. If left on my own, I would make my family members eat all the rotis I made till they got to eat the properly puffed up one (which would be rare.)

That changed after marriage when I would quietly eat all the messed up ones or the ones which were charred and give only soft puffed up ones to my husband. So, even though I could make rotis in India, making them in the U.S. required another set of skills as we had an electric stove in our apartment. I can’t wait to see my mother struggle with her first couple of rotis when she comes here……..mean, I know, yet I am amused, even by that thought.

First, one needs whole wheat flour. Durum flour is a complete no no as far as I am concerned if one really wants soft which also stay soft until the next day. Sujata is the only brand I get here in Indian grocery stores although Pillsbury is as good.

Next you need a griddle, metal mesh (to prevent the roti from burning on electric coil) and a rolling pin.

Recipe:

4 cups flour

1 3/4 cups water

That’s it, yes. I don’t add salt cause I have always eaten roti this way. Enjoy the basic wheat taste. For the dough, I use a big plate with raised edges….called ‘paraat’ in India but I guess any vessel with high edges can be used. Spread the dry wheat flour in the plate and I sprinkle half the amount of water in the flour. Using circular motion of my hands, I try to wet all the flour. Then I start gathering the flour together and keep sprinkling more water as needed. After the dough gets together, hands’ knuckles and the small of the palm is used. 2-3 oz of extra water may be used during the process of kneading, if one finds it comfortable. A clean plate is a sign of just the right dough. If by chance, it gets very sticky, more dry flour needs to be added.  The softer the dough, the better, I just make sure that it can be rolled properly. Punching the dough well with hands and using the knuckles also helps.  A drop of oil is spread in the plate in the end and the dough is kneaded on it till it absorbs all oil. The dough is ready.I make a fair amount of dough  and keep it in the refrigerator and it lasts me for about 4 days. It does change color and become darker but the rotis come out just as good.

100_0997.jpgv

Roti dough with dry flour for dusting.

100_0999.jpg

Divide the dough into equal rounds. Here’s my 2 year old trying to help me out.

100_1000.jpg

Smaller rounds make thin phulkas ..closer to perfect. Dust the round with dry flour and begin rolling using a rolling pin on a flat surface.

100_1001.jpg

Uniform thickness of the rolled out roti is the key to it being puffed up later. Try to roll out away from the center of the ball.  Make sure that the edges are of the same thickness as the center after the roti is rolled out completely.

100_1002.jpg

I try making a thin round; one can suit one’s taste

100_1003.jpg

I keep the metal mesh under the griddle so that it heats up sufficiently as well. The griddle is heated before one starts rolling out the dough round. If the roti sticks on the griddle, then the griddle is too hot, reduce the heat. If the griddle is not hot enough, the surface visible will take longer to develop bubbles. Usually the burner stays on maximum heat when I make rotis, reducing it in between if the next roti is not rolled out already.

100_1006.jpg

Once some bubbles seem to develop on the underside of the roti on the griddle, it is turned over. Tongs can be used for this but hands work as well. This is the first turn.

100_1029.jpg

This is after the first turn. Its fine if you if it does not get this brown.

100_1009.jpg

Using the smaller burner helps. Next the griddle is removed and the roti is directly put on the wire mesh. Elevate the wire mesh after putting the roti on it. The heat has to be at the maximum when I put the roti directly on the coil.  Give the roti a jump and flip it over if it is not puffed up fully. Both sides need to get a few brown spots. 100_1030.jpg

The Phulka’s ready!!

Similar procedure can be used for making rotis on gas stoves. http://www.ifood.tv/recipe/roti is a good video through wikipedia.

Posted in -Whole wheat flour, The staple | Tagged: , , | 15 Comments »