चर्चे चौके के Charche Chauke Ke

Hey! Join in the Kitchen Gossip!!

Posts Tagged ‘Sweets’

Gujiyas (Indian Fried Pies or sweet empanada)

Posted by vivnidhi on March 21, 2010

100_4177

Gujiyas

This post has been lying in my drafts for months now. Yes, my dear blog turned two this November but I could not post anything or even celebrate for that matter. To make the long story short, we all kept falling sick and prey to almost all the bugs around. This certainly has been a very healthy year for the bugs, specially in Michigan. Let me shut the hypochondriac in my brain who wants to enlist every detail of the past months, starting from the no. of coughs per minutes to the boxes of tissues used and move on to better things I can share with you.

In December I attended Michigan Lady Food Bloggers (MLFB) cookie exchange which was real fun.The no. of cookies I brought back home cheered everyone like nothing else could. Check out  Kate’s blog for the photographs and you can absolutely drool at ALL the cookies ….. All the cookies were delicious! I made (as usual) roasted almond macarons with chocolate ganache. I think almost all got over baked. Yet, with all that sugar, how bad can a badly baked macaron taste ?…….so it wasn’t too bad 🙂 .

Moving on…….to an authentic old Indian treat “Gujiya” . I have interesting stories up my sleeve regarding the gujiya or pirakiya.  I grew up watching my Grandmother (Dadda)  and my Mother make gujiya for most festivals. Dadda would always fill it and close it while my Mom would make the dough, the filling and even fry it. My Mom cannot close a gujiya, she never felt the need to learn it 🙂 . Closing the gujiya or making the ‘curved pattern’ is called “Murri Banana” meaning making murri. The good thing is that I know how to make murri somewhat. [You bet, as if  I will leave the chance to brag 😉 .]  In my grandmother’s generation, when a girl (Indian girls then would be married at a very early age i.e. 13-14…..I am talking 1930’s) would be married, she would be asked to make gujiyas and the way her gujiya looked and tasted would be a measure of her competence in the kitchen. As I heard this story almost every year, I thought I better learn to make it well (lest I be judged on the same basis 😉 ) and so I coaxed Dadda to teach it to me. Well! till my last gujiya making stint with her, she was never really pleased with my murri. She always said mine was ok cause it would not open up but I could do better.  So, see I could have actually done without bragging 🙂 . There’s always a gujiya mold available in Indian stores which seals the gujiya well and one need not make murri etc. but I have never used it. An Empanada mold would be perfect too.

Fast forward to my first year after marriage…….the first year on Diwali, I planned to make gujiyas. I really thought to myself,”big deal” I have always helped Dadda and Mummy make it. I made a few and took them to the husband’s aunt (Masiji’s ) place. Oh, were they sweet(no, not the gujiyas……..my husband’s Aunt & Uncle)….. my gujiyas were really soft and I have blanked out on the filling now. Masiji just put all the gujiyas in the oven and I think transformed it into something edible somehow. Then I kept making gujiyas every year and I doubt I ever really got it right. Either the dough would be soft or I would fry on a higher temperature or I would play with the filling , I was always unsatisfied and a bit hesitant to offer it to others. 3 years later came my Mother-In-Law who actually taught me how to make the real thing. Since then, I have been successful consistently. Nothing beats practice.

The Recipe: (For about 30 gujiyas)

For the Shell:

  • 2 cups All Purpose Flour
  • 4 Tbsp. Canola Oil
  • 1/4 cup Water + /- 2 Tbsp. water

For the Filing:

  • 200 g Khoya/Mava (Indian cooked dried milk) cut in small cubes
  • 1/2 cup dry fruits (cashews, almonds, pistachios) slivered, sliced thin
  • 1/4 cup raisins (green/golden ones are preferable )
  • 1/2 cup sugar
  • 1 Tbsp. Cardamom powder (I even crush the cardamom seeds using a rolling pin when in hurry)
  • Canola/Vegetable  Oil for frying

For the binder:

  • 2 Tbsp. All Purpose flour
  • 1/4 cup water

To make the shell dough:

Add the oil to the all purpose flour and rub the mixture between the palms of your hands. The oil should be uniformly distributed in the flour and should resemble fine bread crumbs.

Add the water slowly to the flour and make a stiff dough. It is important to knead the dough well for good gujiyas. A good tip for all such dough is to set aside a tsp. of oil initially and then at the very end add it in a corner of the plate you are using to knead. The dough is then broken in 2 -3 pieces and then made smooth by touching those pieces with the oil in the corner till all the oil is absorbed. Cover the dough and let it rest for 1/2 an hour while the filling is prepared.

100_4090

Stiff gujiya dough

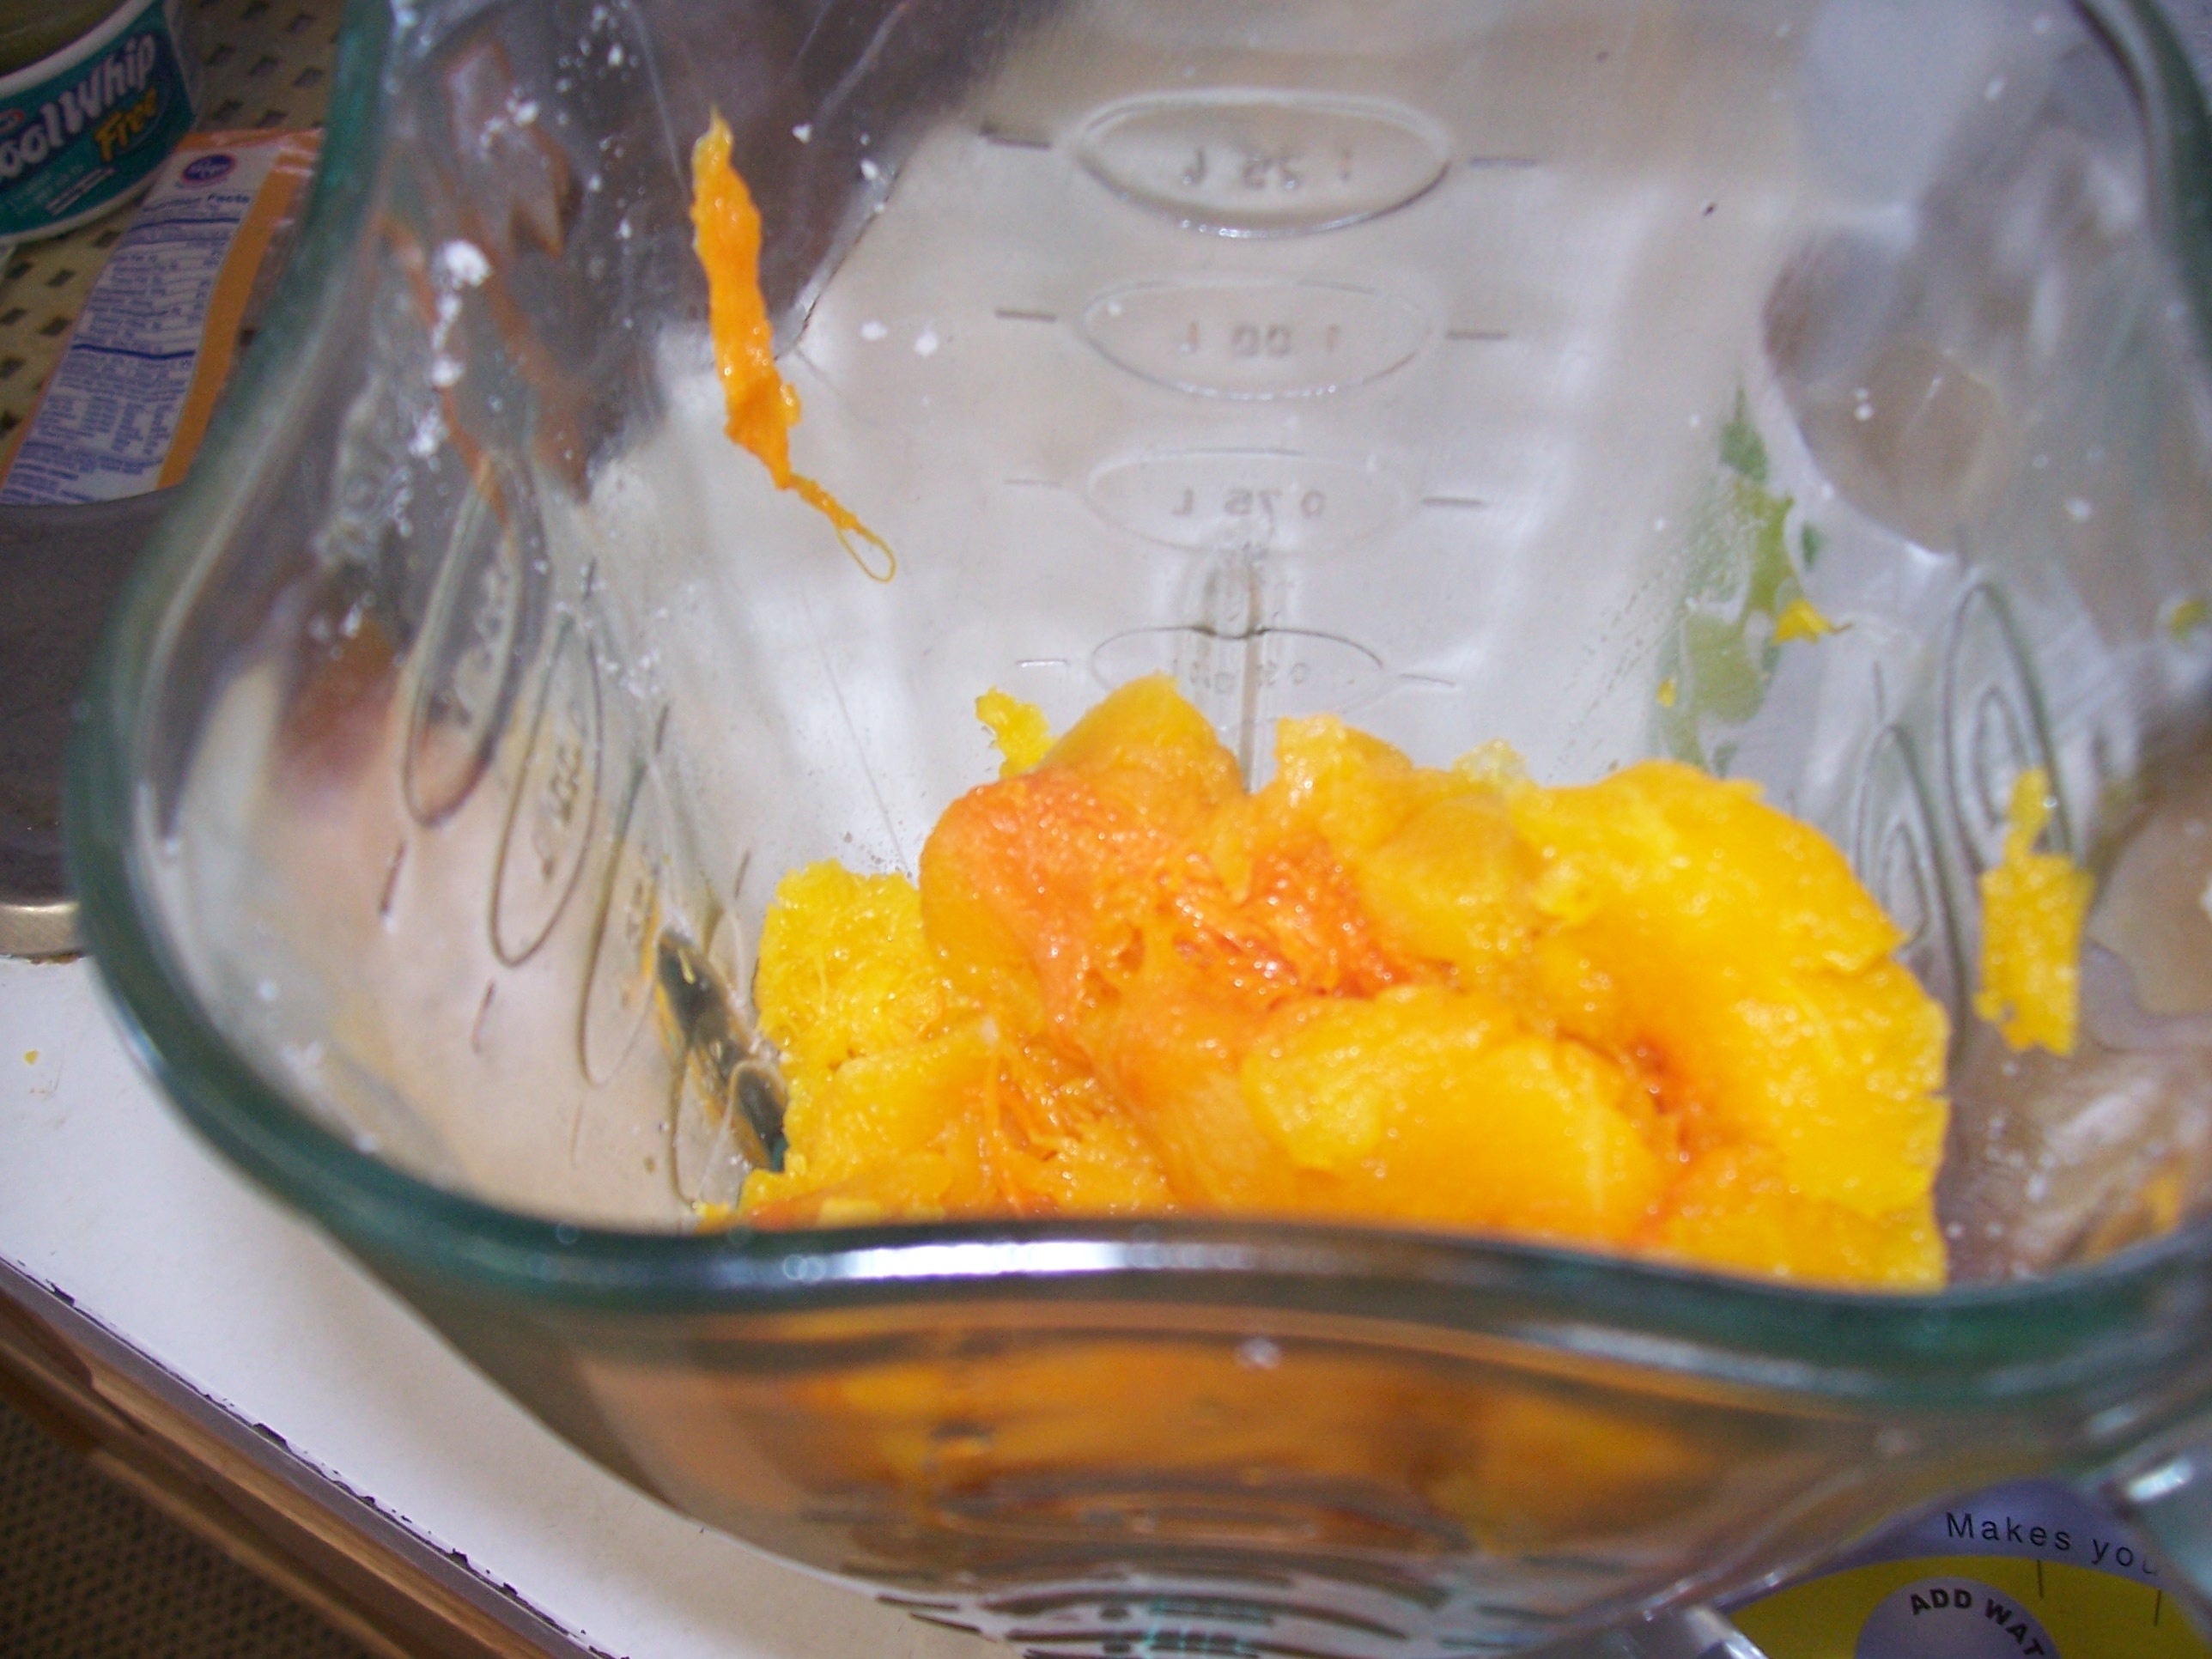
To make the filling:

Heat a wok or a saucepan on medium heat (no. 5 mark) and add the khoya (milk solids) in it.

Use a spatula to break the big lumps of the khoya.

Keep frying the khoya till it turns golden brown. The heat can be reduced a little bit if you are not able to stir all the khoya to (no. 4 mark). Once the khoya turns brown, add the nuts, raisins and cardamom powder.

Let the mixture cool and then add sugar to the mixture. The sugar amount can be varied as per taste too.

100_4072 100_4073

Store bought Khoya / Mawa

100_4076

Khoya cut into cubes

100_4078

Adding nuts and raisins to fried Khoya….we do not want to brown it too much at this stage

100_4079

Khoya, nuts, raisins and cardamom…….filling’s ready…it will be crumbly when dry


To make the Gujiyas:

First prepare the binder paste by mixing the all purpose flour and water. Set it aside.

The dough should be more pliable now as it has rested (goes same as humans 😉 ). Break the dough into 30 equal parts and keep rounding them with your palms as you are breaking. Cover the broken and rounded dough with a moist cloth so that they do not dry too much.

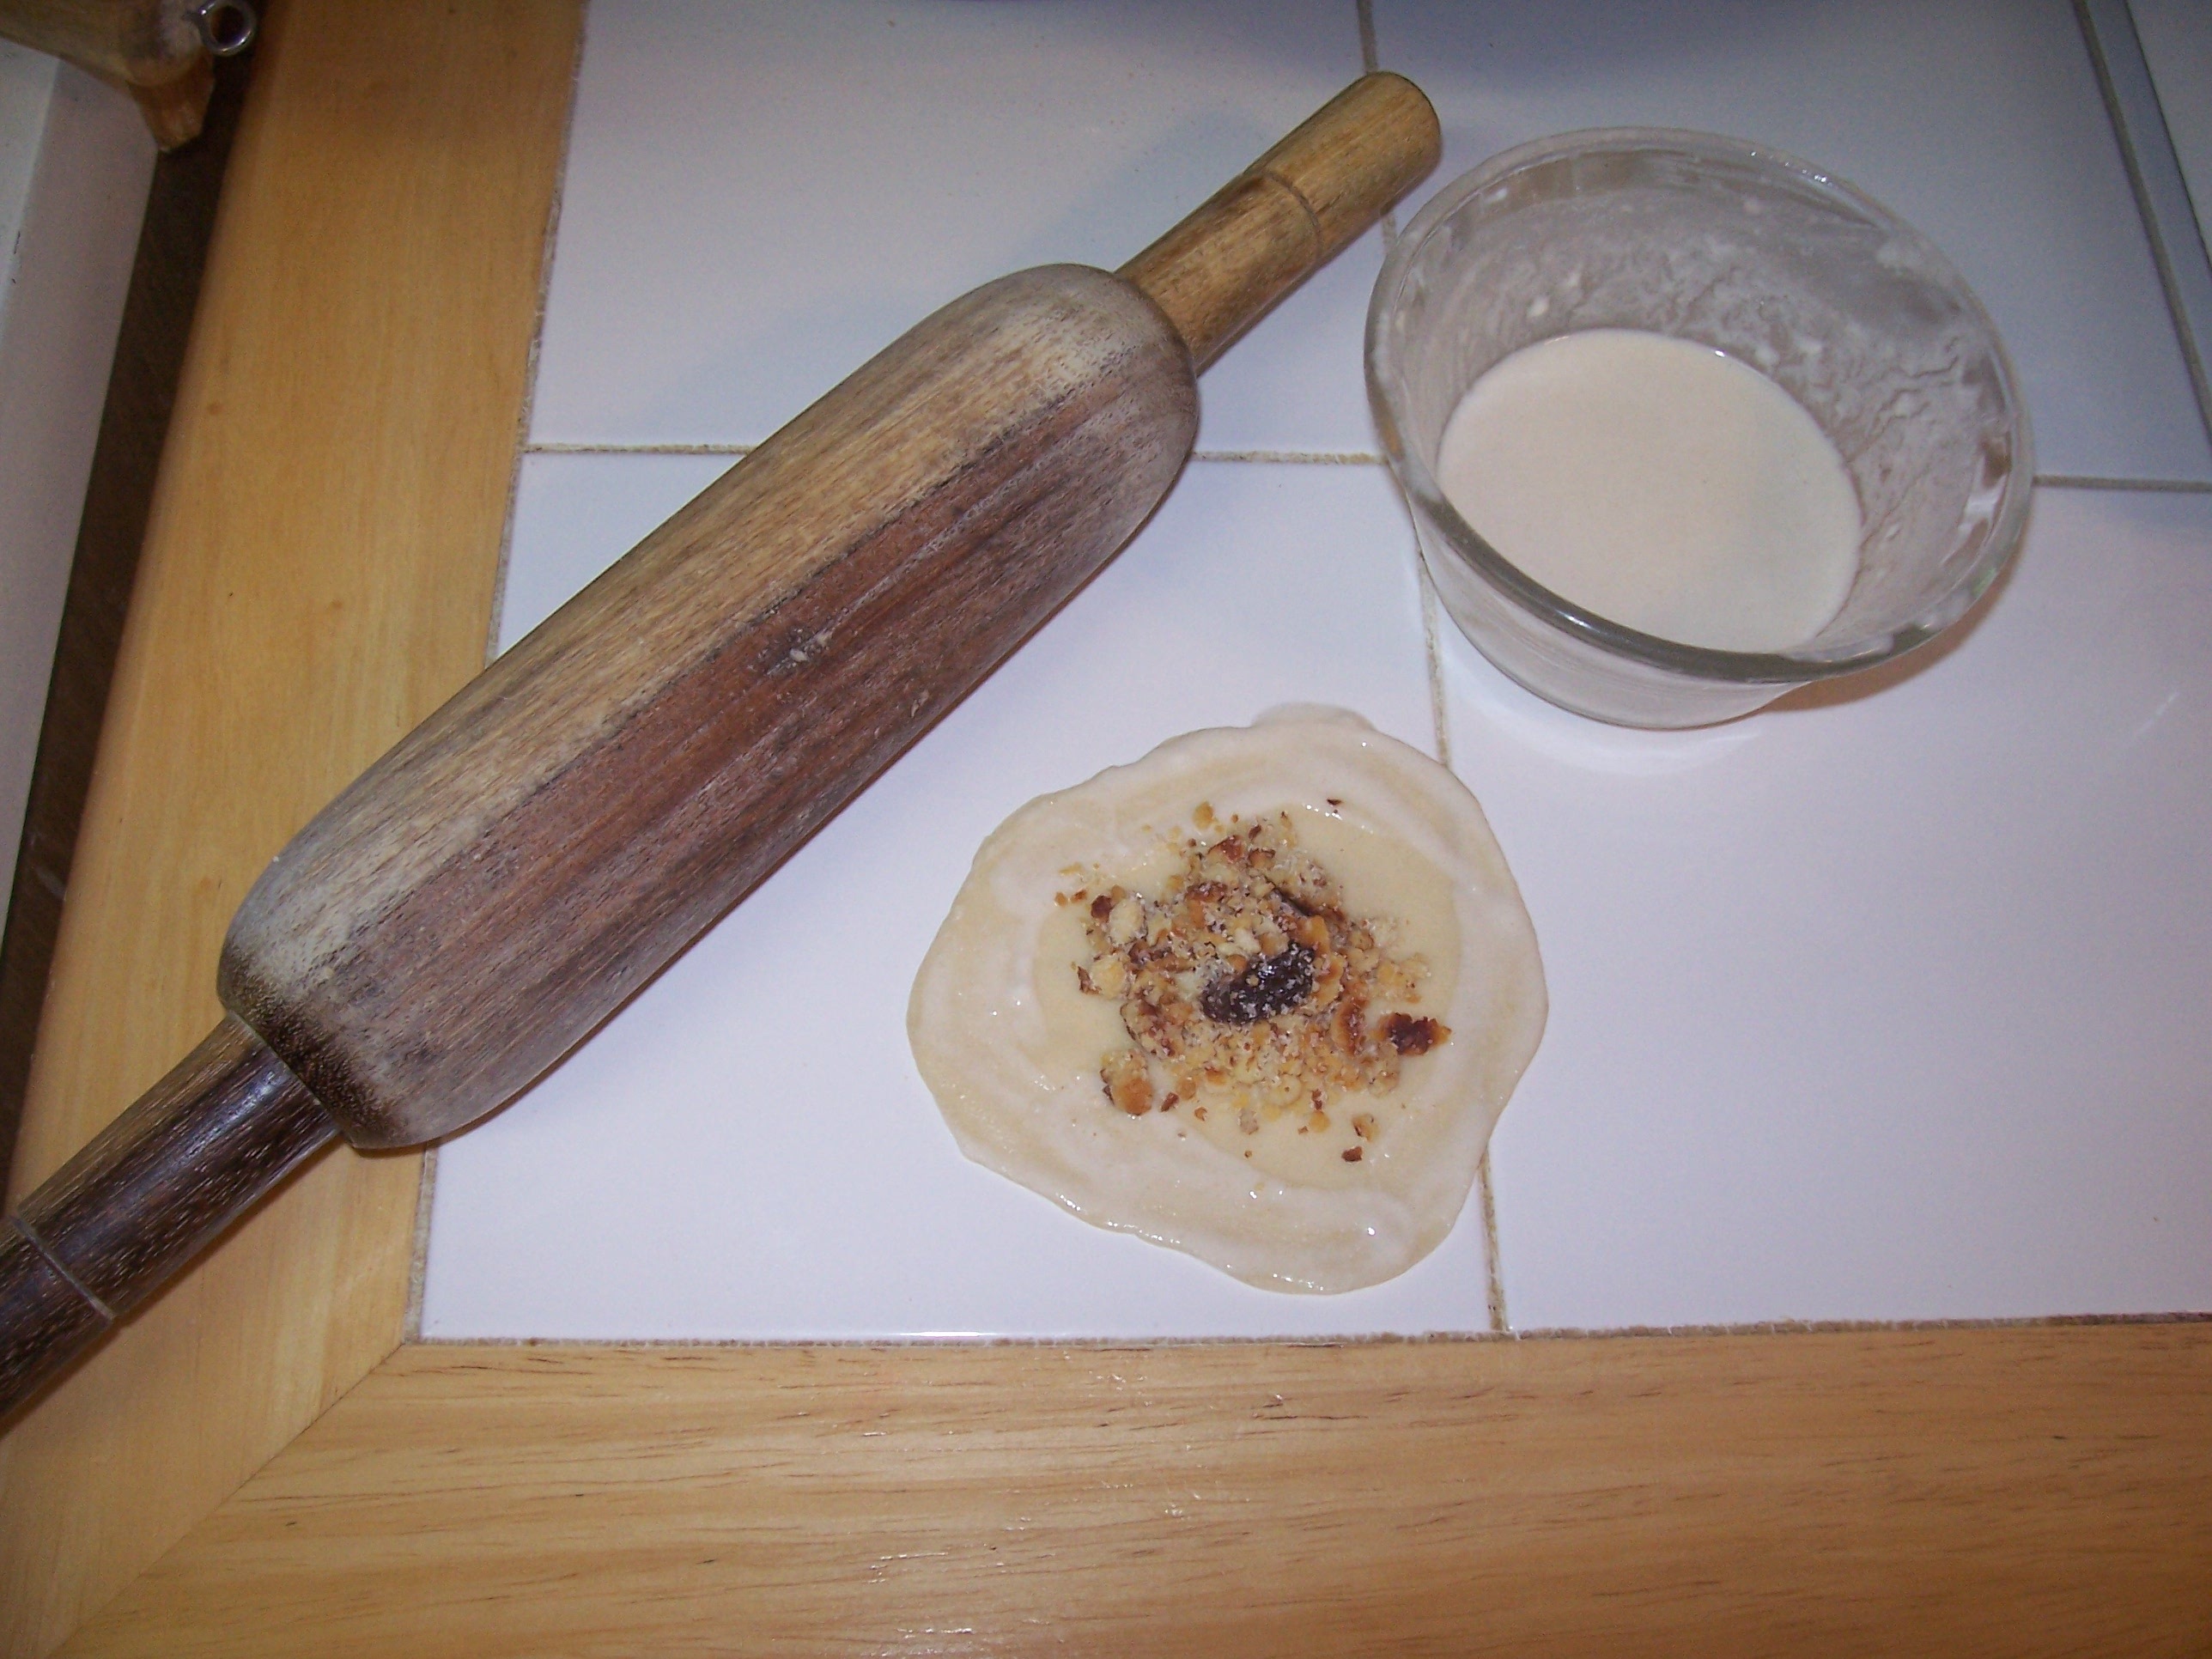
Using a rolling pin, roll each dough ball into a round about 2.5″ in diameter.

Apply the binder paste along the edges. Use your index finger to dip in the binder paste and then spread it around the circumference of the rolled out round.

Add about 1 Tbsp. of the filling into the round and fold the round into a semicircle now. At this step, you can either press all the edges hard so that they do not open, or use a gujiya mold ( empanada mold) or make a murri. The murri is made by pulling very small portions of the dough edge and rolling it over the edges. Honestly, it is a little difficult to write about it, its easier to learn when seen. I shall try someday to insert a video here but that has to wait. Keep the prepared gujiya aside and cover with a moist towel while you prepare the other gujiyas.

100_4093 100_4094

Almost round 😉 dough and filling

100_4099

Folding and closing in process

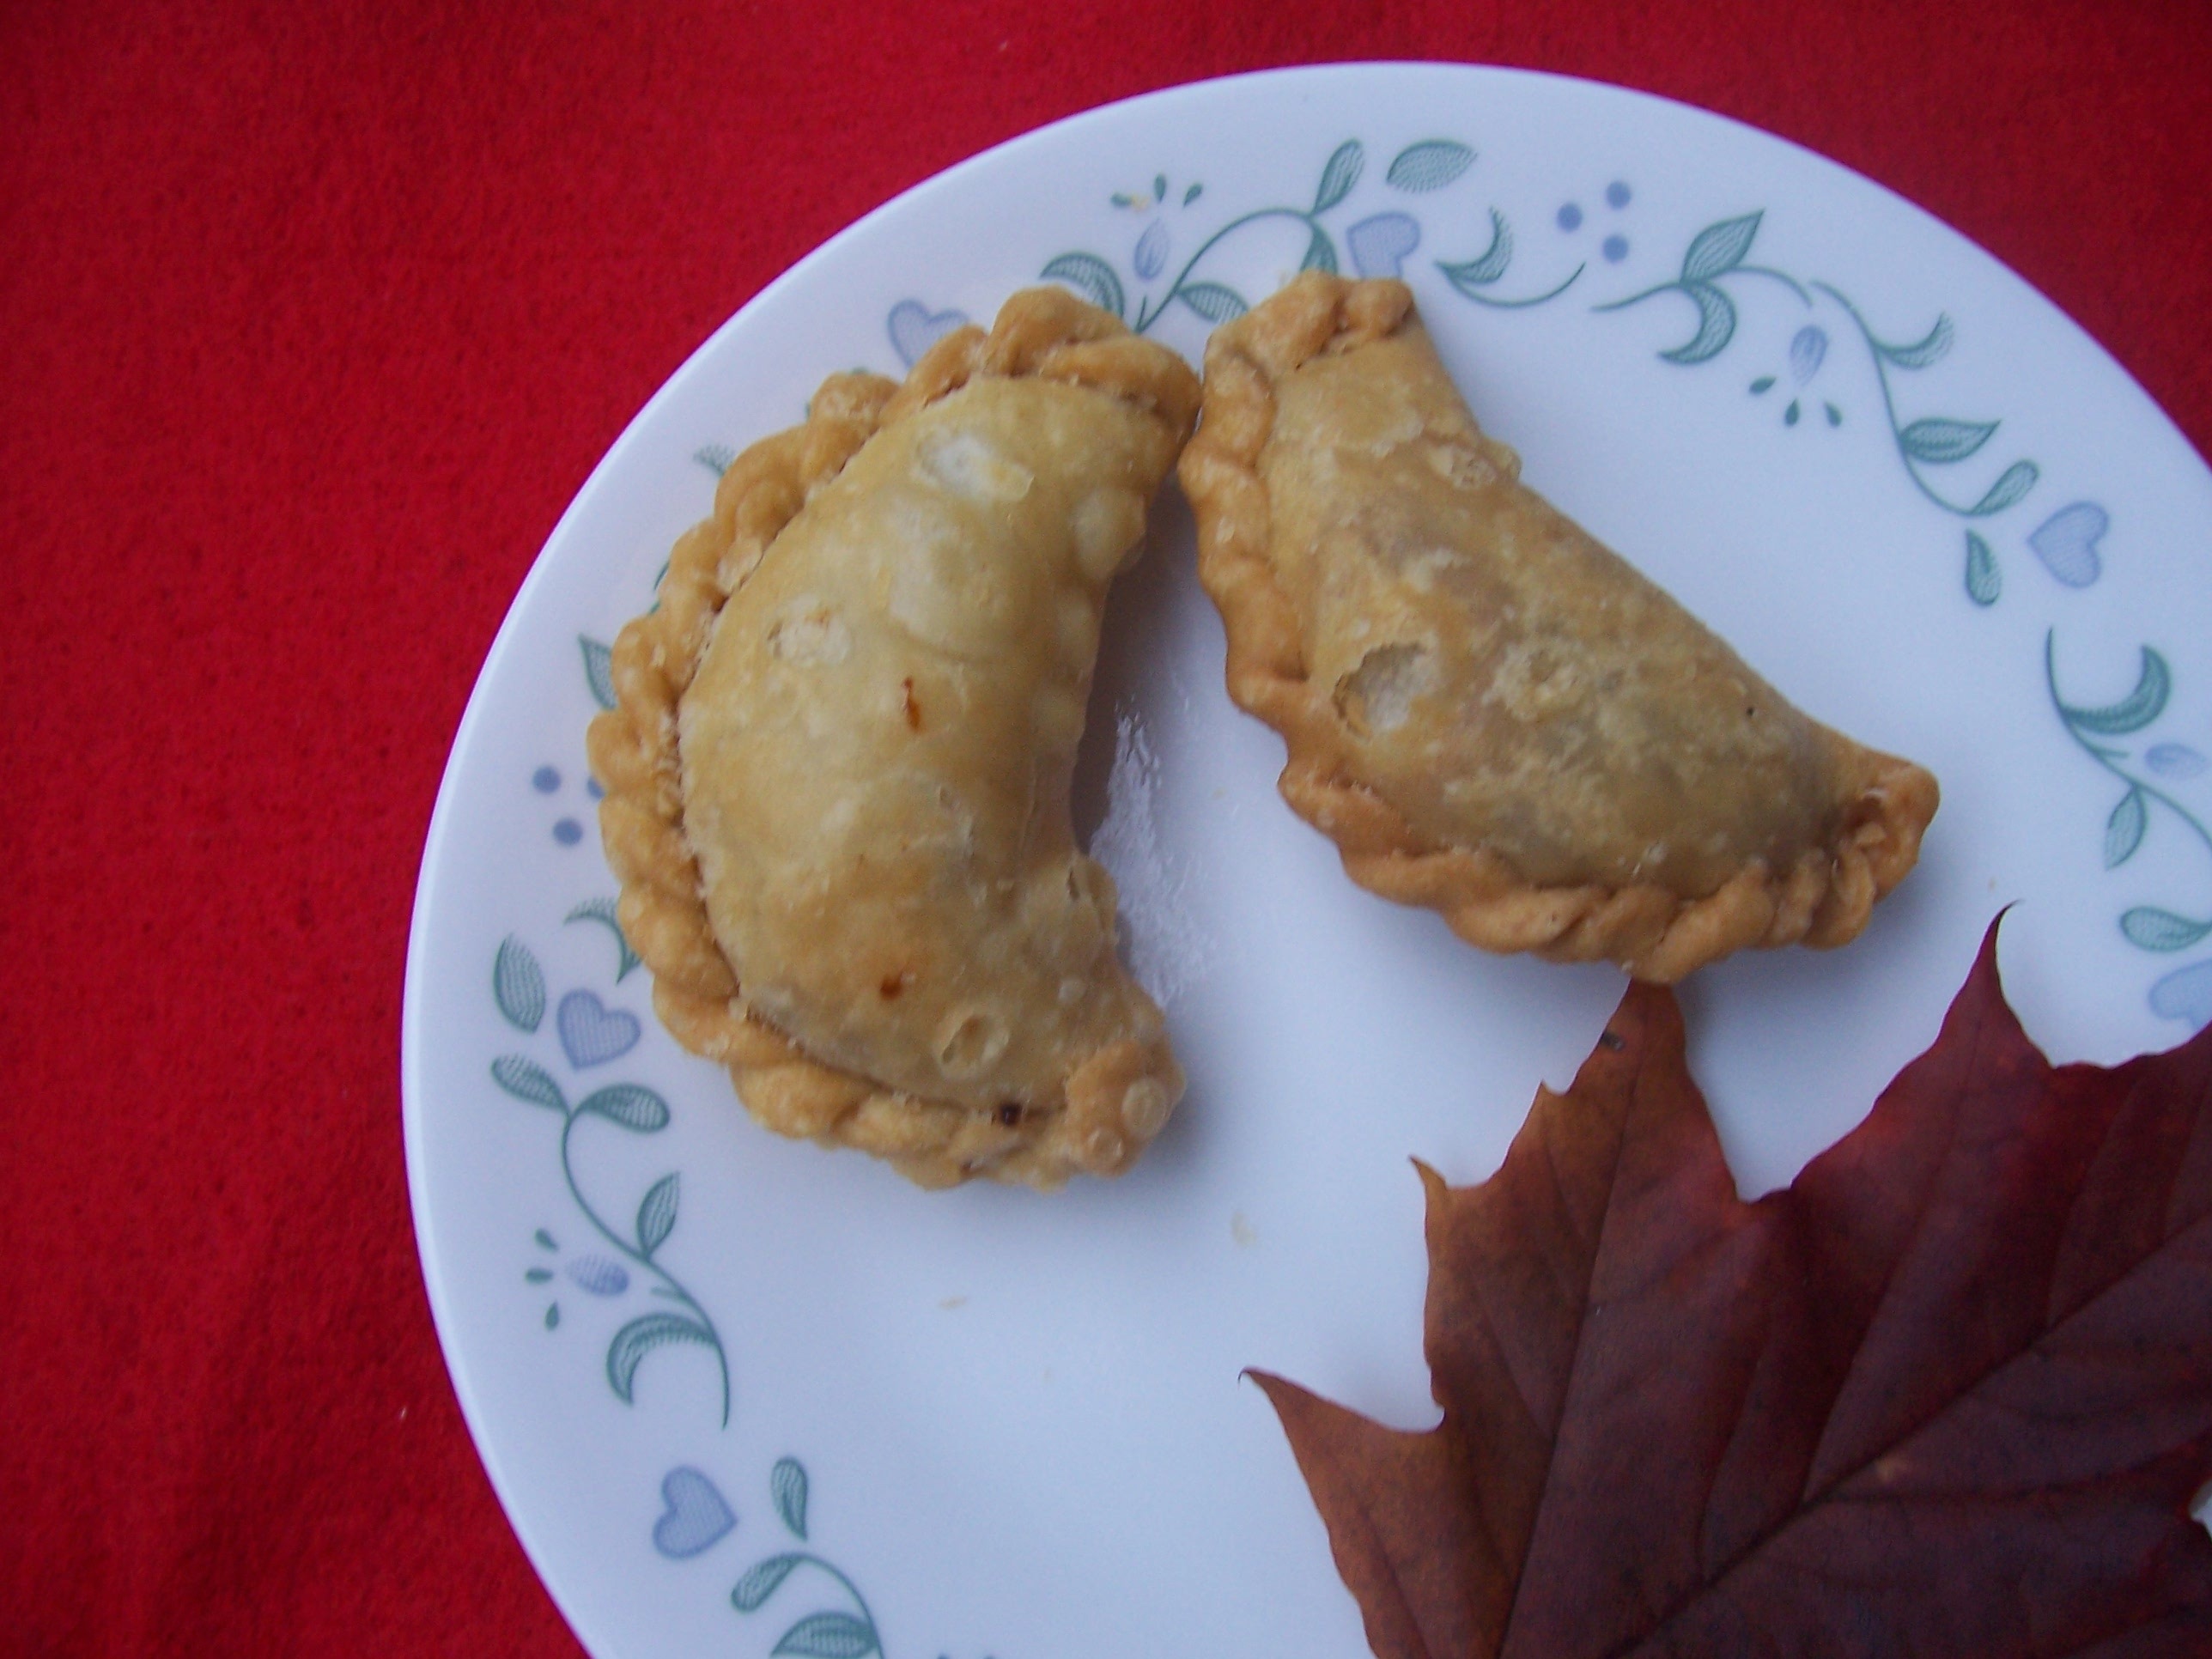
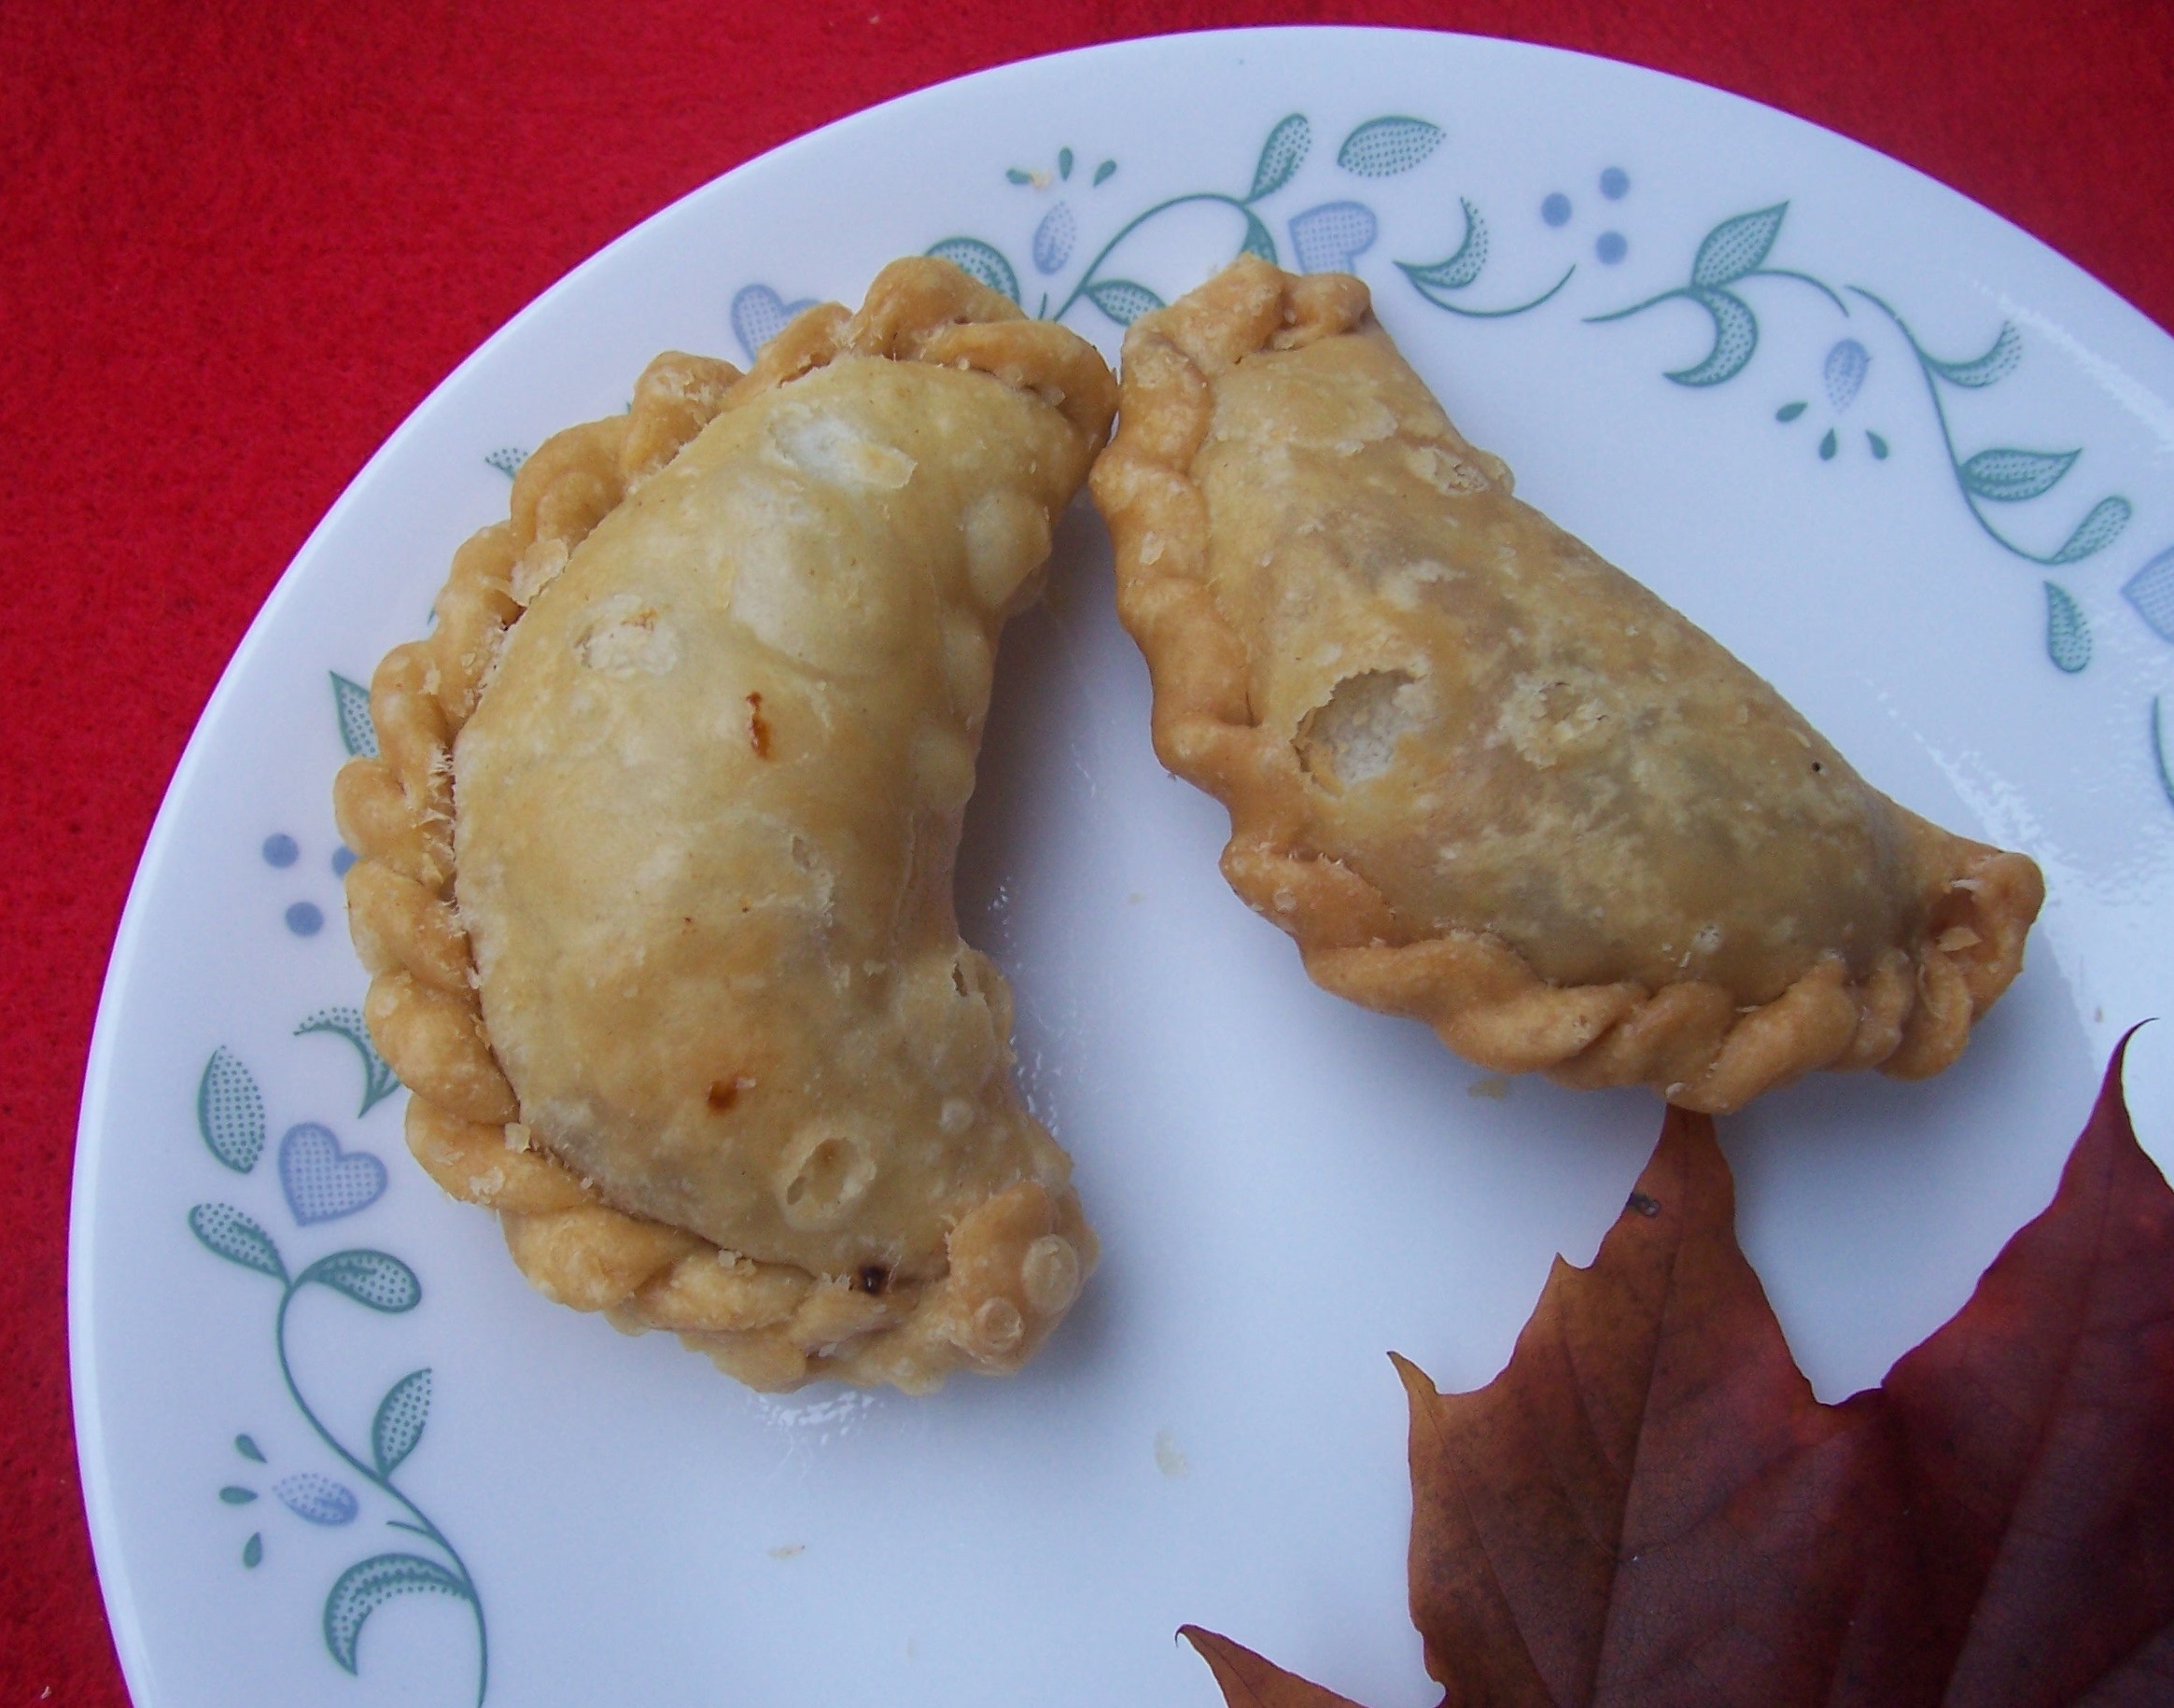
The wok or frying pan should at least have 2″ of oil. Start heating the oil on medium heat as you prepare the gujiyas. Once 5 or 6 gujiyas are ready, add them to the oil. Drop a tiny dough piece to check the oil. It should not be so hot that the dough ball comes to the surface at once. The oil should be just hot enough that the dough ball stays immersed for about 30 seconds. You should be able to see the bubbles as you add the dough piece. Lower the heat just a little bit to about medium low (gas mark 4) and fry the gujiyas till golden and crisp.

100_4098

Gujiyas in hot oil

Serve hot or at room temperature. These gujiyas keep well for at least 2 weeks in an airtight container.

These gujiyas are sometimes further dipped in sugar syrup. The consistency of the sugar syrup varies. The sugar syrup can be quite dry or even a little liquid resulting in different tasting gujiyas. I most often like it without the extra sugar though the other kinds have their own place in my heart 😉 .

If you have made any dumpling, empanada, sweet pie before, please do try this simple filling. It is extra-ordinary. No coconut, semolina….yet these will taste quite good. Most North Indians make it on Holi, the festival of colors….ah well for the next year now!

100_4178

Only pictures for now 😉


Posted in -All Purpose flour, -Almonds, -Canola Oil, -Cardamom, -Cashews, -Khoya/Mava (Milk solids), -Pistachios, -Raisins | Tagged: , , | 4 Comments »

Daring Bakers 2010 : Nanaimo Bars

Posted by vivnidhi on January 27, 2010

jan_66

Nanaimo Bars

This is the only picture I was able to take…..took them to a friend’s potluck and forgot to take photos

All the Daring Bakers are headed to Canada for winter Olympics. Of course, I can’t fool you….no……we are not going….just celebrating 😉 by making nanaimo bars. OK, I also had never heard of these until………..”The January 2010 Daring Bakers’ challenge was hosted by Lauren of Celiac Teen. Lauren chose Gluten-Free Graham Wafers and Nanaimo Bars as the challenge for the month.”

Nanaimo Bars are a classic Canadian dessert created in none other than Nanaimo, British Colombia. In case you were wondering, it’s pronounced Nah-nye-Moh. These bars have 3 layers: a base containing graham crackers, cocoa, coconut and nuts, a middle custard layer, and a topping of chocolate. They are extremely rich and available almost everywhere across the country.

Lauren wanted us to bake the Graham Crackers gluten free. I used all  whole wheat pastry flour (atta) instead of the gluten free flours as I am too lazy. These are absolutely divine. You will not want to buy store bought after trying these out. Superlative praises for these graham crackers. I stopped buying Indian Glucose biscuits long long back because of Trans fats. These graham crackers will certainly fill that craving. Please visit Celiac Teen or the other daring bakers this month for some great gluten free versions.

Recipe Source: Graham Wafers — 101 Cookbooks (http://www.101cookbooks.com/archives/000126.html) I adapted it to be gluten-free. The adapted recipe is below.
Nanaimo Bars — City of Nanaimo (http://www.nanaimo.ca/EN/main/visitors/NanaimoBars.html)

The Recipe:

Preparation time:
• Graham Wafers: 30 to 45 minutes total active prep, 2 ½ hours to overnight and 45 minutes inactive prep.
• Nanaimo Bars: 30 minutes.

Equipment required:
• Food Processor
• Bowls
• Parchment paper or silpats
• Cookie sheets
• Double boiler or pot and heatproof bowl
• 8 by 8 inch square pan
• Hand mixer or stand mixer (You may use a wooden spoon, but this makes it much easier!)
• Saucepan

  • For  Graham Wafers
    Ingredients
    2 1/2 cups + 2 Tbsp. Whole wheat pastry flour (atta)
    1 cup (200 g) (7.1 ounces) Dark Brown Sugar, Lightly packed
    1 teaspoon (5 mL) Baking soda
    3/4 teaspoon (4 mL ) Kosher Salt
    7 tablespoons (100 g) (3 ½ ounces) Unsalted Butter (Cut into 1-inch cubes and frozen)
    2 Tbsp. Honey, Mild-flavored such as clover.
  • 3 Tbsp. Molasses
    5 tablespoons (75 mL) Whole Milk
    2 tablespoons (30 mL) Pure Vanilla Extract

Directions:
1. In the bowl of a food processor fitted with a steel blade, combine the flours, brown sugar, baking soda, and salt. Pulse on low to incorporate. Add the butter and pulse on and off, until the mixture is the consistency of a coarse meal. If making by hand, combine aforementioned dry ingredients with a whisk, then cut in butter until you have a coarse meal. No chunks of butter should be visible.
2. In a small bowl or liquid measuring cup, whisk together the honey, molasses, milk and vanilla. Add to the flour mixture until the dough barely comes together. It will be very soft and sticky.
3. Turn the dough onto a surface well-floured with atta and pat the dough into a rectangle about 1 inch thick. Wrap in plastic and chill until firm, about 2 hours, or overnight.
4. Divide the dough in half and return one half to the refrigerator. Sift an even layer of whole wheat pastry flour onto the work surface and roll the dough into a long rectangle, about 1/8 inch thick. The dough will be quite sticky, so flour as necessary. Cut into 4 by 4 inch squares. Gather the scraps together and set aside. Place wafers on one or two parchment-lined baking sheets. Chill until firm, about 30 to 45 minutes. Repeat with the second batch of dough.
5. Adjust the rack to the upper and lower positions and preheat oven to 350 degrees Fahrenheit (180 degrees Celsius).
6. Gather the scraps together into a ball, chill until firm, and reroll. Dust the surface with more flour and roll out the dough to get a couple more wafers.
7. Prick the wafers with toothpick or fork, not all the way through, in two or more rows.
8. Bake for 25 minutes, until browned and slightly firm to the touch, rotating sheets halfway through to ensure even baking. Might take less, and the starting location of each sheet may determine its required time. The ones that started on the bottom browned faster.
9. When cooled completely, place enough wafers in food processor to make 1 ¼ cups (300 mL) of crumbs. Another way to do this is to place in a large ziplock bag, force all air out and smash with a rolling pin until wafers are crumbs.

jan_70

Graham Crackers

jan_74

We loved our graham crackers with some nutella and whipped topping……….Husband can’t have enough of it 🙂

Nanaimo Bars
Ingredients:

For Nanaimo Bars — Bottom Layer
1/2 cup (115 g) (4 ounces) Unsalted Butter
1/4 cup (50 g) (1.8 ounces) Granulated Sugar
5 tablespoons (75 mL) Unsweetened Cocoa
1 Large Egg, Beaten
1 1/4 cups (300 mL) (160 g) (5.6 ounces) Graham Wafer Crumbs (See previous recipe)
1/2 cup (55 g) (1.9 ounces) Almonds (Any type, Finely chopped)
1 cup (130 g) (4.5 ounces) Coconut  unsweetened

For Nanaimo Bars — Middle Layer
1/2 cup (115 g) (4 ounces) Unsalted Butter
2 tablespoons and 2 teaspoons (40 mL) Heavy Cream
2 tablespoons (30 mL) Vanilla Custard Powder (Such as Bird’s. Vanilla pudding mix may be substituted.)
2 cups (254 g) (8.9 ounces) Icing Sugar

For Nanaimo Bars — Top Layer
4 ounces (115 g) Semi-sweet chocolate
2 tablespoons (28 g) (1 ounce) Unsalted Butter

Directions:
1. For bottom Layer: Melt unsalted butter, sugar and cocoa in top of a double boiler. Add egg and stir to cook and thicken. Remove from heat. Stir in crumbs, nuts and coconut. Press firmly into an ungreased 8 by 8 inch pan.
2. For Middle Layer: Cream butter, cream, custard powder, and icing sugar together well. Beat until light in colour. Spread over bottom layer.
3. For Top Layer: Melt chocolate and unsalted butter over low heat. Cool. Once cool, pour over middle layer and chill.

jan_64

Making of the Nanaimo Bar………bottom layer

(This is the only photograph I have :-)) )

——————————-

My Tweaks to the recipe:

  1. Used whole wheat pastry flour (atta) for the crackers.
  2. Substituted molasses for some  honey as I was out of honey.
  3. I made double the middle layer (mistake..) and double the chocolate (bring on more 🙂 )

Additional Information:

These bars freeze very well, so don’t be afraid to pop some into the freezer.

The graham wafers may be kept in an airtight container for up to 2 weeks. Mine lasted about that long.

If making the graham crackers with wheat, replace the gluten-free flours (tapioca starch, sweet rice flour, and sorghum flour) with 2 ½ cups plus 2 tbsp of all-purpose wheat flour, or wheat pastry flour. Watch the wheat-based graham wafers very closely in the oven, as they bake faster than the gluten-free ones, sometimes only 12 minutes OR even 10.

For the Nanaimo Bars, if making with wheat, replace the gluten-free graham wafer crumbs with equal parts wheat graham wafer crumbs!

Information on Celiac Disease: http://www.mayoclinic.com/health/celiac-disease/DS00319

Information on Vancouver 2010: http://www.vancouver2010.com/

City of Nanaimo: http://www.nanaimo.ca/EN/index.html

Gluten Free Flour Information: http://glutenfreemommy.com/gluten-free-grains-101-the-best-flour-blend/

Video on making Nanaimo bars: http://www.youtube.com/watch?v=x5aqa6R1jIM&feature=fvsr

Recipe and video for Vegan Nanaimo Bars (you didn’t think I’d leave you guys out?): http://www.everydaydish.tv/index.php?page=recipe&recipe=159

Recipe for gluten-free and vegan Graham Wafers: http://www.thesensitivepantry.com/the-sensitive-pantry/2009/8/3/grahams-…


Nanaimo bars disappointed me because of the middle layer. A bit too sweet. I will try other buttercreams or some custard as filling the next time. The husband was pretty impressed with the texture of the middle layer though and wanted me to just follow the recipe and make the amount of filling given.

For the funny attempts at decorating. I used plastic chocolate. I will post the plastic chocolate recipe separately later.

It’s after ages I am posting a daring baker challenge on time. I also hope that I shall continue to do so in the coming months and blog a little more….I have dozens of posts half written which have not yet made it to the blog.

Expenditure:

Heavy Whipping Cream 1/2 pint ……….$1.99………….from Meijer

———————————————————————————————

Total………………………………………$1.99

IMG_1344

I just received this photo…..it certainly looks better than the first

Posted in - Confectioner's Sugar, -Almonds, -Butter, -Coconut, -Cream, -Dark Brown sugar, -Honey, -Molasses, -Semisweet Chocolate, -Vanilla, -Whole Wheat Pastry flour, Baking Soda, Daring Bakers, Eggs, Milk, Sugar, Vanilla Pudding mix | Tagged: , , , | 4 Comments »

Macarons………..

Posted by vivnidhi on October 27, 2009

Daring Bakers finally…..made MACARONS .

measure_w180x180 presents…..

100_4145

PLAIN but nevertheless ;-)…..Roasted almond macarons with chocolate ganache

If you have been reading even one food blog these days, you cannot escape macarons ( A good history lesson here 😉 ) I  can speak for the food blogosphere , Macarons are a rage these days. I had been dreaming of eating these and dreading baking these myself. I kept reminding the husband what is a must eat…..whenever we visit Paris 🙂 . Mon Paree is a soft spot with me (as anyone who knows me is aware 😉 ). It’s one place I never want to visit on a budget 🙂 . David Lebovitz’s 10 Insanely Delicious things you shouldn’t miss in Paris will be a starting point 🙂 .

Anyway , moving on, Ami finally chose macarons for this month’s daring Bakers challenge, finally giving the weak hearted like me an incentive to try it out. The 2009 October Daring Bakers’ challenge was brought to us by Ami S. She chose macarons from Claudia Fleming’s The Last Course: The Desserts of Gramercy Tavern as the challenge recipe.

In Ami’s words “French macaroons are notorious for being difficult to master. Type in “macaroon,” “French macaroon” or “macaron” in your search engine of choice, and you will be inundated not only with bakeries offering these tasty little cookies, but scores and even hundreds of blogs all attempting to find the perfect recipe, the perfect technique. Which one is right? Which captures the perfect essence of macaroons? The answer is all of them and none of them. Macaroons are highly subjective, the subject of passionate, almost Talmudic study and debate. Chewy? Crisp? Age your egg whites? Ground the nuts or use nut meal or nut flour? Cooked sugar syrup, or confectioners’ sugar? In the words of a therapist, what do you think is the ideal macaroon? The answer lies within you.

Will French macaroon supplant the cupcake as the next sweet trend? There’s no way to know. I couldn’t have predicted the resurgence of leggings, yet here they are.”

I am sorry Ami , I did not use the recipe given. I read each and every post on the daring bakers forum and everybody seemed to be getting more success with Helen‘s recipe and so…….I decided to tread carefully on my first experiment.

Oh..I have come to know that these are often called macaroons in United States though they also refer to another coconut cookie as well.

Ok ….now to my “Hurrah” moment. I got it right the first time. Reason: I have made it a 100 times in my head. It was completely different when I actually made it yet I knew what I was doing. What I should be doing and what can lead to what. Two people require special mention and thanks as without them, I would not have been able to complete the challenge: 1. Helen of Tartelette and 2. Audax Artifex of Audax Artifex.  The recipe and instructions I used to make my first macarons are Helen‘s. The explanations, clarifications, warnings and encouragement……..even conversions are from Audax. He provided so much information that I did not have to even use my brains for menial conversions.

Roasted Almond macarons: (Makes approx. 11 macarons and hence around 22 shells)

  • Egg White 1 (approx. 32 g …aged 4 days in the refrigerator) brought to room temperature before whipping
  • Icing Sugar 64 g
  • Granulated Sugar 16 g (3 1/2 tsp. )
  • Roasted almond meal 35 g

1. I measured these with my tipsy weighing scale (which my kids have fiddled with well) and the least count of which is 25 g …….so do not get deterred by the weighing scale (oh…only if you are like me ) and take the plunge. It was fun :-).

2. First I toasted the almonds under the broiler and kept checking every two minutes. When the almonds were browned uniformly, removed them for the oven and let them cool. Once the almonds were cool, I used my blender to grind them along with the icing sugar. This helps the almonds not clump up. Audax also mentions that the grinder should not get  hot. Well! mine did…..I was scared but after sifting, the mix seemed fine to me.

100_4121

Sifted Ground almonds and icing sugar

3. I whipped the egg white to a firm foam. Then added the granulated sugar till the egg whites were firm and glossy. I had heard that if the egg whites are whipped right, the bowl can be turned upside down and it won’t fall off. Well! I took  the plunge with confidence and here we are:

100_4123 100_4124

Whipped Egg Whites…..without sugar and after addition of sugar

100_4126

There is whipped egg in there….really……

4. I then used this video to learn how to fold the almond mixture in the egg whites. I may have required 10-12 strokes to get it to magma like consistency. The key is that when the mix is dropped back in itself. It should mix with the mix soon and no trace should remain.

100_4127

My final macaron batter

5. Then I piped it on marked parchment paper. Here was the problem. I did not have a big enough tip with my piping bag. Next time, I will just use a ziploc cut in a corner. 

6. Left the piped macaron shells to dry out for half an hour. Up to an hour is fine I believe. Meanwhile preheat the oven to 300 F . When the shells have formed a skin on top, I used another baking tray under the piped one (another Audax tip…..to ensure even heating) and slid them in the oven. In spite of the fact that I had all kinds of sizes, baking for 10 minutes was good.

100_4128

Please do not look at their amoebic shapes, they will be better next time……oh, this is after the skins have formed on top……….30 minutes after piping

7. When warm, the macarons like to stick well to the parchment paper. I used Helen’s tip and sprinkled/sprayed a few droplets of water under the parchment on the tray while still warm. Then I used a plastic knife to slide the macaron shells off the parchment. Worked very well for me.

100_4129

Out of the oven… oh… what joy,

I was almost expecting flat grainy biscuits…..but I got this……..

and because I can do it………….U can too

Chocolate Ganache Recipe:

I used unsweetened chocolate cause I knew that the macaron shells are very sweet (yes I love licking all my cake batters 🙂 and by now know before hand , how the baked product will taste based on the batter)

  • Unsweetened chocolate 2 oz. grated or chopped fine
  • Sugar 1/4 cup
  • Butter 1 Tbsp.
  • Whipping Cream 1/4 cup
  • Vanilla extract 1/4 tsp.

1. Add chocolate , butter and whipping cream in a bowl.

2. Heat the whipping cream and sugar in a heavy bottomed pan on low heat. Do not let it boil or form a skin. Keep whisking to dissolve the sugar.

3. Add hot cream in the bowl with the chocolate and mix well. Whisk to achieve a smooth texture.

4. As it cools, the mixture thickens. Pipe it on top of half the shells. Cover the piped chocolate ones with plain shells and you are ready to munch.

100_4158

Please do try one …………(These are all that were left by the time I could take pictures)

Bottom line is : Macarons are quite do-able. As Helen says…..” if you find a recipe that works for you, stick to it, no matter whose it is, especially if you are new to macarons and don’t make them that often.” I will stick with hers…….. 🙂 . My opinion is that one must not get intimidated by macarons and do try them at home unless you can afford Laduree‘s all the time :-).  Some may find it too sweet but kids love it. Here we are in the sniffles season so kids taste buds are very difficult to please……macarons made my work easier as there were smiles all around. My son couldn’t say enough of “Thank you Mama” AND ‘I just want half more” . Well! if you have kids ….do make these………until we visit Paris ….that is……..I like to dream 🙂 .

100_4135

Bad light……..but great taste

Before I close, I really must thank Ami for the challenge, Helen for  such a foolproof recipe and Audax for the tremendous support. This has been a great challenge and I loved learning a great skill. I have 5 days aged 3 egg whites in he refrigerator. This time I will be playing as I am not that scared. Looking forward to the adventure. If I find the time, I will certainly update with better pictures.

Update Nov. 1 : I did forget the expenses; didn’t I ?

Expenditure :

Confectioner’s Sugar ……..$2.74 ……from Kroger (I am absolutely done with this store….too rude for me to handle)

Posted in - Confectioner's Sugar, -Almonds, -Butter, -Cream, -Egg Whites, -Unsweetened Chocolate, -Vanilla, Eggs, Sugar | Tagged: , , , , | 8 Comments »

Daring Bakers July bring Cookies…….

Posted by vivnidhi on July 28, 2009

Vanilla at 180 x 180 (largest)brings…..

100_3688

The boy can’t stop himself 😉 Plum jam cookies and lots more…….

Jaana tha Japan , pahunch gaye Cheen…………Had to go to Japan , and I reached China…. You don’t get it……yeah…..oh well! the daring baker challenge this month was mallow cookies and milanos….long live Pepperidge Farm! I ended up making those and a fusion…..which we all absolutely loved.

These cookies pictured above are truly the best cookies I have ever made. If you liked and ate jam biscuits (called so in India) in your childhood, these cookies will bring those memories back. I surprised myself……..these tasted so good.

The July Daring Bakers’ challenge was hosted by Nicole at Sweet Tooth. She chose Chocolate Covered Marshmallow Cookies and Milan Cookies from pastry chef Gale Gand of the Food Network.

The mallow cookies were great, I would have never dreamt of making homemade marshmallows but homemade taste so………..good and you can flavor them just as you would want. Thanks a lot Nicole, for this challenge.The mallows biscuit was really delicious. The no. of cookies mentioned in the original recipe is all messed up….which actually worked in my favor 🙂 .  I loved it so much that I made some plum jam and filled them up and loved the result.

Milanos were quite a disappointment and I would certainly not want to make those again. The milanos dough was like tuiles batter yet not even that….I give up.

The husband was quite excited about Milano cookies and so I made them first, in fact packed a few for a friend, but it was a lot of effort in trying to make them the same size…..and the end result was not worth it… I just made about 2 dozen of them.After that I split the batter in half , spread on the parchment on the entire tray and baked for 5 minutes in the oven. Cut them with a pizza cutter in squares and back in oven for 5-7 minutes more. Same with the rest of the batter. Filled them up up with the chocolate ganache and anything with chocolate gets eaten here. I do not recommend this and will not be making them again 🙂 . I should mention the chocolate ganache tasted good and the husband even helped me zest the whole orange. What do you think…….I will need help again some other time too..I must not forget the dear husband 🙂

100_3679

Don’t they look cute…….

Milanos for friends…….hope they ate it up soon…..before they turned chewy…….oh no….boo hoo hoo

100_3682 100_3686

Rest of the Milanos……..:-)


Here come the mallows…..pretty good cookies , if one is fond of marshmallows. We are not too fond of them, yet no cookies left of the 28 I made.

The recipe:

Mallows(Chocolate Covered Marshmallow Cookies)
Recipe courtesy Gale Gand, from Food Network website

Prep Time: 10 min
Inactive Prep Time: 5 min
Cook Time: 10 min
Serves: about 2 dozen cookies

• 3 cups (375grams/13.23oz) all purpose flour
• 1/2 cup (112.5grams/3.97oz) white sugar
• 1/2 teaspoon salt
• 3/4 teaspoon baking powder
• 3/8 teaspoon baking soda
• 1/2 teaspoon ground cinnamon
• 12 tablespoons (170grams/ 6 oz) unsalted butter
• 3 eggs, whisked together
• Homemade marshmallows, recipe follows
• Chocolate glaze, recipe follows

1. In a mixer with the paddle attachment, blend the dry ingredients.
2. On low speed, add the butter and mix until sandy.
3. Add the eggs and mix until combine.
4. Form the dough into a disk, wrap with clingfilm or parchment and refrigerate at least 1 hour and up to 3 days.
5. When ready to bake, grease a cookie sheet or line it with parchment paper or a silicon mat.
6. Preheat the oven to 375 degrees F.
7. Roll out the dough to 1/8-inch thickness, on a lightly floured surface. Use a 1 to 1 1/2 inches cookie cutter to cut out small rounds of dough.
8. Transfer to the prepared pan and bake for 10 minutes or until light golden brown. Let cool to room temperature.
9. Pipe a “kiss” of marshmallow onto each cookie. Let set at room temperature for 2 hours.
10. Line a cookie sheet with parchment or silicon mat.
11. One at a time, gently drop the marshmallow-topped cookies into the hot chocolate glaze.
12. Lift out with a fork and let excess chocolate drip back into the bowl.
13. Place on the prepared pan and let set at room temperature until the coating is firm, about 1 to 2 hours.

Note: if you don’t want to make your own marshmallows, you can cut a large marshmallow in half and place on the cookie base. Heat in a preheated 350-degree oven to slump the marshmallow slightly, it will expand and brown a little. Let cool, then proceed with the chocolate dipping.

Homemade marshmallows:
• 1/4 cup water
• 1/4 cup light corn syrup
• 3/4 cup (168.76 grams/5.95oz) sugar
• 1 tablespoon powdered gelatin
• 2 tablespoons cold water
• 2 egg whites , room temperature
• 1/4 teaspoon pure vanilla extract

1. In a saucepan, combine the water, corn syrup, and sugar, bring to a boil until “soft-ball” stage, or 235 degrees on a candy thermometer.
2. Sprinkle the gelatin over the cold water and let dissolve.
3. Remove the syrup from the heat, add the gelatin, and mix.
4. Whip the whites until soft peaks form and pour the syrup into the whites.
5. Add the vanilla and continue whipping until stiff.
6. Transfer to a pastry bag.

Chocolate glaze:
• 12 ounces semisweet chocolate
• 2 ounces cocoa butter or vegetable oil

1. Melt the 2 ingredients together in the top of a double boiler or a bowl set over barely simmering water.

100_3674

Marshmallow cookies before the dip in chocolate

I got 28 cookies by using 1/4 of the cookie dough. Made 1/2 the amount of marshmallows and chocolate glaze. Since my glaze eventually bloomed, I covered them up in Milanos ganache…….the Milano cookie filling :-)………yeah that’s me!! Tasted good, nevertheless 😉

Chocolate Ganache:

• 1/2 cup heavy cream
• 8 ounces semisweet chocolate, chopped
• 1 orange, zested

I also prepared some plum jam….just because I had some plums I had to use. Filled them up in the mallows crust, sprinkled with sugar and loved , loved it! Please do try if you are in the mood to make cookies, true labor of love , forming so many small bites but totally worth it ……..as you will see in pictures below 🙂

Plum Jam Recipe:

  • Plums 2 1/2 cups …..pitted, and chopped fine
  • Sugar 1 1/2 cups
  • Lemon juice  1 Tbsp

That’s it….I added all of this in a heavy bottomed saucepan with 2 Tbsp. water. Cooked it down till I could do the plate test. For the plate test, place a plate in the freezer or chill it well. Pour a big drop of jam on this cold plate and give it 30 seconds. If the jam has reached the right consistency, it will very slowly spread a little. More about jam making here. I made a small quantity, hence it went directly to the refrigerator.

100_3693

Pick one up……these are ready for a sprinkling of sugar

100_3709

Here are the mallows…..this is how they looked

100_3700

Perfect with coffee….for some great mornings………

I just took a picture as the husband had set the table

100_3711

Somebody else had a great time too……….

It’s been one whole year being a part of the Daring Bakers for me. I have come a long way…..I remember my first challenge Filbert Gateau….I remember my delight. Now I dare to experiment on my own…..Thank you Lis and Ivonne and the whole Daring Baker community which is the best resource of all.

Expenditure:

Unsalted Butter: ………………….$2.17……….from Walmart, some left

Corn syrup(16 oz.)…………………$1.67……….from Kroger, lots left

Heavy cream(1/2 pint)…………….$2.89…………from Kroger, lots left

Powdered sugar……………………$1.99…………from Kroger, lots left

Bakers Chocolate semisweet(8 oz):$ 3.29………….from Kroger, none left

Orange 1 :-)…………………………$0.64………….from Kroger, ate it up….

————————————————————————————————–

Total………………………………..$12.65

Posted in -All Purpose flour, -Butter, -Canola Oil, -Cinnamon, -Corn Syrup, -Cream, -Orange, -Plums, -Semisweet Chocolate, -Vanilla, Baking Powder, Baking Soda, Daring Bakers, Eggs, Gelatin, Sugar | Tagged: , , , , , | 14 Comments »

Daring Bakers Layered Chocolate Amaretto Cheesecake

Posted by vivnidhi on April 27, 2009

Spatulla at 180 x 180 (largest)Oh Yeah, it was the E L Spatulla’s magic this month!

Apr_84

Perfectly layered Chocolate Amaretto Cheesecake

I must admit here that cheesecake is the ultimate dessert for me. Yes, I am extremely fond of custards and the like…..and if you bake it………I can eat it all the time. This is my all time favorite cake. And I had never eaten it all these years when I was in India! Ah! what a waste………I wish I could have eaten it without the guilt ……..calories…….look at yourself……..you still have 10 lbs to lose………look at all the plain sugars you are putting in your body!! UFF!!!  So, when now I baked it and placed it on the table……..in spite of the fact that I was pleased no end that the cake did not crack one bit and was layered exactly as I wanted………the husband’s look said something else.

“This is a calorie bomb…..fat, sugar, cheese………what kind of life will you have……. if you eat more of these”

“Well! when temptation rules, the mirror breaks, and I asked the husband to look the other way ….pleeeeeeeease….”

Ah! I so wish we did not have to fight this constant war against cholesterol and high blood sugar. As, I have so often admitted, the husband has to keep a check on his cholesterol and I have to worry about an eventual high blood sugar. And since I am still 10 lbs more than I was pre-second pregnancy, the threat is real for me. I am not overweight, just that I’d do my health and myself a favor if I lost these pounds.

Well! this blog is not about health rants (it so often becomes) ! I absolutely loved this cheesecake. I have baked cheesecakes before (coffee caramel remains the husband’s fav…….he can’t get over coffee and I chocolate)  but this is the best recipe. I had never tried layering the cheesecakes and since I got all daring ……….I tired it out!

Love you Jenny and your famous friend Abbey for sharing a great, easy recipe. The April 2009 challenge is hosted by Jenny from Jenny Bakes. She has chosen Abbey’s Infamous Cheesecake as the challenge.

This is truly an easy recipe and I know this will be made again!

Abbey’s Infamous Cheesecake:

crust:
1 3/4  cups / 240 g chocolate wafers

7 Tbsp. / 3 1/2 oz butter, melted
1/4 almonds ground

cheesecake:
3 sticks of cream cheese, 8 oz each (total of 24 oz) room temperature
1 cup / 210 g sugar
3 large eggs
1 cup / 8 oz heavy cream
3 tbsp. Amaretto

7 oz. semi sweet chocolate

The recipe calls for 1 Tbsp of lemon juice, 1 Tbsp. of vanilla extract and 1 Tbsp. of booze. I replace all with amaretto.

DIRECTIONS:
1. Preheat oven to 350 degrees F (Gas Mark 4 = 180C = Moderate heat). Begin to boil a large pot of water for the water bath.

2. Mix together the crust ingredients and press into your preferred pan. You can press the crust just into the bottom, or up the sides of the pan too – baker’s choice. Set crust aside.

Apr_39 Apr_40

Crushed Chocolate Wafers, almonds and butter

Apr_43

Chocolate wafer crust

My crust definitely had too much butter. I need to reduce it the next time. This did not compromise the taste but it would be better with lesser butter.

3. Combine cream cheese and sugar in the bowl of a stand-mixer (or in a large bowl if using a hand-mixer) and cream together until smooth. Add eggs, one at a time, fully incorporating each before adding the next. Make sure to scrape down the bowl in between each egg. Add heavy cream, amaretto and blend until smooth and creamy.

4. Pour batter into prepared crust and tap the pan on the counter a few times to bring all air bubbles to the surface. Place pan into a larger pan and pour boiling water into the larger pan until halfway up the side of the cheesecake pan. If cheesecake pan is not airtight, cover bottom securely with foil before adding water.

Apr_44 Apr_47

Cream cheese on the left and creamed ingredients on the right

Apr_49

3 cups plain Amaretto batter is removed and rest mixed with melted chocolate

I chopped the chocolate well and then melted it in the microwave for 1 minute. Stir the chocolate and check for lumps. Melt further in 15 sec or 30 sec intervals only if there are lumps. Keep stirring after every heating. Removed 3 cups of the batter separately and then added the melted chocolate to the rest of the batter. Mixed with a light hand so as to not overmix.

Apr_54 Apr_55

On top of chocolate wafer crust goes chocolate layer and then sieved very finely ground almonds on top of it.

Apr_57

Ready for the oven

5. Bake 45 to 55 minutes, until it is almost done – this can be hard to judge, but you’re looking for the cake to hold together, but still have a lot of jiggle to it in the center. You don’t want it to be completely firm at this stage. Close the oven door, turn the heat off, and let rest in the cooling oven for one hour. This lets the cake finish cooking and cool down gently enough so that it won’t crack on the top. After one hour, remove cheesecake from oven and lift carefully out of water bath. Let it finish cooling on the counter, and then cover and put in the fridge to chill. Once fully chilled, it is ready to serve.

Pan note: The creator of this recipe used to use a springform pan, but no matter how well she wrapped the thing in tin foil, water would always seep in and make the crust soggy. Now she uses one of those 1-use foil “casserole” shaped pans from the grocery store. They’re 8 or 9 inches wide and really deep, and best of all, water-tight. When it comes time to serve, just cut the foil away.

Prep notes: While the actual making of this cheesecake is a minimal time commitment, it does need to bake for almost an hour, cool in the oven for an hour, and chill overnight before it is served. Please plan accordingly!

Apr_60

The end result! Perfect layers! Hurrah!!

Things I learnt: As I read more on the Daring Baker forum, I realized that my cake top got brown and it should not have browned at all for a perfect cheesecake.

Next My crust indeed got soggy , so I should have either used more foil or used a normal cake pan instead of spring form. Jacque of Daisy lane cakes has very beautifully demonstrated how to use regular pan for cheesecake in her post Sweet Potato Cheesecake.

Some variations from the recipe creator:

** Lavender-scented cheesecake w/ blueberries – heat the cup of heavy cream in the microwave or a saucepan until hot but not boiling. Add 2 tbsp of lavender flowers and stir. Let lavender steep in the cream for about 10-15 minutes, then strain the flowers out. Add strained cream to cheesecake batter as normal. Top with fresh blueberries, or make a quick stovetop blueberry sauce (splash of orange juice, blueberries, a little bit of sugar, and a dash of cinnamon – cook until berries burst, then cool)

** Cafe au lait cheesecake with caramel – take 1/4 cup of the heavy cream and heat it in the microwave for a short amount of time until very hot. Add 1-2 tbsp. instant espresso or instant coffee; stir to dissolve. Add this to the remainder of cream and use as normal. Top cheesecake with homemade caramel sauce (I usually find one on the food network website – just make sure it has heavy cream in it. You can use store-bought in a pinch, but the flavor is just not the same since its usually just sugar and corn syrup with no dairy).

** Tropical – add about a half cup of chopped macadamias to the crust, then top the cake with a mango-raspberry-mandarin orange puree.

** Mexican Turtle – add a bar of melted dark chocolate (between 3 and 5 oz., to taste) to the batter, along with a teaspoon of cinnamon and a dash of cayenne pepper (about 1/8 tsp.). Top it with pecan halves and a homemade caramel sauce.

** Honey-cinnamon with port-pomegranate poached pears – replace 1/2 cup of the sugar with 1/2 cup of honey, add about a teaspoon or more (to taste) of cinnamon. Take 2 pears (any variety you like or whatever is in season), peeled and cored, and poach them in a boiling poaching liquid of port wine, pomegranate juice/seeds, a couple of “coins” of fresh ginger, a cinnamon stick, and about a 1/4 cup of sugar. Poach them until tender, then let cool. Strain the poaching liquid and simmer until reduced to a syrupy-glaze consistency, then cool. Thinly slice the cooled pears and fan them out atop the cooled cheesecake. Pour the cooled poaching syrup over the pears, then sprinkle the top with chopped walnuts and fresh pomegranate seeds.

Some variations from Jenny (from JennyBakes):

**Key lime – add zest from one lime to sugar before mixing with cream cheese. Substitute lemon juice, alcohol, and vanilla with key lime juice.

**Cheesecakelets – put in muffin tins, ramekins, or custard cups. Try baking 20-35 minutes, or until still a little jiggly, and cool as before.

I just melted some more chocolate and piped it lines on top. As I was in a rush, I did not paint the actual leaves with melted chocolate, instead just piped them freehand in leaf shape on wax paper. In the freezer for a quick 15 minutes and the leaves were ready. Remove from wax paper and decorate 😉 .

In spite of the mistakes, this cake was a hit. Loved it a lot and will make again. And guess what the husband visited New York for work and got me a Junior’s cheesecake. Now, I could compare mine against the best. And, I tell you mine was not far from the best. The junior’s cake crust absolutely bowled me over though. I have the junior’s cheesecake cookbook (borrowed from the library) and so I will note down their crust recipe and post when I try it.

If you want to have a look at what all can be done with a cheesecake , please visit the Daring Bakers Blogroll. See imagination and creativity at it best!

r100_3304

Here’s a bite…….enjoy!

Oh, I forgot to list my expenditure:

Cream Cheese 3 (8 oz.) packs ..........$6.18.........from Meijer.......none left
Chocolate wafers ......................$2.50.........from Meijer......all eaten up
Semisweet chocolate....................$2.50..........from Meijer......all eaten up
----------------------------------------------------------------------
Total ................................$11.18

Posted in -Almonds, -Butter, -Chocolate wafer, -Cream, -Semisweet Chocolate, Amaretto, Cream Cheese, Eggs, Sugar | Tagged: , , , , | 31 Comments »

Winter Squash Puli or Coconut Stuffed Gulab Jamun

Posted by vivnidhi on March 12, 2009

Mar_18

Wish you all a very colorful & Happy Holi

Yesterday was the festival of colors Holi. In India, almost every household would be full of unrecognizable children colored with every shade in the spectrum. My Kids here in Michigan managed playing with dry colors and still coloring the kitchen walls and their clothes :-). If you want to know more about Holi this wikipedia article is great! I have written too many essays on “My Favorite Festival” on Holi and the Wikipedia article is quite comprehensive.

One cannot welcome the coming of spring (  😉 Summer in India) without sweets. I wanted something simple and was happy when I discovered a GITS Gulab Jamun pack in the cupboard. Gulab Jamuns are very soft fried dumplings made of milk solids. The milk solid could either be dried milk powder or more traditionally Khoya (very thick milk, almost solid). I find the GITS mix to be the easiest and the best. There are very few things that I use from a premade mix but Gulab Jamun mix is definitely one of those. Its quite foolproof whereas in homemade ones, a little change in ratio can result in the sugar syrup not reaching the center of the sweet.

My relationship with making Gulab Jamuns is very old 😉 . I made Gulab Jamuns for the entire class & the teachers as a team leader in class 8 (part of work experience). You bet that did wonders to my confidence as a cook :-). Then onwards I have made Gulab Jamuns very often. At potlucks I am always asked to get these. While I oblige, I am bored of making more of the same. ( I get bored of cooking the same thing very very easy 😉 ) Now, don’t talk about Roti & Arhar ki Daal, that’s the staple 😉

OK, First though I am rewriting the recipe as per what I did with it, full credit for this recipe goes to Sury’s Ranga Alur Puli of (Lima) Beans and Delhi Cha(a)t and Indira’s sweet potato Gulab Jamuns of Mahanandi. I remembered reading on Indira’s blog (I have read her’s back to front 😉 ) about some sweet potatoes and gulab jamuns so I went back to hers and checked out Sury’s too.

Give all the food bloggers 1 recipe and you will find unimaginable variations as results. That is what happened with me. Now , Ranga Alur Puli in Bengali should certainly mean colored potato sweet treat. I started working on Sury’s and Indira’s recipe and here’s what I ended up making. I don’t know what to call it and don’t care how it looks but it tastes absolutely fabulous. The husband commented that it tastes like coconut laddoo rolled in a gulab jamun :-).


Mar_30

What do you want to call it?

Fried pumpkin pie with coconut , anyone? ………..well Stuffed Gulab Jamuns is good enough!

So, I used butternut squash in the mix with Gulab Jamun mix and of course some spices. Stuffed it with coconut, almond, raisin, milk mixture and dunked it in sugar syrup with cardamom.

The Recipe: (Makes 35 large stuffed gulab jamuns )

For the Jamuns/Pulis/Gujiyas (what do U want to call it?)

  • GITS Gulab Jamun mix 250 g (any other brand would be fine, GITS is my favorite)
  • Butternut squash 125 g (cut in half, bake for 1 hour, cool, peel and puree)……….yeah………..that’s it 😉
  • Ground Cinnamon 1 tsp.
  • Ground nutmeg 1 tsp.
  • Canola Oil 2 Tbsp.
  • Oil for frying 3 cups

For the Stuffing:

  • Sweetened flaked Coconut 4 oz. (1/2 cup)  or substitute Fresh grated coconut
  • Fat free Evaporated milk 8 oz (1 cup) or substitute whole milk
  • Raisins 1/2 cup
  • Ground almonds 1/2 cup

For the sugar syrup:

  • Sugar 800 g / 3.5 cups
  • water 1 liter/ 4 cups
  • Cardamom 5 powdered

1. So, one day before making the gulab jamuns, I cut the butternut squash in half, removed the seeds and baked it for approximately an hour till the flesh was really soft. After it cooled , I peeled it and pureed it in a blender. Smooth, silky puree is ready. This puree could be used for soups or gravies also. Baking increases the sweetness of the squash and hence this method. A sweet pumpkin would be a great substitute too. This puree helps make rich gulab jamuns without the use of ghee.

Mar_07 Mar_16

Butternut squash before baking and after baking

2. Mix all the stuffing ingredients in a microwave safe bowl and microwave for a total of 6 minutes. Microwave in 1 minute / 30 seconds intervals initially and mix. When the mixture is sticky and not liquidy, the stuffing is ready.

Mar_13

Coconut stuffing ingredients

3. Mix the gulab jamun mix with the spices and mix well breaking any lumps with the hands. Add the pumpkin puree and mix. The dough will be quite sticky. Take the 2 Tbsp. oil and spread it in the palms of your hands and try to bring the mix together into one mass. Break off 35 pieces from the dough of equal size. Use more oil for the hands as required to avoid the stickiness. Make a thin round from the broken dough pieces using the tips of the fingers. Add 1/2 Tbsp. filling in each round and fold the round into a semicircle. Any shape that pleases the heart would be good. I made it into a semicircle based on Sury’s description and then just raised the edges for some pattern. Make sure there are no cracks on the surface. Cover with a moist towel to prevent drying up of the prepared jamuns.

Mar_23

Stuffed Gulab jamuns…..ready for frying

4. Add the sugar syrup ingredients in a deep vessel and let it heat up on medium heat till the sugar dissolves and then reduce the heat to very low.

5. Heat oil in a fryer or a wok as the sugar syrup is being made.When a very small piece of dough dropped in oil does not stick to the bottom and bubbles up immediately, the oil is ready. reduce the heat to medium. Add the stuffed prepared jamuns one by one slowly and continuously turn them with a very light hand making sure that it does not get broken.

Mar_24

Stuffed Gulab Jamuns frying

6. They should be fried well and reach a dark brown color. Transfer them to the slightly simmering sugar syrup. Fry the next batch as the earlier batch soaks in the syrup. The jamuns increase quite a bit in size as they soak. Remove them on a different plate if there is crowding in the vessel with syrup and transfer them all back to the vessel once all the gulab jamuns have soaked. Put the heat off under the sugar syrup when all the jamuns have finished soaking. Some syrup should remain in  the end and it should not be very thick.

Mar_30

Mar_38

Stuffed Gulab Jamuns

Posted in -Almonds, -Butternut Squash, -Canola Oil, -Cardamom, -Cinnamon, -Evaporated Milk, -Nutmeg, -Raisins, Sugar, Sweets | Tagged: , , , | 5 Comments »

Daring Bakers: Caramel Cake with Caramelized Butter Frosting & Golden Vanilla Bean Caramels

Posted by vivnidhi on November 29, 2008

Nov_49

Caramel Cake with Caramelized Butter Frosting

cNov_61

Golden Honey Vanilla Ginger Caramels……They really are delicious…

The mood is really really somber as I write this post. This month was so full of fun……..if only Mumbai was not attacked. The cowardly act has left me anxious. It was extremely sad to watch the city I so adored, terrified like that. I grew up in a town close to the Financial Capital Mumbai. I was always in awe of the Metro and a little scared too….if this small town girl would ever be able to walk as fast as the rest of Mumbaikars. As Luck would have it, I got to work in a Mumbai suburb and I could not believe that the city was so welcoming. Felt like I belonged there. I could walk as fast (or faster) as the Mumbaikars.I, too have walked past the Taj Mahal Hotel and felt a sense of pride, awe. All the politicians have left a sour note by their behavior and power politics. The complete lack of moral value in the politicians of India is shameful. The security forces, firemen and the Doctors have done us Indians proud. If only these people were supported by the “RULERS”. I was absolutely stunned to hear one of the State Ministers call themselves “RULERS” I didn’t know we had “RULERS”, some years back they called themselves Public Servants. Not one of the Indian politician has shown any leadership.Life is getting back to routine for Mumbai residents as we all mourn the deaths of innocents. I can only hope that the security forces are further strengthened and equipped in the days to come as these threats become more real everyday. That would be a fitting tribute to the brave men who have laid down their lives.

Daring Bakers were back to sweet celebrations this month & completed two years on Nov. 19. Charche Chauke Ke turned one year old too this month. So, sweet treats ruled the month. The recipe is by Shuna Fish Lydon of Eggbeater (http://eggbeater.typepad.com/) and her signature caramel cake. Alice Medrich’s Golden Vanilla Bean Caramels were an optional challenge. This month’s challenge was hosted by Dolores (http://culinarycuriosity.blogspot.com/), Alex (Brownie of the Blondie and Brownie duo: http://blondieandbrownie.blogspot.com/), Jenny of Foray into Food (http://forayintofood.blogspot.com/) and helped by Natalie of Gluten-a-Go-Go (http://glutenagogo.blogspot.com/) for gluten free version of the recipe.

I tackled the caramels first as I have never made candy. First I bought an inexpensive candy thermometer. I am extremely impressed by the results. The caramels were just delicious. The hubby and son loved it. I have made it twice. The first time round, I had printed the recipe incomplete and so after the addition of cream…….I just did not heat the caramel mixture:). Yeah….that’s typical me;). So, I waited all night for the caramels to firm up………which they never did………..Result……..I had the most delicious caramel sauce I have ever eaten. Alice Medrich……..I love you. Honestly……if you want the best caramel sauce……..use her recipe and use Golden syrup. It’s the best!!! You will feel like throwing the store bought caramel sauce the moment you taste this. Anyway, I scraped half the mixture back in the pan and heated it back up to 260F and Voila………I had some delicious toffee. Incredible. Now I had a bottle full of caramel sauce and delicious toffee. No more salivating for Alpenliebe:). Well , I made caramels again…….this time it was half honey and half golden syrup. I added ginger while heating the cream and strained it later. I had increased he cream by 2 tablespoons as I thought some would be absorbed by ginger. Anyway, the net result was fabulous. Thank you for this incredible challenge. I would have never made candy otherwise.

Nov_10

First attempt………sugar and golden golden syrup

Nov_24

Result…………..The BEST Caramel Sauce Ever!!

Nov_21

Golden Vanilla Toffee

cNov_23

All dressed up

Caramels Recipe:

Recipe Source: Golden Vanilla Bean Caramels from Pure Dessert by Alice Medrich, Artisan Press, Copyright 2007, ISBN: 978-1579652111

GOLDEN VANILLA BEAN CARAMELS
– makes eighty-one 1-inch caramels –
Ingredients
1 cup golden syrup
2 cups sugar
3/8 teaspoon fine sea salt
2 cups heavy cream
1 1/2 teaspoons pure ground vanilla beans, purchased or ground in a coffee or spice grinders, or 1 tablespoon plus 1 teaspoon pure vanilla extract
3 tablespoons unsalted butter, cut into chunks, softened
Equipment
A 9-inch square baking pan
Candy thermometer
Procedure
Line the bottom and sides of the baking pan with aluminum foil and grease the foil. Combine the golden syrup, sugar, and salt in a heavy 3-quart saucepan and cook over medium heat, stirring with a silicone spatula or wooden spoon, until the mixture begins to simmer around the edges. Wash the sugar and syrup from the sides of the pan with a pastry brush dipped in water. Cover and cook for about 3 minutes. (Meanwhile, rinse the spatula or spoon before using it again later.) Uncover the pan and wash down the sides once more. Attach the candy thermometer to the pan, without letting it touch the bottom of the pan, and cook, uncovered (without stirring) until the mixture reaches 305°F. Meanwhile, combine the cream and ground vanilla beans (not the extract) in a small saucepan and heat until tiny bubbles form around the edges of the pan. Turn off the heat and cover the pan to keep the cream hot.
When the sugar mixture reaches 305°F, turn off the heat and stir in the butter chunks. Gradually stir in the hot cream; it will bubble up and steam dramatically, so be careful. Turn the burner back on and adjust it so that the mixture boils energetically but not violently. Stir until any thickened syrup at the bottom of the pan is dissolved and the mixture is smooth. Continue to cook, stirring occasionally, to about 245°F. Then cook, stirring constantly, to 260°F for soft, chewy caramels or 265°F; for firmer chewy caramels.
Remove the pan from the heat and stir in the vanilla extract, if using it. Pour the caramel into the lined pan. Let set for 4 to 5 hours, or overnight until firm.
Lift the pan liner from the pan and invert the sheet of caramel onto a sheet of parchment paper. Peel off the liner. Cut the caramels with an oiled knife.  Wrap each caramel individually in wax paper or cellophane.
Variations
Fleur de Sel Caramels: Extra salt, in the form of fleur de sel or another coarse flaked salt, brings out the flavor of the caramel and offers a little ying to the yang. Add an extra scant 1/4 teaspoon of coarse sea salt to the recipe. Or, to keep the salt crunchy, let the caramel cool and firm. Then sprinkle with two pinches of flaky salt and press it in. Invert, remove the pan liner, sprinkle with more salt. Then cut and wrap the caramels in wax paper or cellophane.
Nutmeg and Vanilla Bean Caramels: Add 1/2 teaspoon freshly grated nutmeg to the cream before you heat it.
Cardamom Caramels: Omit the vanilla. Add 1/2 teaspoon slightly crushed cardamom seeds (from about 15 cardamom pods) to the cream before heating it. Strain the cream when you add it to the caramel; discard the seeds.
Caramel Sauce: Stop cooking any caramel recipe or variation when it reaches 225°F or, for a sauce that thickens like hot fudge over ice cream, 228°F. Pour it into a sauceboat to serve or into a heatproof jar for storage. The sauce can be stored in the refrigerator for ages and reheated gently in the microwave or a saucepan just until hot and flowing before use. You can stir in rum or brandy to taste. If the sauce is too thick or stiff to serve over ice cream, it can always be thinned with a little water or cream. Or, if you like a sauce that thickens more over ice cream, simmer it for a few minutes longer.
(recipe from Alice Medrich’s Pure Dessert)

Next comes the Caramel Cake. I should admit, overconfidence led to a bitter caramel syrup…and I made the cake with it. Again thankfully, the cake tasted great…..no extra sweetness. Just right……but the leftover caramel syrup is not of much use. I had only made half the caramel syrup recipe given here. I took time to like the cake and the frosting. And I believe that I did not do a good job of it. Next time, I have to be more careful.

The Recipe:

EQUIPMENT: For Cake/Icing: Stand mixer with paddle attachment (or use a hand mixer, or mix the old-fashioned way), 9-inch cake pan (or whatever size/shape you choose), cookie sheet or sheet pan, stainless steel saucepan, pastry brush, whisk, sieve.

RECIPE SOURCE
Caramel Cake with Caramelized Butter Frosting courtesy of Shuna Fish Lydon (
http://eggbeater.typepad.com/), as published on Bay Area Bites (http://blogs.kqed.org/bayareabites/).

CARAMEL CAKE WITH CARAMELIZED BUTTER FROSTING
10 Tablespoons unsalted butter at room temperature
1 1/4 Cups granulated sugar
1/2 teaspoon kosher salt
1/3 Cup Caramel Syrup (see recipe below)
2 large eggs, at room temperature
splash vanilla extract
2 Cups all-purpose flour
1/2 teaspoon baking powder
1 cup milk, at room temperature
Notes from Natalie for those of you baking gluten-free:
So the GF changes to the cake would be:
2 cups of gluten free flour blend (w/xanthan gum) or 2 cups of gf flour blend + 1 1/2 tsp xanthan or guar gum
1/2 – 1 tsp baking powder (this would be the recipe amount to the amount it might need to be raised to & I’m going to check)
I’ll let you when I get the cake finished, how it turns out and if the baking powder amount needs to be raised.

Preheat oven to 350F
Butter one tall (2 – 2.5 inch deep) 9-inch cake pan.
In the bowl of a stand mixer fitted with a paddle attachment, cream butter until smooth. Add sugar and salt & cream until light and fluffy.
Slowly pour room temperature caramel syrup into bowl. Scrape down bowl and increase speed. Add eggs/vanilla extract a little at a time, mixing well after each addition. Scrape down bowl again, beat mixture until light and uniform.
Sift flour and baking powder.
Turn mixer to lowest speed, and add one third of the dry ingredients. When incorporated, add half of the milk, a little at a time. Add another third of the dry ingredients, then the other half of the milk and finish with the dry ingredients. {This is called the dry, wet, dry, wet, dry method in cake making. It is often employed when there is a high proportion of liquid in the batter.}
Take off mixer and by hand, use a spatula to do a few last folds, making sure batter is uniform. Turn batter into prepared cake pan.
Place cake pan on cookie sheet or 1/2 sheet pan. Set first timer for 30 minutes, rotate pan and set timer for another 15-20 minutes. Your own oven will set the pace. Bake until sides pull away from the pan and skewer inserted in middle comes out clean. Cool cake completely before icing it.
Cake will keep for three days outside of the refrigerator.

Nov_32
Creaming Butter and sugar

Nov_35

Addition of Caramel Syrup…….I know that’s dark;);)

Nov_37

Ready for the oven

Nov_44

Here’s the cake!

CARAMEL SYRUP
2 cups sugar
1/2 cup water
1 cup water (for “stopping” the caramelization process)
In a small stainless steel saucepan, with tall sides, mix water and sugar until mixture feels like wet sand. Brush down any stray sugar crystals with wet pastry brush. Turn on heat to highest flame. Cook until smoking slightly: dark amber.
When color is achieved, very carefully pour in one cup of water. Caramel will jump and sputter about! It is very dangerous, so have long sleeves on and be prepared to step back.
Whisk over medium heat until it has reduced slightly and feels sticky between two fingers. {Obviously wait for it to cool on a spoon before touching it.}
Note: For safety reasons, have ready a bowl of ice water to plunge your hands into if any caramel should land on your skin.


CARAMELIZED BUTTER FROSTING
12 tablespoons unsalted butter
1 pound confectioner’s sugar, sifted
4-6 tablespoons heavy cream
2 teaspoons vanilla extract
2-4 tablespoons caramel syrup
Kosher or sea salt to taste
Cook butter until brown. Pour through a fine meshed sieve into a heatproof bowl, set aside to cool.
Pour cooled brown butter into mixer bowl.
In a stand mixer fitted with a paddle or whisk attachment, add confectioner’s sugar a little at a time. When mixture looks too chunky to take any more, add a bit of cream and or caramel syrup. Repeat until mixture looks smooth and all confectioner’s sugar has been incorporated. Add salt to taste.
Note: Caramelized butter frosting will keep in fridge for up to a month.
To smooth out from cold, microwave a bit, then mix with paddle attachment until smooth and light
(recipes above courtesy of Shuna Fish Lydon)

The cake was moist with a distinct caramel flavor. I used crushed up vanilla toffee on top.

Nov_50

Have a bite!!

Expenditure:

  • Sugar 5 lb ………………….$ 2.50 from Kroger……lots left
  • Heavy cream 1 Quart………. $ 6.50 from Kroger………..very little left
  • Golden Syrup 12 oz. ………..$4.99 from Cost Plus ……..finished
  • Candy Thermometer…………$ 2.99 from Walmart

Total…………………………………$ 15.98

Posted in -All Purpose flour, -Butter, -Cream, -Golden Syrup, -Vanilla, Herbs, Milk, Sugar | Tagged: , , | 10 Comments »

Daanedaar Besan Ke Laddoo ( Sweet Gram Flour Balls)

Posted by vivnidhi on November 22, 2008

cNov_12

Celebrating with Daanedaar Besan Ke Laddoo

It has been 1 year since I published my first post. Yes, Charche Chauke Ke turned one!! Even though it has been difficult at times to find time to blog, it has been a lot of fun.

Ch Ch Ke………what………is a regular question ?? “Yeah, that’s a blog I write, it is about my discussions of the urban Indian kitchen ” I almost always reply with a cheeky smile. It is about my experiments in the kitchen and some random thoughts. Sneaky tidbits as I watch my kids grow. The smile is cheeky cause I know there are far better cooks and writers than me almost everywhere. But here is my journey as I learn to cook better, healthier and more wholesome everyday.  My attempt here is to chronicle what is important and interesting to me. I write about what I know, have seen my seniors do and learn more as I go about. It is very satisfying to know what you think cause it is a very important part of Charche Chauke Ke.

A big thank you to all who have visited this blog in the year past. Finally the resolution: That I will continue blogging as much as I can into the coming year as well. One step at a time:) . So, please pick a laddoo up virtually and join me in marking the first year of this blog.  Pick that glass of water up and clank it with mine….”Cheers” :))

Besan Ke Laddoo can be made in several ways. Here’s my Nani’s (maternal grandmother’s) recipe, only it is using a little lesser amount of ghee (clarified butter).  I like my laddoos simple, no nuts etc. though they can be added if you desire.

The Recipe: (Approximately  40 small laddoos)

  • Gram flour (Besan) 3 cups
  • Ghee (Clarified butter) 3/4 cup
  • Castor Sugar (Bhoora)  1 cup
  • Milk 1/4 cup (Can be whole milk or even skim milk if you want)
  • Cardamom powder (Elaichi) 2 tsp.

Take besan and ghee in a wok and keep the heat to medium high. Keep stirring till the besan starts to brown a little . Next take a Tbsp. of milk in your palm and sprinkle all over the besan which is frying. Keep stirring till the milk is absorbed well by the gram flour. Repeat till all milk is absorbed by the gram flour. This is an important step. Not only does this make small grain like texture in the gram flour but it also makes the laddoo less dry. Besan Ka Laddoo made in less ghee would otherwise taste quite dry.

100_2558

Gram Flour

100_2561

Gram Flour after addition of milk

100_2559

The ghee separates……indication that the besan has fried enough

Keep stirring till the ghee separates as in the photograph above. Turn the heat off and let the besan cool a little. When the besan mixture is warmer and can be handled by bare hands, add sugar to the mixture. Grainy castor sugar is a good alternative to the traditional boora. ‘Boora’ was prepared by heating sugar with water and drying it completely till the normal white sugar would reconstitute itself into grains. Its quite a tardy process and I am glad I had some store bought boora from India;) to add to the laddoo.

Mix the cardamom powder to the mix. Pick out fistfuls of besan mixture and compress it till it feels like one mass. Then compress it further to make  a perfect round. Lastly a technique is used to get a smooth, shiny round which is quite easy to adopt if seen. Unfortunately I do not have any pictures so I will try my best to explain in words. The fist is opened with the compressed besan in the center of the palm. The hand is then shaken continuously and the besan round is allowed to move in the hand. Slowly, the entire round becomes smooth and shiny. Laddoos are ready!

cNov_12

Please try one!!

Aparna (another Daring Baker…….and Daring Bakers also turned two years old on 19th November!!) of My Diverse Kitchen is also celebrating her first blog anniversary with Sweet Celebrations image . Here Aparna……pick a laddoo up……..to us…………:)) .

These laddoos are also on their way to Joelen of Joelen’s Culinary Adventures who is hosting Devon Ave. Indian-Jewish Adventure this month.

Cheers!!

Posted in -Cardamom, -Ghee, -Gram Flour, Milk, Sugar | Tagged: , , | 13 Comments »