चर्चे चौके के Charche Chauke Ke

Hey! Join in the Kitchen Gossip!!

Archive for the ‘-Strawberry’ Category

Last of the oldies: Daring Bakers June Challenge : Bakewell Tart….er…Pudding

Posted by vivnidhi on August 10, 2009

Perhaps the pictures I took were so bad that I never felt like posting. But, nevertheless, I must say that I made this delicious dessert in the month of June when I was supposed to, I don’t know why I did not post it. It was my first time making frangipane……..”it was lovely indeed” ……….as the English would say 😉

It’s easy and quite delicious. The June Daring Bakers’ challenge was hosted by Jasmine of Confessions of a Cardamom Addict and Annemarie of Ambrosia and Nectar. They chose a Traditional (UK) Bakewell Tart… er… pudding that was inspired by a rich baking history dating back to the 1800’s in England.  You can read all about the bakewell tart on these blogs and it is a very interesting read. I am just on one of my “too tired to write sessions” today.

The Mighty Flame at 180 x 180 (largest)presents:

July1_44

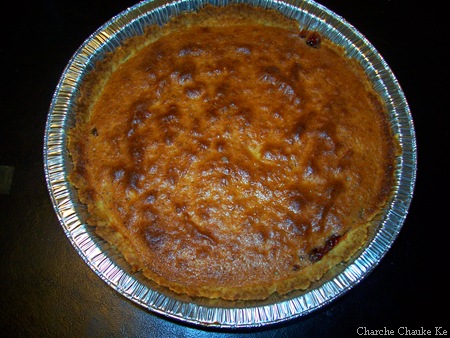
Bakewell Tart ….er pudding

Looks plain but trust me ….tastes delicious

The recipe:

Makes one 23cm (9” tart)
Prep time: less than 10 minutes (plus time for the individual elements)
Resting time: 15 minutes
Baking time: 30 minutes
Equipment needed: 23cm (9”) tart pan or pie tin (preferably with ridged edges), rolling pin

One quantity sweet shortcrust pastry (recipe follows)
Bench flour
250ml (1cup (8 US fl. oz)) jam or curd, warmed for spreadability
One quantity frangipane (recipe follows)
One handful blanched, flaked almonds

Assembling the tart
Place the chilled dough disc on a lightly floured surface. If it’s overly cold, you will need to let it become acclimatised for about 15 minutes before you roll it out. Flour the rolling pin and roll the pastry to 5mm (1/4”) thickness, by rolling in one direction only (start from the centre and roll away from you), and turning the disc a quarter turn after each roll. When the pastry is to the desired size and thickness, transfer it to the tart pan, press in and trim the excess dough. Patch any holes, fissures or tears with trimmed bits. Chill in the freezer for 15 minutes.

Preheat oven to 200C/400F.

Remove shell from freezer, spread as even a layer as you can of jam onto the pastry base. Top with frangipane, spreading to cover the entire surface of the tart. Smooth the top and pop into the oven for 30 minutes. Five minutes before the tart is done, the top will be poofy and brownish. Remove from oven and strew flaked almonds on top and return to the heat for the last five minutes of baking.

The finished tart will have a golden crust and the frangipane will be tanned, poofy and a bit spongy-looking. Remove from the oven and cool on the counter. Serve warm, with crème fraîche, whipped cream or custard sauce if you wish.

When you slice into the tart, the almond paste will be firm, but slightly squidgy and the crust should be crisp but not tough.

Jasmine’s notes:
• If you cannot have nuts, you can try substituting Victoria sponge for the frangipane. It’s a pretty popular popular cake, so you shouldn’t have any troubles finding one in one of your cookbooks or through a Google search.
• You can use whichever jam you wish, but if you choose something with a lot of seeds, such as raspberry or blackberry, you should sieve them out.
• The jam quantity can be anywhere from 60ml (1/4 cup) to 250ml (1cup), depending upon how “damp” and strongly flavored your preserves are. I made it with the lesser quantity of home made strawberry jam, while Annemarie made it with the greater quantity of cherry jam; we both had fabulous results. If in doubt, just split the difference and spread 150ml (2/3cup) on the crust.
Annemarie’s notes:
• The excess shortcrust can be rolled out and cut into cookie-shapes (heck, it’s pretty darned close to a shortbread dough).

Sweet shortcrust pastry

Prep time: 15-20 minutes
Resting time: 30 minutes (minimum)
Equipment needed: bowls, box grater, cling film

  • 225g (8oz) all purpose flour
    30g (1oz) sugar
    2.5ml (½ tsp) salt
    110g (4oz) unsalted butter, cold (frozen is better)
    2 (2) egg yolks
    2.5ml (½ tsp) almond extract (optional)
    15-30ml (1-2 Tbsp) cold water

Sift together flour, sugar and salt. Grate butter into the flour mixture, using the large hole-side of a box grater. Using your finger tips only, and working very quickly, rub the fat into the flour until the mixture resembles bread crumbs. Set aside.

Lightly beat the egg yolks with the almond extract (if using) and quickly mix into the flour mixture. Keep mixing while dribbling in the water, only adding enough to form a cohesive and slightly sticky dough.

Form the dough into a disc, wrap in cling and refrigerate for at least 30 minutes

Jasmine’s notes:
• I make this using vanilla salt and vanilla sugar.
• If you wish, you can substitute the seeds of one vanilla bean, one teaspoon of vanilla paste or one teaspoon of vanilla extract for the almond extract

Frangipane

Prep time: 10-15 minutes
Equipment needed: bowls, hand mixer, rubber spatula

  • 125g (4.5oz) unsalted butter, softened
    125g (4.5oz) icing sugar
    3 (3) eggs
    2.5ml (½ tsp) almond extract
    125g (4.5oz) ground almonds
    30g (1oz) all purpose flour

Cream butter and sugar together for about a minute or until the mixture is primrose in colour and very fluffy. Scrape down the side of the bowl and add the eggs, one at a time, beating well after each addition. The batter may appear to curdle. In the words of Douglas Adams: Don’t panic. Really. It’ll be fine. After all three are in, pour in the almond extract and mix for about another 30 seconds and scrape down the sides again. With the beaters on, spoon in the ground nuts and the flour. Mix well. The mixture will be soft, keep its slightly curdled look (mostly from the almonds) and retain its pallid yellow colour.

We had gone strawberry picking that weekend and so of course I prepared some quick strawberry jam. No pectin, nothing but strawberries, sugar and lemon juice….that’s it and folks at home could not have enough of it…..actually there wasn’t t enough of it as I used it up in the tart 🙂 .

Optional element: Home made jam or curd
We know several amongst us are rather jammy with making their own jams and preserves. Go ahead get wild and creative or simply showcase whatever’s local and in season. If you haven’t jammed before and want some hints or recipes, take a look at Bernardin’s homecanning.ca. If you want to just make some jam for this challenge and not go through sterilizing jars and snap lids, you can try a pan jam, similar to Jasmine’s Blackberry Pan Jam. If you do use homemade jam, please include your recipe or the link to the one you used in your post.

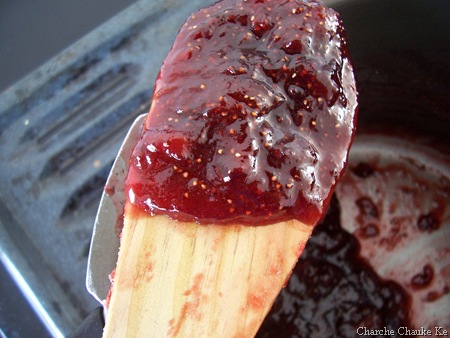
Quick Strawberry Pan Jam (similar to Jasmine‘s pan jam)

  • Strawberries 2 cups cleaned and quartered (measured after cutting)
  • sugar 1 1/2 cups
  • Lemon Juice 1 Tbsp.

On a heavy bottomed pan, heat the strawberries till they boil and add the sugar and lemon juice. Let this cook on medium heat till a  successful plate test can be done. For the plate test, place a plate in the freezer or chill it well. Pour a big drop of jam on this cold plate and give it 30 seconds. If the jam has reached the right consistency, it will very slowly spread a little. More about jam making here.

July1_39

Strawberry Pan Jam

I also made some strawberry leather ( I mentioned we went strawberry picking, so, yeah I had a bounty)  for “decoration” which looked good but bad pictures…. Anyway, the boy is nuts about this fruit leather and I prefer making it at home to avoid preservatives and less sugar compared to store bought. Very simple to make, patience is the only virtue required in making fruit leather. Most types of fruits can be used to prepare fruit leather. Please leave melons :-)). I have made fruit leather out of strawberries and kiwi fruit so far. It’s basically like aam papad that we would eat just with other fruits….kids love it. Unfortunately, I have no pictures…next time.

Strawberry Leather:

The Recipe:

  • Strawberries 2 cups cleaned, hulled and pureed
  • sugar  1/4 cup
  • Lemon juice 1 tsp.

1. The same ingredients as jam but tastes quite different. Lemon juice is required both here and in jam to reduce crystallization of sugar. I remember jam bottles which would have rims covered in sugar. Anyway, so far I have only made in small quantities which lasts me about 3-4 weeks in the refrigerator and no sugar crystallization so far. Anyway, puree the strawberries and strain them. I just add the strawberry seeds to the jam….I like the crunch in it .

July1_31 July1_32

Strawberries for strawberry leather

2. In a heavy bottomed pan, add sugar, strained puree and lemon juice and heat on medium heat. Stop after about 20 minutes or until the mixture has thickened considerably yet should be of pouring and spreading consistency. Try your hand at it……..the result will be delicious anyway 🙂 .

3. Cover a baking sheet with parchment paper. Parchment paper is a necessity for making fruit leather. Spread the mix as thinly and uniformly as possible. We don’t want to spread very thin as it will get crisp or worse burn but too thick will take an eternity. About 1/4 inch is good enough.

4. Preheat the oven to 200 F. Keep the baking sheet in the oven and forget for at least an hour. After the first hour (for a small batch) I like to check every half hour. The mixture keeps drying and when it’s ready, there won’t be any soft portion left & will also not be very sticky.

5. Let it cool completely and store wrapped in parchment. Can be cut as desired. The result is worth the effort.

July2_07

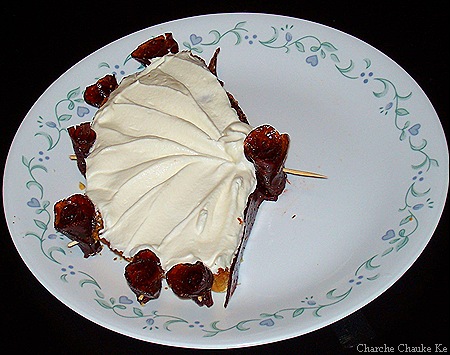
Bad attempt really……bakewell tart was delicious with some whipped topping

The red stuff is strawberry leather roses…..bet it didn’t look as bad as here 🙂

We all thoroughly enjoyed this bakewell tart…..er..pudding. It’s a great & easy make ahead dessert. We liked it better the next day. 

Did not cost me anything as I made half the quantity and had everything at home.

Posted in - Confectioner's Sugar, -All Purpose flour, -Almond extract, -Almonds, -Butter, -lemon, -Strawberry, Eggs, Sugar | Tagged: , , | 3 Comments »

Sailing the Pink Seas

Posted by vivnidhi on January 29, 2009

j_97

Tuile Boats with whipped cream and strawberry cream

This month’s Daring Bakers challenge was French Tuiles. Light and fragile as can be. I can definitely not call this month a success cause we were a part of several mishaps as we waded our way in making these fragile bits. First my one year old chanced upon the chocolate sauce bottle as I was playing with refrigerating tuile dough and baking tray. Next thing we had a delicious choco-baby and chocolate floor (right when I was using the tuile stencils). Thank God for my 3 year old(who loves to keep an eye on such situations and raises the alarm only when the deed is done;-) )………otherwise I would not even have noticed and continued my play. Next, when I thought I had learnt how to roll these exactly as I wanted to……….kept the last batch in the oven ………………………………….and ………….forgot to take it out ………until it turned into crisp , dark brown ………..yes, burnt.

Anyway, in spite of all this , as usual with daring bakers, the tuiles were delicious and very fragile. They paired beautifully with the strawberry cream I made. I learnt a fabulous way to garnish in future. I will certainly use these in my desserts.

I paired these with Light and easy strawberry Cream. The strawberries were courtesy of Locavorious. I must say that they were better than store bought frozen ones and my son just loves to snack on them plain. A very big thank you to Rena Basch who gave these to us free of cost. I joined a fabulous group of Michigan Lady Food Bloggers and through them I came to know of locavores. I will try and join them next season.

j_81

Local Strawberries

Light & Easy Strawberry Cream

The Recipe:

  • Strawberries 1 cup (fresh /frozen)
  • Sugar 1 tsp.
  • Sugar Free Strawberry gelatin 6 oz (1 pack)
  • Water 1/2 cup
  • Fat free Whipped Topping 2 cups thawed

This is an extremely simple recipe. Dissolve the gelatin in 1/2 cup hot water. Puree the strawberries in the blender with 1 tsp. sugar. No need to thaw the strawberries. Add the strawberry puree to the gelatin and mix well. Put  this in the refrigerator for half an hour. When it has started to set a little, add the whipped topping and fold it in the gelatin mixture carefully. Back it goes in the refrigerator for at least 4-6 hours. Ready!! Pair it with tuiles and a sprinkle of best aged balsamic vinegar and we have a classic dessert ready.

j_91

Light & Easy Strawberry Cream

For a little shaping up after the holidays, we’re adapting an air of lightness, adding a touch of crisp and maybe even go nuts. A challenge that’s more about technique than about baking a recipe. With the choices given, we think you’ve got plenty of options to chose something that’s individually challenging. You are allowed every flavor in the universe, you may go round or square, roll or fold but you need to shape up!
So here we go; January – something light… Tuiles – what could be lighter?? big_smile
Traditionally, tuiles are thin, crisp almond cookies that are gently molded over a rolling pin or arched form while they are still warm. Once set, their shape resembles the curved French roofing tiles for which they’re named. The Dutch angle: traditionally this batter was used to bake flat round cookies on 31st December, representing the year unfold. On New Years day however, the same batter was used but this day they were presented to well-wishers shaped as cigars and filled with whipped cream, symbolizing the New Year that’s about to roll on. And of course the batter is sometimes called tulip-paste….

This month’s challenge is brought to us by Karen of Bake My Day and Zorra of 1x umruehren bitte aka Kochtopf. They have chosen Tuiles from The Chocolate Book by Angélique Schmeink and Nougatine and Chocolate Tuiles from Michel Roux.

About the shaping: you don’t need to buy anything especially for this challenge, I made the stencils I used for the butterflies myself out of thick plastic sheet and cut out the desired shape. You can use anything you have handy in your kitchen/house like broomsticks, knitting needles, cups, cones.. use your imagination.

Following is a recipe taken from a book called “The Chocolate Book”, written by female Dutch Master chef Angélique Schmeinck.
Recipe:

Yields: 20 small butterflies/6 large (butterflies are just an example)

Preparation time batter 10 minutes, waiting time 30 minutes, baking time: 5-10 minutes per batch

65 grams / ¼ cup / 2.3 ounces softened butter (not melted but soft)
60 grams / ½ cup / 2.1 ounces sifted confectioner’s sugar
1 sachet vanilla sugar (7 grams or substitute with a dash of vanilla extract)
2 large egg whites (slightly whisked with a fork)
65 grams / 1/2 cup / 2.3 ounces sifted all purpose flour
1 table spoon cocoa powder/or food coloring of choice
Butter/spray to grease baking sheet

Oven: 180 C / 350F
Using a hand whisk or a stand mixer fitted with the paddle (low speed) and cream butter, sugar and vanilla to a paste. Keep stirring while you gradually add the egg whites. Continue to add the flour in small batches and stir to achieve a homogeneous and smooth batter/paste. Be careful to not overmix.
Cover the bowl with plastic wrap and chill in the fridge for at least 30 minutes to firm up. (This batter will keep in the fridge for up to a week, take it out 30 minutes before you plan to use it).
Line a baking sheet with parchment paper or grease with either butter/spray and chill in the fridge for at least 15 minutes. This will help spread the batter more easily if using a stencil/cardboard template such as the butterfly. Press the stencil on the bakingsheet and use an off sided spatula to spread batter. Leave some room in between your shapes. Mix a small part of the batter with the cocoa and a few drops of warm water until evenly colored. Use this colored batter in a paper piping bag and proceed to pipe decorations on the wings and body of the butterfly.
Bake butterflies in a preheated oven (180 C/350F) for about 5-10 minutes or until the edges turn golden brown. Immediately release from bakingsheet and proceed to shape/bend the cookies in the desired shape. These cookies have to be shaped when still warm, you might want to bake a small amount at a time or maybe put them in the oven to warm them up again. (Haven’t tried that). Or: place a bakingsheet toward the front of the warm oven, leaving the door half open. The warmth will keep the cookies malleable.
If you don’t want to do stencil shapes, you might want to transfer the batter into a piping bag fitted with a small plain tip. Pipe the desired shapes and bake. Shape immediately after baking using for instance a rolling pin, a broom handle, cups, cones….

Anything you’d like to know and more: http://www.pastrysampler.com/Questions_ … /tuile.htm

There are more alternative recipes too  Nougatine, Chocolate Tuiles, Savory tuile/cornet recipe. These recipes can be found at host’s blogs here. To check out who has made what , check out the Daring Bakers’ blogroll.

Wish I had done the savory…..the husband wanted me to but I couldn’t some other time:-) Not a great start to 2009 but then there’s hope………I see it just behind the snow 🙂

Expenditure:

Parchment paper : $ 2.84 from Walmart lots left

And a huge big thank you to Rena for the strawberries!

Posted in - Bread Flour, - Confectioner's Sugar, -Balsamic Vinegar, -Butter, -Cocoa Powder, -Cream, -Strawberry, Eggs, Gelatin, Sugar | Tagged: , , | 14 Comments »

I am a Daring Baker too!

Posted by vivnidhi on July 30, 2008

This post is long.

c100_2114

Filbert Gateau with Praline Buttercream

You bet, I am a Daring Baker too! Otherwise why would anybody with such limited skills and equipment attempt this…………:). I am so glad I am a part of Daring Bakers now……..because I learnt a lot from one challenge itself and learning  is a lot of fun. So, this month’s challenge was hosted by  Chris of Melle Cotte and the challenge was : Filbert Gateau with Praline Buttercream. I was really glad that my first challenge turned out to be a cake. I love cakes, so I was really excited about making it.

Even though a little expensive, I wanted to try the recipe as is with hazelnuts. The husband remarked ” Didn’t we stop buying mixed nuts cause they have hazelnuts in them” Yeah! but nutella has plenty of hazelnuts. I had made my mind so we bought a pound:). Thankfully, the husband had dark rum and orange Curacao in his bar otherwise that would have added to my expenditure too……

Filbert Gateau with Praline Buttercream
From Great Cakes by Carol Walter

  1. 1 Hazelnut Filbert Genoise
  2. 1 recipe sugar syrup, flavored with dark rum
  3. 1 recipe Praline Buttercream, flavored with dark rum and Orange Curacao
  4. ½ cup heavy cream, whipped to soft peaks
  5. 1 recipe Strawberry Glaze
  6. 1 recipe Ganache Glaze, prepared just before using, flavored with Orange Curacao
  7. 3 tablespoons filberts (hazelnuts), toasted and coarsely chopped

The 1st day I prepared the sugar syrup, toasted and tried to skin the hazelnuts as much as I could and coarsely chopped the few I could. So item no. 2 & 7 were done. I toasted the hazelnuts in a preheated oven at 350 degrees F for 15 minutes. Removed and immediately put them in a wet towel and rubbed to remove as much as I could. Not a lot of success there. Earned a blister too trying to take the hazelnuts skins off. What is with cakes and my blisters?

Day 2  Tried to skin more hazelnuts and I succeeded!! Thanks to a fellow Daring Baker who wrote about boiling them with Baking soda, skinning and toasting again. That worked, Phew!! So prepared the praline. Mine got darker than it should but it was so…….. good with the buttercream. Guess the praline flavor came out well because of the darkness.  Prepared the strawberry glaze.

Day 3 : The genoise day. Everything was fine until I dropped the butter I was trying to clarify. Not a lot fell but some did. So 2 Tbsp was the clarified butter and 2 Tbsp. was ghee I had at home. The cake took longer to come off the pan but thankfully it did, without breaking. Made the buttercream. Chilled the bowl in which I made the Swiss buttercream. This is the star!! The best buttercream I have ever made. Mixed with praline, its heavenly.

Day 4 : Finally, assembled the cake. Could not slice the layers uniformly. Used floss to cut the cake.  Whipped heavy cream, prepared the ganache. And yes, I got to pipe anything seriously for the first time. Not impressive but good for me:) . All is fun, that is fun when done, right ??

Here goes the detailed recipe with my comments in black:

Filbert Genoise
Because of the amount of nuts in the recipe, this preparation is different from a classic genoise.
1 ½ cups hazelnuts, toasted/skinned
2/3 cup cake flour, unsifted
2 Tbsp. cornstarch
7 large egg yolks
1 cup sugar, divided ¼ & ¾ cups
1 tsp. vanilla extract
½ tsp. grated lemon rind
5 large egg whites
¼ cup warm, clarified butter (100 – 110 degrees)

Position rack in the lower 3rd of the oven and preheat to 350 degrees.  Grease and flour a 10” X 2” inch round cake pan.
Using a food processor, process nuts, cake flour, and cornstarch for about 30 seconds.  Then, pulse the mixture about 10 times to get a fine, powdery mixture.  You’ll know the nuts are ready when they begin to gather together around the sides of the bowl. While you want to make sure there aren’t any large pieces, don’t over-process.  Set aside.
Put the yolks in the bowl of an electric mixer, with the whisk attachment, and beat until thick and light in color, about 3-4 minutes on med-high speed. Slowly, add ¾ cup of sugar.  It is best to do so by adding a tablespoon at a time, taking about 3 minutes for this step.  When finished, the mixture should be ribbony.  Blend in the vanilla and grated lemon rind.  Remove and set aside.
Place egg whites in a large, clean bowl of the electric mixer with the whisk attachment and beat on medium speed, until soft peaks. Increase to med-high speed and slowly add the remaining ¼ cup of sugar, over 15-20 seconds or so.  Continue to beat for another ½ minute.
Add the yolk mixture to the whites and whisk for 1 minute.
Pour the warm butter in a liquid measure cup (or a spouted container). * It must be a deep bottom bowl and work must be fast.*  Put the nut meal in a mesh strainer (or use your hand – working quickly) and sprinkle it in about 2 tablespoons at a time – folding it carefully for about 40 folds.   Be sure to exclude any large chunks/pieces of nuts. Again, work quickly and carefully as to not deflate the mixture. When all but about 2 Tbsp. of nut meal remain, quickly and steadily pour the warm butter over the batter.  Then, with the remaining nut meal, fold the batter to incorporate, about 13 or so folds.
With a rubber spatula, transfer the batter into the prepared pan, smoothing the surface with the spatula or back of a spoon.  **If collected butter remains at the bottom of the bowl, do not add it to the batter!  It will impede the cake rising while baking.
Tap the pan on the counter to remove air bubbles and bake in the preheated oven for 30-35 minutes. You’ll know the cake is done when it is springy to the touch and it separates itself from the side of the pan.  Remove from oven and allow to stand for 5 minutes.  Invert onto a cake rack sprayed with nonstick coating, removing the pan.  Cool the cake completely.
*If not using the cake right away, wrap thoroughly in plastic wrap, then in a plastic bag, then in the refrigerator for up to 3 days. If freezing, wrap in foil, then the bag and use within 2-3 months.

100_2112

Genoise:Straight out of the oven: surface becomes uniform as it cools

This Recipetips link is a very good help in understanding how eggs should be beaten for the cake. It would be a good idea to use parchment paper under the cake as it was difficult to take it out. I used a 9″ pan to bake the genoise.

Sugar Syrup
Makes 1 cup, good for one 10-inch cake – split into 3 layers
1 cup water
¼ cup sugar
2 Tbsp. dark rum or orange flavored liqueur

In a small, yet heavy saucepan, bring the water and sugar to a boil and simmer for 5 minutes. Remove from heat, add the liqueur. Cool slightly before using on the cake.  *Can be made in advance.

Praline Buttercream
1 recipe Swiss Buttercream
1/3 cup praline paste
1 ½ – 2 Tbsp. Jamaican rum (optional)

Blend ½ cup buttercream into the paste, then add to the remaining buttercream.  Whip briefly on med-low speed to combine.  Blend in rum.

Swiss Buttercream
4 large. egg whites
¾ cup sugar
1 ½ cups (3 sticks) unsalted butter, slightly firm
1 ½ -2 Tbsp. Grand Marnier or liqueur of your choice
1 tsp. vanilla

Place the egg whites in a large/ bowl of a electric mixer and beat with the whisk attachment until the whites are foamy and they begin to thicken (just before the soft peak stage). Set the bowl over a saucepan filled with about 2 inches of simmering water, making sure the bowl is not touching the water. Then, whisk in the sugar by adding 1-2 tablespoon of sugar at a time over a minutes time. Continue beating 2-3 minutes or until the whites are warm (about 120 degrees) and the sugar is dissolved.  The mixture should look thick and like whipped marshmallows.
Remove from pan and with either the paddle or whisk attachment, beat the egg whites and sugar on med-high until its a thick, cool meringue – about 5-7 minutes. *Do not overbeat*. Set aside.
Place the butter in a separate clean mixing bowl and, using the paddle attachment, cream the butter at medium speed for 40-60 seconds, or until smooth and creamy. *Do not overbeat or the butter will become toooooo soft.*
On med-low speed, blend the meringue into the butter, about 1-2 Tbsp. at a time, over 1 minute.  Add the liqueur and vanilla and mix for 30-45 seconds longer, until thick and creamy.
Refrigerate 10-15 minutes before using.
Wait! My  buttercream won’t come together! Reheat the buttercream briefly over simmering water for about 5 seconds, stirring with a wooden spoon. Be careful and do not overbeat. The mixture will look broken with some liquid at the bottom of the bowl. Return the bowl to the mixer and whip on medium speed just until the cream comes back together.
Wait! My buttercream is too soft! Chill the buttercream in the refrigerator for about 10 minutes and rewhip. If that doesn’t work, cream an additional 2-4 Tbsp. of butter in a small bowl– making sure the butter is not as soft as the original amount, so make sure is cool and smooth. On low speed, quickly add the creamed  butter to the buttercream, 1 Tbsp. at a time.
Refrigerate in an airtight container for up to 5 days, or can be frozen for up to 6 months. If freezing, store in 2 16-oz. plastic containers and thaw in the refrigerator overnight or at room temperature for several hours.

It helps to have the bowl chilled in which you make the buttercream.
Praline Paste
1 cup (4 ½ oz.) Hazelnuts, toasted/skinless
2/3 cup Sugar

Line a jelly roll pan with parchment and lightly butter.
Put the sugar in a heavy 10-inch skillet.  Heat on low flame for about 10-20 min until the sugar melts around the edges. Do not stir the sugar. Swirl the pan if necessary to prevent the melted sugar from burning. Brush the sides of the pan with water to remove sugar crystals.  If the sugar in the center does not melt, stir briefly. When the sugar is completely melted and caramel in color, remove from heat. Stir in the nuts with a wooden spoon and separate the clusters. Return to low heat and stir to coat the nuts on all sides.  Cook until the mixture starts to bubble.  **Remember – extremely hot mixture.** Then onto the parchment lined sheet and spread as evenly as possible. As it cools, it will harden into brittle. Break the candied nuts into pieces and place them in the food processor.  Pulse into a medium-fine crunch or process until the brittle turns into a powder. To make paste, process for several minutes. Store in an airtight container and store in a cook dry place.  Do not refrigerate.

Praline is easy to make, as long as you are patient. It gets burnt easily, thankfully mine didn’t even though it got darker than it should. The consistency of the praline paste becomes like peanut butter when processed. This is necessary so that there are no pieces in the buttercream and it is smooth enough to pipe with.

Strawberry Glaze
Good for one 10-inch cake
2/3 cup thick strawberry preserves
1 Tbsp. water

In a small, yet heavy saucepan, bring the water and preserves to a slow boil and simmer for 2-3 minutes. If the mixture begins to stick to the bottom of the saucepan, add water as needed.
Remove from heat and, using a strainer, press the mixture through the mesh and discard any remnants. With a pastry brush, apply the glaze onto the cake while the cake is still warm.  If the glaze is too thick, thin to a preferred consistency with drops of water.

Ganache Glaze
Makes about 1 cup, enough to cover the top and sides of a 9 or 10 inch layer or tube cake
**Ganache can take on many forms.  While warm – great fudge sauce.  While cool or lukewarm – semisweet glaze. Slightly chilled – can be whipped into a filling/frosting. Cold & solid – the base of candied chocolate truffles.
6 oz. (good) semisweet or bittersweet chocolate, like Lindt
6 oz. (¾ cup heavy cream
1 Tbsp. light corn syrup
1 Tbsp. Grand Marnier, Cointreay, or dark Jamaican rum (optional)
¾ tsp. vanilla
½ – 1 tsp. hot water, if needed

Blend vanilla and liqueur/rum together and set aside.
Break the chocolate into 1-inch pieces and place in the basket of a food processor and pulse until finely chopped.  Transfer into a medium sized bowl and set aside.
Heat the cream and corn syrup in a saucepan, on low, until it reached a gentle boil.  Once to the gently boil, immediately and carefully pour over the chocolate.  Leave it alone for one minute, then slowly stir and mix the chocolate and cream together until the chocolate is melted and incorporated into the cream. Carefully blend in vanilla mixture. If the surface seems oily, add ½ – 1 tsp hot water. The glaze will thicken, but should still be pourable. If it doesn’t thicken, refrigerate for about 5 minutes, but make sure it doesn’t get too cold!

Assembling Cake

Cut a cardboard disk slightly smaller than the cake.  Divide the cake into 3 layers and place the first layer top-side down on the disk. Using a pastry brush, moisten the layer with 3-4 Tbsp. of warm sugar syrup. Measure out 1 cup of praline buttercream and set aside.
Spread the bottom layer with a ¼-inch thickness of the remaining buttercream.  Cover with ½ of the whipped cream, leaving ¼-inch border around the edge of the cake.  Place the middle layer over the first, brush with sugar syrup, spreading with buttercream. Cover with the remaining whipped cream.
Moisten the cut side of the third layer with additional sugar syrup and place cut side down on the cake.  Gently, press the sides of the cake to align the layers. Refrigerate to chill for at least 30 minutes.
Lift the cake by sliding your palm under the cardboard. Holding a serrated or very sharp night with an 8-inch blade held parallel to the sides of the cake, trim the sides so that they are perfectly straight. Cut a slight bevel at the top to help the glaze drip over the edge. Brush the top and sides of the cake with warm apricot glaze, sealing the cut areas completely.  Chill while you prepare the ganache.
Place a rack over a large shallow pan to catch the ganache drippings.  Remove the gateau from the refrigerator and put it the rack. With a metal spatula in hand, and holding the saucepan about 10 inches above the cake, pour the ganache onto the cake’s center.  Move the spatula over the top of the ganache about 4 times to get a smooth and mirror-like appearance.  The ganache should cover the top and run down the sides of the cake. When the ganache has been poured and is coating the cake, lift one side of the rack and bang it once on the counter to help spread the ganache evenly and break any air bubbles. (Work fast before setting starts.) Patch any bare spots on the sides with a smaller spatula, but do not touch the top after the “bang”.  Let the cake stand at least 15 minutes to set after glazing.
To garnish the cake, fit a 12 – 14-inch pastry bag with a #114 large leaf tip. Fill the bag with the reserved praline cream.  Stating ½ inch from the outer edge of the cake, position the pastry tube at a 90 degree angle with the top almost touching the top of the cake. Apply pressure to the pastry bag, moving it slightly toward the center of the cake.  As the buttercream flows on the cake, reverse the movement backward toward the edge of the cake and finish by pulling the bag again to the center. Stop applying pressure and press the bag downward, then quickly pull the tip up to break the flow of frosting.  Repeat, making 12 leaves evenly spaced around the surface of the cake.
Make a second row of leaves on the top of the first row, moving the pastry bag about ¾ inch closer to the center.  The leaves should overlap.  Make a 3rd row, moving closer and closer to the center. Add a 4th row if you have the room. But, leave a 2-inch space in the center for a chopped filbert garnish. Refrigerate uncovered for 3-4 hours to allow the cake to set. Remove the cake from the refrigerator at least 3 hours before serving.
Leftover cake can be covered with foil and kept in the refrigerator for up to 5 days.

100_2118 100_2117

The last layer : Thinning out in the middle:)

100_2115

One last look, not too bad, eh!

Expenditure:

  • Hazelnuts- 1 lb $6.69 from Trader Joe’s (about 1/2 a cup left)
  • Cake Flour – $3.19 from Kroger Lots left
  • Unsalted Butter-$3.09 from Kroger half a stick left
  • Semisweet Chocolate 8 oz  $3.30 from Kroger 2 oz. left
  • Heavy Cream-$1.50 from Kroger
  • Lite Corn Syrup-$1.99 from Kroger lots left

Total: 19.76……not too bad.

Before I forget , this cake is dedicated to my mother whose birthday was on  the 18th and who loves cakes flavored with Rum. It just incidentally so happened that this cake had rum in it.

Even though I didn’t like the nutty texture of the cake initially, it matured on us and we liked it more after a day. It took us 11 days to finish the cake between the 3 of us and it was great till the last day. I know, sounds weird but it took us that long to eat it. I am glad I tried it.

Check out Daring Bakers’ blogroll for much more beautiful pictures and cakes.

Posted in -Butter, -Cake Flour, -Cream, -Hazelnuts, -Strawberry, Alcohol, Chocolate, Daring Bakers, Eggs | Tagged: , , , | 27 Comments »